As you know, a screed is never completely level. No matter how you fill it, small irregularities will still remain. Therefore, for floor coverings that require a perfectly flat base, self-leveling mixtures (“self-leveling mixtures”) are poured
. This is essential for vinyl plank, laminate, and hardwood flooring. Under tiles is not necessary - minor differences in height can be adjusted with glue. But this is provided that the screed itself is generally filled evenly.
The main problems that arise when using self-leveling are bloating and delamination. The works themselves seem to be nothing complicated. But the situation where today you poured a perfectly flat floor, and tomorrow the self-leveling floor cracked and bounced, alas, is not uncommon. We understand the reasons and ways to eliminate them.
The screed must be strong and thoroughly dry. When pouring self-leveling over a loose screed, the following happens. The self-leveling floor gains strength and, as it hardens, simply tears off the top layer of the base. As a result, he bounces off and lives his own life.
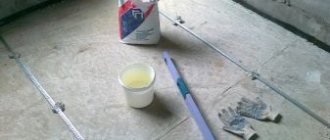
The second problem is dust removal. The screed must be thoroughly vacuumed. Just vacuum, not sweep. And then prime it. If dust remains on the floor, the primer will mix with it into a total mass and create a thin film on the surface. As a result, the self-leveling agent will adhere to this film, and not to the screed. And it will bounce back tomorrow.
The screed is primed to protect the self-leveling floor from excessive moisture loss. An overdried mixture (moisture will go into the base) will certainly crack and bounce off.
It is better to prime in two passes. And before directly applying the self-leveling compound, allow the primer to dry for two to three hours. And even better - within 24 hours.
The self-leveling compound is poured before the actual installation of the floor covering. That is, after the plasterboard partitions are installed, the walls are plastered and puttied, and no large-scale repair work is expected. Such mixtures dry quickly - 1 cm per day. But the probability of damaging it during finishing work is quite high.
The main reason for the mixture to separate is that more water was poured during mixing than required according to the instructions. If self-leveling is too liquid, shrinkage increases and the polymers included in the composition float to the surface. If this happens, all defective areas must be cleaned with a spatula and a wire brush or sandpaper. Then vacuum, prime and refill.
And the last point: self-leveling floors dry, like wallpaper, without drafts.
Anyone who has ever started a renovation knows the role that smooth floors play, and they also know what it means to fill a good screed and repair loose screeds. After all, it doesn’t matter what type of flooring you choose: laminate, parquet, linoleum; during installation, all irregularities will be clearly visible. Moreover, they will spoil the positive impression of the repair or even prevent normal installation of the coating. So, after laying on an uneven surface, the laminate begins to creak and sag, which leads to rapid wear and tear. That’s why high-quality screed filling and repair of loose screeds are so important. Thus, thanks to technological progress, floor screed has ceased to be something unnecessarily complex and labor-intensive. After all, if previously you had to manually pull out and level the floor, which was quite a long and labor-intensive task, today you can use a self-leveling screed. Thus, a screed is a special construction mixture designed to quickly level the floor under laminate or parquet; it is poured in a thin layer onto a ready-made concrete base. This type of screeding is very quick and gives a highly even floor.
Standards for self-leveling screeds
When ordering floor screeds, remember that there are certain standards for self-leveling screeds, depending on what kind of floor covering will be laid. Therefore, when ordering a screed, immediately indicate which floor covering it is intended for. In particular, there are the following standards: • DBN V.2.6-22-2001; • SNiP 3.04.01-87; • SNiP 2.03.13-88; • DIN 18365. Each of these standards is intended for a specific type of finishing floor (parquet, laminate, tile), respectively, and their characteristics are different. A screed for tiles is completely unsuitable for parquet flooring, and a screed for parquet will be more expensive than for tiles.
Overview of solvents for concrete
There is a fairly large assortment of the product in question on the market, but there are several brands of solvents that are most popular among consumers.
Himfrez
This solvent does not contain acetic, otophosphoric or hydrochloric acid - this characteristic allows Himfrez to be used for cleaning decorative coatings, since neither the design nor the color itself will be damaged.
If you use a solvent to get rid of dried cement mortar on brickwork, you should consider:
- Himfrez opens microcracks in bricks, which has a beneficial effect on the result of subsequent waterproofing work;
- This type of product eliminates efflorescence - a white coating that appears on brickwork.
The advantage of this particular solvent is that Himfrez can be used simultaneously with manual/mechanical cleaning and sandblasting. Work to remove hardened cement mortar using Himfrez can be carried out at temperatures of +5 and above.
Barracuda
This brand of solvent also has its own distinctive features:
the composition does not contain acid and therefore can be used for work on any surface;- absolutely safe for humans - Barracuda does not have a negative effect on the mucous membranes and skin of humans;
- can remove dried tile adhesive, efflorescence on brickwork, lime deposits;
- does not spoil varnish and decorative paint coatings;
- can remain on the surface for a long time after application - nothing will happen to the base material;
- if metal objects/structures are processed, then you don’t have to worry about the appearance of corrosion;
- environmentally friendly solvent - completely dissolves without harming the organic layer of the soil.
Lugato
This concrete solvent contains acid, so it should be used with extreme caution and not on all surfaces.
It is strictly forbidden to treat marble and terrazzo surfaces with it, but Lugato will effectively and quickly remove even long-dried cement mortar from the surface of plumbing fixtures and unglazed ceramics. Please note : this solvent can be used to treat chrome-plated products - the coating will remain intact.
BIO DECAP'BETON GUARD
Can be used on glass, plastic and metal surfaces.
BIO DECAP'BETON GUARD acts as a surface cleaner, but can be used to remove fresh dirt and old stains from cement mortar. The solvent in question for cement mortar is absolutely safe for the environment - it dissolves almost completely.
Visual inspection of screeds before laying coatings and repair of screeds
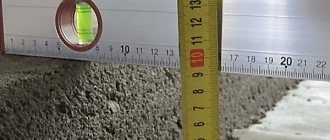
When accepting finished work, many clients are interested in how to check whether the screed meets the standards. If you do not have any special tools at your disposal, you can conduct a visual inspection of the poured surface before laying the finished floor. So, the surface should not have cracks or other visible defects. It should be dry and should not crumble; if the screed crumbles, it means it is loose and poorly made. The screed can be checked for looseness in a primitive way - by scratching it with a door key or another sharp metal object. It must be taken into account that the screed must be dry. CPS 5 cm thick dries within 28 days in dry weather. Drying a freshly poured base using a heated floor is strictly prohibited; it can lead to cracking and collapse. Near the walls and around the columns, if any, there should be expansion joints that are filled with elastic material, such as polystyrene foam or polystyrene. Changes and unevenness are discussed between the client and the master before starting work and depend largely on the type of coating that will be laid on this surface. For laminate and parquet boards, permissible differences are no more than 2-3 mm/2 linear meters. It is checked: a rule or level 2 meters long is placed edgewise on the floor surface in different directions and the gap between the floor and the rule (level) is measured. For installation of ceramic tiles or porcelain stoneware, as well as for carpet, tolerances may be rougher. To lay various PVC coatings when pouring screed, maximum evenness of the floor is necessary, because all irregularities will soon appear on the surface of the coating itself, and the coating will take the exact shape of the subfloor. In these cases, restoration of the screed is simply necessary. The minimum thickness of the DSP is 5 cm, so all unevenness of the low-quality screed will have to be repaired with self-leveling mixtures or resurfacing.
Relevance of dismantling
The strength of screeds is always lower than that of the main building structures, and the daily loads on it are no lower. In addition, these loads are not constant and occur in different places. Therefore, the screed wears out, and wears unevenly. After a few years, areas near doors stand out and weaken, where the flow of people passing is concentrated, near kitchen equipment, plumbing fixtures, etc. The least wear is observed in the corners, where there is practically no variable load. In addition, the condition of the screed is affected by periodic and permanent displacements of the base elements, especially if it is made up of several slabs.
During a major renovation, the project almost always includes dismantling the old screed and installing a new screed. This is often easier to do than carrying out defect detection, determining the degree of safety of individual sections and their suitability for further use. And a new screed will last longer than a partially corrected one.
If the defects are obvious, for example, settlement of the coating along the joint of the slabs or at the junction with the supporting wall or pillar, partial dismantling is carried out and a new screed is installed in the damaged area.
The old screed is dismantled if:
The work of dismantling an old screed is physically difficult, labor-intensive, and the process generates a lot of waste and dust. They require professional equipment and specific skills.
There are cases when, if the condition of the old screed is acceptable, they decide to pour a new one directly on top of the existing one. This decision should be made with great caution, especially if the thickness of the old screed is large. The total load on the floors may be unacceptable. In each individual case, strict engineering calculations are required.
Repair of loose screeds and cracks
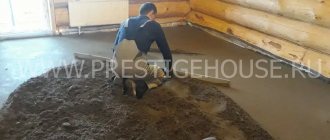
When pouring the screed to prevent cracking, we recommend adding various plasticizers to the solution, which prevent the settling of heavy particles and make the screed plastic, without cracks. We recommend plasticizers from the Italian company Mapei, presented on the Ukrainian building materials market, Dynamon Easy 11 based on modified acrylates. This drug belongs to the latest developments of Mapei Dynamon System additives, produced using the “Designed Performance Polymer” technology - polymers with specified parameters. Using the additive significantly reduces the water consumption for preparing the solution, which in turn will reduce the drying time of the screed and its further repair.
Dismantling a concrete screed: instructions for removing the screed yourself + expert advice
During major renovations, it is often necessary to dismantle the concrete floor screed. Many people turn to specialists for help. But, you see, it’s illogical to spend money on hiring a team of craftsmen if you can disassemble the structure yourself? It is better to use the saved funds to purchase better quality building materials.
In this article we will present an algorithm for self-removal of concrete floor screed. Let us list and characterize the methods for disassembling the structure. We'll tell you when and which method is best to use. We will give useful recommendations.
Surface preparation
Before pouring a self-leveling floor onto a concrete screed, you need to prepare the surface, namely, remove all unevenness and greasy stains. In those places where dirt remains, the coating will not adhere, and any unevenness will begin to stick out.
Potholes and cracks are treated with putty or a mixture based on epoxy resin. After this, the surface is cleaned and treated with a primer, which is selected depending on the condition of the concrete slab. Depending on this, they choose how to treat the concrete floor to prevent dust, taking into account all the nuances of the choice. If the surface is loose, it is recommended to use a deep penetration mixture. Self-leveling flooring on a fresh screed is allowed only after the surface has completely dried.
Since a liquid solution is used to fill this coating, it is recommended to waterproof it so as not to flood the neighbors below. Cement self-leveling flooring, which is cheaper, is quite popular.
Which method should I choose?
The impact method of screed dismantling is recommended for high-strength coatings. For example, this is an ideal option for dismantling floors made of concrete with topping. But this method is not suitable for structures containing reinforcing mesh.
It is recommended to choose impact screed removal technology for private buildings. In multi-storey residential buildings, this dismantling method is also often used. But it causes a lot of inconvenience to neighbors due to the high noise level.
For old buildings, impact technology must be used carefully to avoid causing damage to the house, reducing its performance characteristics and service life.
Cutting removal is suitable for different types of concrete surface. The technology is recommended for use in apartment buildings. Removing the screed using this method will not create as much discomfort as the previous method.
The use of drilling is advisable if dismantling of part of a concrete structure is required.
Pouring self-leveling floor
Once the primer has dried, you can begin pouring. A self-leveling floor must be covered with a layer not exceeding 5 millimeters, otherwise it will remain damp and burst under mechanical stress.
Since the self-leveling floor dries quickly (in about 30 minutes), pouring is carried out by several people at once. During this half hour, the coating does not dry completely, but it becomes impossible to start leveling it (read: “Drying time for a self-leveling floor is the optimal solution”). During this time, it is impossible to process the entire area efficiently so that the surface turns out smooth. One person can only do the job if the room is small and one portion of the solution is enough to fill.
FAQ
No, grinding is possible 5-6 days after pouring, when the surface does not deform when exposed to it.
If you don’t have a powerful construction vacuum cleaner, then you can. It is best to collect dust immediately so that it does not get into the air.
It all depends on the manufacturer and composition. Some dry in literally an hour, others take much longer. Read the instructions carefully, where all these nuances are indicated.
Pay attention to the abrasive. Each type of grinding has its own standards. Perhaps you should take a coarser nozzle.
If there is a need to give the coating a more attractive look and texture, then yes. Some connoisseurs of the loft style prefer to leave everything as it is.
Rules for installing a self-leveling screed
If the solution begins to dry out before it can be poured onto the floor, it is no longer suitable for use. There is no point in adding water to it and trying to stir it - the composition is damaged and cannot be restored.
The room in which the self-leveling floor is being poured must not be ventilated. It is important to exclude drafts. The adhesive properties of the surface are reduced if moisture evaporates faster than necessary, and this happens when the optimal level of humidity is not maintained. The following type of question is often encountered: “A self-leveling floor on a screed: in how many hours will it dry completely?” There is no definite answer - the drying speed depends on the thickness of the layer, the level of humidity in the room and other factors.
Usually a rough layer of self-leveling coating is laid on a concrete screed, and on top of it is a self-leveling floor with finely dispersed particles (often with colored dyes), which is the finishing surface.
Nuances of partial dismantling
In a number of cases, there is no need to completely dismantle the old screed.
For example, if it is necessary to install a heated floor on a limited surface, or to reduce the overall level. Apply the following sequence of actions:
If it is necessary to remove a part of the screed that is very thick, you can use a construction router - a diamond-coated core drill. Holes are drilled across the entire area to be cleaned with a slight indentation, then the remaining partitions are broken using a hammer drill with a spatula attachment.
Dismantling an old screed is quite a labor-intensive and dusty undertaking. In order for it not to create problems, it must be agreed upon with neighbors and carefully planned. For complete dismantling, pneumatic jackhammers are used; for partial dismantling, you can use a circular saw and a hammer drill.
Source
Tips and secrets
Small pimples that appear on the subfloor are defects and are removed by sanding. Shallow holes are sealed with a self-leveling floor solution. Before pouring the finishing layer, you need to make sure that the rough surface is absolutely flat.
As for whether a self-leveling floor is needed on a screed, this is not necessary. You can level the surface in other ways - for example, using cement is a widely used option. However, self-leveling floors have a number of advantages.
First of all, they are the best solution for premises that are subject to significant mechanical loads - various industries, car services, etc. In apartments, using self-leveling floors you can create an interesting and original design, and this flooring will last for decades.
It’s not difficult to pour a self-leveling floor onto an old screed, and you can do this job yourself. But during the work and after it, you need to strictly adhere to the technology, since the slightest deviation from it can lead to the coating being hopelessly damaged.
Base requirements
The filling technology requires compliance with the following requirements:
- Strength and integrity of the rough coating. Before installation, a number of surface preparation activities are carried out:
- small cracks are sealed with cement mortar;
- the entire surface is carefully tapped, any voids found are cleared and sealed with cement mortar;
- the prepared base is covered with a layer of primer, which will strengthen the old screed and prevent the appearance of fungus or mold on the surface.
- Compliance with the standards for the thickness and weight of the floor, since not all floors can withstand increased load. This is especially true for multi-storey buildings. And an increase in the thickness of the base will affect the height of the ceilings, which will affect the appearance of the entire room.
Important! Remember that the use of metal reinforced mesh makes the floor structure heavier.
Video description
How to strengthen concrete that is peeling off from the base is described in the video:
Having found out why the floor screed cracked and what to do, you can begin repairs.
- First, by tapping, areas of delamination and voids are identified and marked with chalk.
- In the marked places, holes are drilled in the screed at a distance of 15-20 cm from each other.
- After cleaning and priming, an epoxy mixture is poured into the holes.
- It also seals cracks.
- After the mixture hardens, the holes are filled with liquid cement mortar.
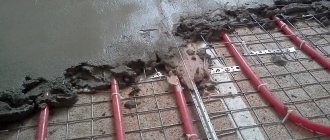
It is important! This method cannot be used if a water or electric heated floor system is installed in the screed, or other communications without an accurate wiring diagram.
When drilling repair holes, there is a high risk of damaging the cable Source sense-life.com
Making expansion joints
One of the main reasons for cracking of a concrete slab is the lack of compensation gaps around the perimeter of its abutment to vertical barriers - walls, columns, thresholds, etc. And in rooms with a large area, the screed can crack and swell during shrinkage and during linear expansion, if expansion joints are not installed in it, dividing the solid slab into several sections independent from each other.
The expansion joint allows the screed to expand freely Source tb.ru
See also: Catalog of companies that specialize in home insulation
Before repairing cracks in the floor screed, it is necessary to arrange all the necessary technological joints in it, otherwise they will appear again and again. And the sooner you do this, the better.
It will no longer be possible to create gaps between the floor and the wall using a finished screed. But you can cut the grooves as close to the wall as possible using a grinder with a large diameter disk or a wall chaser. If there are columns, a shrinkage seam is made around them, but not parallel to the edges, but in the form of a diamond, so that the corner of the column looks at the straight section of the groove.
If the dimensions of the room on one or both sides exceed 3-4 meters, the seams must be cut across it.
Note! The depth of the groove must be at least a third of the thickness of the screed, and the width must be at least 10 mm.
The finished cracks in the floor are cleaned of debris and primed. After the primer has dried, they are filled with polyurethane sealant or special mastic. After drying, these compositions retain elasticity, which will allow the cut cards to move independently of each other without transferring deforming loads.
Filling the seam with sealant Source stiagka-pola.ru
Causes
To dismantle the floor screed, some compelling reasons are necessary. Among the most basic are existing surface defects, as well as errors made during installation work. It can even be said that it is much easier to completely remove the floor screed than to partially remove the floor screed. Eliminating deficiencies sometimes even brings more trouble and financial costs.
Another reason is the repair of communication systems that are located under the floor pouring. But here everything should be done efficiently and with caution. All safety measures must be fully observed.
In your work you will need to use a certain set of tools, among which the main ones include:
Construction teams, due to their experience, can complete the work as quickly as possible. Moreover, they have all the necessary tools for this, including special equipment - a joint cutter, a dismantling robot and much more.
Preparing cement-sand mortar
Today on sale there is a large selection of ready-made mixtures for restoring concrete floors, the basis of which is epoxy resin or polyurethane. But given the relatively light loads and the stability of the environment in the apartment, such a mixture can be prepared independently to repair the cement screed.
Cement-sand mortar
To do this, mix one part of PVA glue well with three parts of water. PVA glue can be replaced with bustylate.
Using this emulsion, a concrete solution consisting of a mixture of sand and cement is mixed in a ratio of 1:3. You can buy a putty glue solution in a store, but a 5-liter canister is the minimum packaging volume.
If the cracks are deep, this adhesive emulsion is not suitable; to repair them, you need to purchase a special thixotropic primer for concrete. Ready-made store-bought mixtures are mixed with water, while those prepared by hand are mixed with an adhesive suspension. It is impossible to prepare such a solution without a mixer; it must be smooth, homogeneous and have a minimum amount of water. If you try to do this manually, it will take a lot of time and the solution will lose its necessary qualities.
Mix the cement mixture using an electric drill or hammer drill at minimum speed. To do this, use a special mixer attachment, the range of which is very large in the store. But instead, you can use a steel rod up to a centimeter in diameter. It is bent into a ring at the end and inserted into the perforator pipe. Mixing lasts up to 5 minutes, during which calm circular rotations are performed over the entire surface of the solution. After finishing kneading, the mixer should be immediately lowered into a bucket of water and rinsed intensively with a high-speed drill.
You can also repair with tile adhesive, replacing ready-made mixtures with it.