Using a gas water heater is one of the best options for heating water in a house when there is no centralized water supply or the ability to obtain hot water. The technology is very useful and independent of public utilities. It provides residents with uninterrupted hot water. However, these devices also fail for unknown reasons.
Undoubtedly, problems with such equipment should be resolved by gas service employees with special permission, because this is a requirement of safe operation rules. But there are some problems that you can easily fix yourself. Today we will look at one of the common ones, which is associated with a leaking gas water heater. Let's talk about what to do if a gas water heater is leaking, how to identify the cause of the breakdown and what actions can be taken. We will also analyze the features of breakdowns that are inherent in various brands of gas water heaters.
Why is the geyser leaking - what to do
If there is no maintenance, after 4-5 years of operation, you may suddenly encounter water starting to drip from your instantaneous gas water heater. Leaks occur for several reasons.
Some problems are easy to fix yourself. Others require skilled maintenance. If the owner is faced with the fact that his gas water heater is leaking, there are several important points to consider:
- Is it possible to use a faulty water heater?
what causes the leak;
- methods for eliminating leaks and increased condensation formation.
Regardless of how intensely water drips from the boiler, it is necessary to determine the cause of the leak and eliminate it immediately.
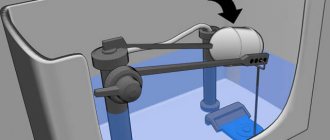
Radiator leak
Hot water appears thanks to the existing heat exchanger. The heat exchanger radiator consists of metal pipes and plates located close to each other. The plates come into direct contact with the fire, due to which soot appears on them during operation.
Signs of soot accumulation include:
- The flame is yellow;
- When burning, the fire deviates to the side and heats the body (the flame should tend upward);
- Soot falls off the gas water heater;
- Even when operating at full power, the water heats up weakly.
To remove soot, you will need to remove the casing by unscrewing the bolts (latches) that secure it.
Important! To prevent soot from entering during disassembly of the column, it is necessary to cover the burner with a rag.
After the assembly is removed, it must be washed by placing it in a container with water for several hours to loosen the soot. This will make it easier to clean the space between the heat exchanger plates. For quality cleaning, it is recommended to use running water, a long-bristled brush and detergents. After drying, the radiator is put in place.
Green spots on the heat exchanger indicate existing cracks and holes.
If the geyser is leaking due to a failure of the heat exchanger radiator, then the actions should be as follows:
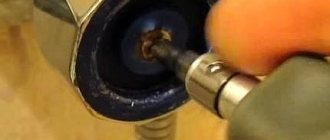
- The water supply pipes must be shut off to prevent water from entering the gas water heater. After which the hoses are disconnected and the remaining water is drained. The remaining liquid in the coil is removed with a pump or vacuum cleaner; you can try blowing the water out with your mouth using a hose. This must be done, since the remaining moisture absorbs heat during the soldering process, and it will not be possible to heat the metal to the desired temperature.
- Damaged areas (they are green) will need to be cleaned with sandpaper and degreased with a solvent, and then wiped dry.
- Crushed rosin or an aspirin tablet should be sprinkled on the work surface. Rosin and aspirin will serve as solder here.
- Using a soldering iron with a power of at least 100 W (since they will have to work at temperatures above 180 degrees), it is necessary to increase the solder to a height of approximately two millimeters. If the soldering is loose, this means that the working surface is not heated enough. You can additionally heat the soldering area with an iron or another soldering iron.
- Each through-hole fault will need to be soldered in a similar manner.
- After the soldering work is completed, you need to wait until the working surface has completely cooled and assemble the gas water heater.
- Before full operation, the equipment is started in test mode.
Is it possible to use the column if it leaks?
Only serviceable, operational gas-consuming equipment is allowed for operation. It is prohibited to use a gas water heater if it is dripping. There are several consequences of turning on a faulty water heater:
there is a high probability of the burner flooding with water from the heat exchanger, which leads to an explosion and gas poisoning (if the combustion control function is missing or faulty in the column);
If the leak was caused by a malfunction of the water unit, the automatic gas water heater simply will not start. The block is connected to the ignition system and gas valve. A leak indicates a malfunction of the gearbox and often after a short period of time leads to complete failure of the water heater.
Welding methods
We have already written how you can solder a heat exchanger. But there can be several welding methods.
Soldering iron
The method requires the presence of a powerful tool (at least 100-110 W). Also prepare your solder and flux. Sprinkle the damaged area with flux and place solder on top using a soldering iron. Make sure it spreads evenly and covers the hole. Continue building up until the layer reaches 2-3 mm.
After such repairs, the fistula will not manifest itself.
Gas-burner
This method is suitable for a thick-walled radiator that has high thermal conductivity. Connect the burner to a gas cylinder, set the flame to a low flame so as not to damage the walls of the heat exchanger.
The damaged area must be warmed well to remove any remaining water. Soldering is carried out with solder, after which the remaining flux is carefully removed. It contains acid, which may cause the tube to break down.
The video shows in detail how to solder correctly:
Technical reasons for column leakage
There are two main failures that lead to leaks. The malfunction is determined by the method of exclusion. The breakdown is indicated by the localization of the appearance of liquid. So, if water flows from below, most likely the malfunction is associated with a failure of the gearbox. When condensation appears, the breakdown is associated with the heat exchanger.
Below is a description of common problems:
- The malfunction of the water unit is a gearbox, a simple control device that sends a signal to open the gas valve and to the ignition unit. Inside, the “frog” is a hollow structure divided in half by a membrane. When water is supplied to the reducer, pressure is applied to the diaphragm, which in turn leads to the movement of the rod connected to the gas valve. The membrane fails due to prolonged pressure and mechanical stress. Signs of a breakthrough:
- water drips from the safety valve of the gas water heater - the membrane blocks the access of liquid, but the barrier disappears after damage or wear of the gasket;
- the water unit is leaking - another clear sign of failure of the membrane or rod seal. Initially, only a few drops of water are released during operation. Over time, the flow in the frog becomes more intense.
Corrosion or hole in the heat exchanger (radiator) - the steel or copper tubes of the coil are subject to constant thermal stress. As a result of direct exposure to fire, microcracks form on the metal surface. Burnout of the tubes occurs. The first sign of failure is the accumulation of condensation on the body and internal components of the water heater. In places of leakage, copper changes color to poisonous green.
To eliminate a leak, you must determine its root cause. For this purpose, remove the boiler casing and carry out a visual inspection. Work begins after determining the location and intensity of the leak. Before servicing, turn off the gas and water supplies.
Unit design
Before you decide why the gas water heater does not ignite and what are the causes of this malfunction, it is necessary to study the design and operating principle of this unit. Currently, there are two types of devices that differ from each other both in design and operating principle. They are divided into the following types:
- With an open combustion chamber (atmospheric) - in these devices, air for fuel combustion is supplied naturally through a special intake. The most famous models: Termet AquaHeat, Dion, Zanussi, Neva Comfort, Ariston, etc.
- Turbocharged or with a closed combustion chamber - in these devices the air is supplied using a fan. Popular brands: Lemax Alpha Turbo, Selena SWH 20 SE3, Ariston NEXT EVO SFT 11, etc.
From this video we learn about some reasons for the malfunction of geysers:
In addition, the water heaters produced differ in the method of igniting the gas burner. Gas can ignite from a piezoelectric device, an ignition electrode from batteries, or automatically from a hydrogenerator or electrical network . The main elements of gas burners are:
- frame;
- gas burner with ignition device;
- heat exchanger;
- combustion control valve;
- water equipment with safety valve;
- ignition device;
- adapter for connecting the chimney;
- pipes for connection to the water supply system.
Periodically check all elements of the gas water heater to ensure they are in good working order.
In addition, a draft sensor is installed in the water heater system to control the output of combustion products. A flame presence sensor is located in the combustion zone. Both elements are connected to each other by one control circuit.
This diagram describes the design of an atmospheric gas column. There are some differences in forced draft water heaters. In their design, the burner is modulating or stepped, which changes the combustion intensity automatically.
The air is supplied by a fan, the operation of which is regulated by a controller. Ignition and combustion of gas occurs when the cold water tap is opened. The combustion process is maintained automatically under the control of a temperature sensor.
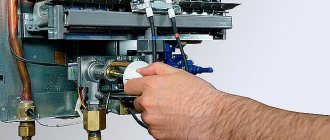
How to fix a leak in a column
First, identify the source of the leak. This can be done quite simply by visual inspection. The casing is attached with latches or fixed with bolts. If water drips from the geyser only when you turn it on, you will need to start heating the water for a few seconds. After identifying the location of the breakdown, they begin to eliminate the leak:
- Threaded and other connections - leaks are eliminated by changing all the gaskets and re-packing the connection. To improve sealing, special silicone compounds (sealants) are used. If a hose leaks, it must be replaced; it cannot be repaired. The average service life of gaskets is 2-4 years. You can prevent leakage by carrying out regular maintenance of the water heater, with the replacement of all sealing rubber bands.
Conclusions and useful video on the topic
Often the problem of geyser heat exchanger leakage is eliminated by soldering tubes. However, not everyone will have the necessary tools and materials in their home. There is an alternative way to solve the problem - without soldering. How to do this, see the following video:
Fixing a leak in a water heater of any brand is not a complicated procedure - all the work can be done independently, having a standard set of tools in the house. To do this, it is not necessary to have special skills and knowledge, but simply use the instructions given above and do not forget about the safety rules when using gas equipment.
And if during the process of carrying out repairs with your own hands you discover a gas leak, you should immediately call the gas specialists.
Would you like to tell us about your own experience of eliminating a gas water heater leak? Or do you have your own opinion about the advisability of independently searching for the cause of the leak and further repairs on your own? Express your opinion, share your experience, participate in discussions - the comment form is located below.
Condensate in a gas water heater - what to do
In this case, the problem is more serious. Most likely there is a leak in the heater. Occurs under the influence of small microcracks. Initially, perspiration appears on the body and internal parts of the speaker. Subsequently, condensation begins to drip from the gas water heater.
A heater (radiator, coil or heat exchanger) consists of pipes with fins. When exposed to direct fire, the metal will burn out over time. Thinning pipe walls lead to leaks and condensation. The malfunction must be corrected immediately. Replacing the radiator or soldering the damaged area will help get rid of condensation.
Soldering is performed in the following way:
- the liquid from the heat exchanger is drained;
remove all dirt and scale from the surface;
soldering is performed with a soldering iron heated to 180°C and a power of at least 100 W;
Condensation in a gas column can form due to every microcrack and deformation. Soldering is used to treat each damaged area.
It happens that condensation forms only on the cold water pipe, and the problem usually arises in new turbocharged boilers. While the water heater is under warranty, it should be replaced immediately. There should be no condensation in a working column.
Source
Types of threaded connections used in instantaneous water heaters
The following types of fittings can be used in internal cold or hot water supply lines:
- sweeps;
- threaded;
- compression;
- crimping
Sgony
- this is one of the old types of threaded connections used for laying cold, hot water or gas pipelines.
In fact, these are two threaded pipes connected to each other by a coupling with a lock nut. Sgon
Sgon
These types of joints can still be found in old houses. In instantaneous water heaters they are definitely not present, but they may be in front of the column. To seal threaded fittings in squeegees, flax tow or a special synthetic tape is used. It is on the slopes that water begins to drip.
Tips: Before unscrewing the threaded connections, drain the water by first turning off the water tap on the water supply when entering the apartment.
Squeegee assembly
Squeegee assembly
Their difference from other fittings is that one end of the fitting is welded to the pipe.
Threaded fittings
can definitely be encountered when disassembling an instantaneous water heater. These are standard connecting elements for pipelines. To ensure tightness, a special tape or linen tow is wound onto the threads. The coupling then tightens the connection and ensures a tight seal. The advantage of such a connection is its low cost and simplicity. However, novice craftsmen are unlikely to be able to make a high-quality seal the first time.
American
American
Unlike threaded connections, the one called “American coupling” is better and more convenient to install. Here the role of seal is played by a rubber, paronite or propylene gasket. In order to repair an American one, you need to replace the old worn gasket with a new one and tighten the union nut.
Compression fittings
can be used when switching from polyethylene pipes to metal ones. In the geyser itself, exclusively metal pipes are used.
Compression fittings
Compression fittings
Compression fittings can be used to supply water to a gas water heater when switching from metal-plastic pipes to metal ones.
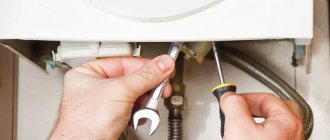
If water drips on the fitting, it must be disassembled, the gasket or sealant replaced and reconnected. Water leaks on a threaded connection can be dealt with using an adjustable wrench.
Drops of moisture on the water unit of a gas water heater. Condensation or leak? Let's check.
Today we’ll look at a case where, for no apparent reason, water leaks through the microswitch of an automatic gas water heater. And so let’s go...
Main reasons.
And so. There are only two main reasons for the appearance of water droplets on the microswitch. 1) You are raising the operating temperature of the device too much. 2)Water is leaking from the water supply system.
If you increase the operating temperature, condensation appears on the metal parts under the column casing. This occurs because the air temperature under the casing becomes high, and the metal parts of the water unit, on the contrary, become very cool due to the flow of water inside them. The process of condensed moisture inside the geyser occurs constantly, but during normal operation of the device, it does not have time to accumulate and quickly evaporate. And at high temperatures, the process of moisture formation occurs too actively. The water does not have time to evaporate and the impression of a leak is created.
All you need is to turn down the gas supply, wipe the wet area with a napkin and observe a little. If within a couple of minutes of operation of the device you do not see dampness, then everything is fine. But if a drop appears again and begins to grow and fall, then this is already a problem .
This means that somewhere the water unit has lost its tightness. And it can no longer contain the pressure of water flowing through the system. And the most problematic places are the membrane and the rod.
Let's go in order. What causes the membrane to fail? There are several reasons. The most common is from hard water. Deposits of minerals dissolved in water appear on the membrane and over time a crack appears through which excess water oozes out. It can also fail simply due to old age and due to manufacturing defects. This can only be treated by replacement.
No, the rod itself remains relatively intact, but the nut inside which it runs suffers.
And not even the nut itself, but the oil seal inside it. This happens because over time a composition appears on the rod. The surface of the rod ceases to be smooth and moving inside the nut and sliding along the oil seal, it simply tears the latter. Again, it can only be treated by replacing the rod and nuts together.
External cleaning of the heat exchanger
To better clean the radiator from contaminants, you need to remove it from the column.
Important! Before starting cleaning work, it is imperative to shut off the gas and water supply valves.
The sequence of actions is as follows:
- close the gas and water supply;
- remove the protective cover;
- open the hot water tap closest to the column;
- place a container under the radiator inlet to drain water;
- unscrew the supply pipe from the heat exchanger and drain the water;
- Unscrew the radiator union nuts and remove it.
You may have to additionally disassemble other parts and elements of the column that do not allow you to remove the heat exchanger. Their number and purpose depend on the design of the unit. It is necessary to carefully and consistently disconnect them, remembering all your actions.
Place the removed heat exchanger in a container and treat the radiator fins with carbon remover or other effective detergent.
Clean with a brush and foam sponge. After this, rinse with a strong stream of water. It is best, of course, to treat the radiator with a mini high-pressure washer, if you have one, or you can get it somewhere for a while. This type of washing can very quickly and efficiently destroy the carbon layer.
Why is a safety valve on a boiler needed?
The valve element releases excess liquid automatically, and stops the removal of water under conditions of normalization of operating pressure.
Externally, the safety valve device is represented by a brass-plated body. The internal part includes a pair of springs and locking elements.
The starting spring mechanism is located in the inner part of the flow channel. Possessing the function of a check valve, such an element prevents water from flowing back into the pipeline supply system.
When the water pressure increases, the spring device moves away, which ensures the unhindered flow of water into the storage tank. After the tank is completely filled and when the pressure indicators are equalized on both sides, the shut-off device closes the hole, which prevents the backflow of water flow into the main pipeline system.
Safety valve on the water supply to the boiler
The second spring mechanism is located on the outlet part of the device, and the function of such an element is represented by water discharge under conditions of increasing pressure.
In such a situation, the pressure arising in the pipeline is able to overcome the stiffness of the spring, which causes its compression and the opening of the hole for water flow by the shut-off element.
Safety valve installed on the boiler
The use of a safety valve device protects the storage tank from rupture, prevents the reflux of hot water from hot water equipment into the water supply system, smoothes out pressure drops, and ensures the discharge of excess water at critical levels of pressure and temperature conditions. Among other things, the valve drains water during the maintenance and repair of the boiler.
Turning on the device
The first step is to install the batteries. To do this, open the battery compartment and install them, observing the polarity. Then you need to open the cold water and gas valves. Open the hot liquid tap on the nearest faucet.
At the moment when the liquid flows through the water unit, a spark ignition occurs and, thanks to this, the burner ignites. If it is turned on for the first time or after a long period of inactivity, air may accumulate in the gas line; in order to remove it, you will need to open the mixer several times, hold it for a minute, and then close it.
If the burner ignites, you need to turn the water pressure adjustment lever (located on the right) to the right, this will make it possible to turn on the Vektor JSD 20 device when the liquid pressure in the system has decreased.
Is it dripping or flowing?
If water drips from the check valve device during the heating of the boiler equipment, then this situation indicates the normal functioning of the device and the operation of the protective group in normal mode.
During operation of a water heating device, the safety valve must discharge excess liquid if there is an increase in water pressure on the walls of the storage tank as a result of thermal expansion of the liquid. The consequence of water discharge is a noticeable decrease in water pressure inside the tank with heating elements.
Installation diagram of a safety valve for a boiler
To monitor the process of removing excess water, it is necessary to install a regular transparent reinforced plastic pipe on the outlet fitting, the outlet of which is mounted on the sewer system.
The water should not flow in a stream, and the release of droplets should stop immediately after cooling.
If water drips constantly, the problem may be a malfunction of the safety valve device or the liquid is drained due to a worn rubber or silicone seal..
Common insulation mistakes
The main indicator that a mistake was made when installing thermal insulation is the heating of the external parts of the structure to high temperatures. If there are flammable materials nearby, this situation poses a fire hazard.
- an incorrectly selected or low-quality insulator shrinks;
- violation of the integrity of the internal part of the pipe (happens quite rarely);
- non-compliance with work technology;
- unsheathed heat insulator at the chimney head.
Thus, there are quite a few ways to insulate chimney pipes. The materials are available for sale, so there will be no problems with the purchase.
You should not purchase cheap materials, because in reality their quality leaves much to be desired. It is important to carry out work in accordance with technical standards. Otherwise, money and time will be wasted
Water dripping at night
It is very important to distinguish between natural water discharge and failure of components. When the water heating equipment is connected to the electrical network, and in the absence of its operation, a small amount of it should flow through the fitting part of the valve device, including at night.
When the appliance operates in an average load mode, including regular washing of dishes and cooking, water flows out of the valve device periodically, in a volume slightly higher than the usual amount. Constant leakage, including at night, may indicate device failure.
The main reason for dripping water at night is that the fitting or the inside of the fitting is clogged with scale or debris. The spring mechanism that opens the valve is not able to close it at the right time, so water flows out even when the water heating equipment is turned off. An equally common cause of water leakage at night is too high pressure in the water supply system. In order to check the working water pressure, it is measured in the main water supply.
Application of FuranFlex
If condensate flows from the pipe , the chimney should be lined with a FuranFlex polymer liner. Those interested can familiarize themselves with the technical characteristics of the material, as well as its advantages. The main feature of the technology is that the pipe starts in a soft state, but after polymerization it becomes durable, resistant to moisture and aggressive substances. FuranFlex is able to reduce the amount of condensate and provide reliable protection for the main structure of the chimney system. Its installation takes only 3-4 hours, and the work can be carried out at any time of the year.
Our specialists can advise you on the creation of chimneys from FuranFlex for boilers Buderus or other manufacturers. On the site you can find out how to extend a coaxial chimney, as well as other useful information.
How much water should the valve drain?
A small amount of water should be dripped from the valve device. The total volume of liquid removed directly depends on the pressure level in the water supply system, as well as the temperature regime used for heating and the volume of the water heating equipment tank. On average, the amount of water released can be about 1.5-3.0% per day.
There are several ways to drain water from a water heater. For detailed instructions, see our website.
Read all about the pros and cons of hygienic showers for toilets here.
You will find options for finishing a bathroom with plastic panels in this topic.
What to do?
There may be several reasons for excessive water pouring out through the fitting of the valve device, and the solution to the problem can vary greatly in complexity and implementation technology:
- if an element loses its protective qualities due to wear, including spring stretching and cracking of the poppet device, the fittings are replaced;
- if the valve breaks down as a result of water hammer with a sharp increase in pressure in the water supply system, it is also advisable to replace the element with a new one with similar indicators;
- if the fitting or the internal part of the system is clogged with debris and scale, it is advisable to clean it, partially or completely replace it;
- if the leak is caused by initially incorrect installation of the protective unit, then it is necessary to carry out diagnostics of the safety valves, including measuring the relief pressure using a pressure gauge, followed by replacing the valve if necessary;
- if excessive leakage of water and incorrect operation of the fittings of the water heating device are caused by non-compliance with installation requirements, then the protective unit should be moved to the correct location.
After the correct relocation of the protective fittings or complete replacement of the safety assembly has been carried out, the excess flow of water should stop. The opposite effect is observed when the nominal pressure level declared by the manufacturer does not correspond to real indicators.
No less often, the cause of leakage is an incorrectly selected or too high temperature mode for heating water, as well as excess water pressure inside the system, so the purchased water heating equipment must fully comply with all requirements.
Correctly installed boiler
It is very important to remember that the operation of water heating equipment without accessories such as a safety valve device is strictly prohibited. When installing an alternative hot water supply system in conditions of excess pressure in the main water supply, a special reducer must be installed at the inlet, capable of regulating such parameters.
Do you want to save money on boiler installation? How to connect a water heater to the water supply in an apartment - you will find a connection diagram in the article.
We will consider types of plastic panels for the bathroom and repair options in this material.
A prerequisite for comfortable and safe operation of water heating equipment equipped with a safety valve device is the supply of a flexible transparent hose to the drainage hole, the second end of which is discharged into the sewer system or a container specially installed to collect the released water.
Prevention methods
To avoid having to tinker with the unit too often or constantly call the repair service, you should adhere to the following rules:
- Set the temperature at the optimal level so that there is no need to dilute the water, then scale will not appear so quickly. To avoid having to adjust the column every season, it is preferable to choose a model that remembers the settings for winter and summer modes.
- To remove salts from water with high hardness, you can install an electromagnetic system that will purify the liquid.
- Regular cleaning of the chimney and parts of the water heating system is necessary.
- Modern speakers that have a built-in electronic controller are better connected to the network through a stabilizer and not turned off at night.
- If the hose is longer than 3 meters, the pressure during gas supply will greatly decrease.
- When the column is operating, it is better to open the window; this simple method will allow you to get a lot of air for the normal functioning of the unit.
- The chimney and parts of the column that quickly become dusty should be periodically checked for dirt, cobwebs and the like and removed with brushes and a vacuum cleaner.
Signs that unscheduled maintenance and technical inspection from a specialist are required:
- the pressure in the water supply is normal, but the heat exchanger still works for a small amount of time;
- the unit constantly turns off or does not function at all, although the supply of gas and water is carried out in optimal mode;
- often the thermal protection is triggered for no reason, causing the working system to shut down;
- The heating of the water decreases, although there are no noticeable operational disturbances.
To check the column from the inside, you need to remove the upper housing. This is done using a Phillips screwdriver, which is used to unscrew the screw located on the handle of the gas lock valve.
The handle itself is removed by pulling it towards you. Then, using a flat-head screwdriver, remove the screws that secure the case, after which it can be removed.
The main tasks in routine maintenance are to check the general performance, inspect the column inside and outside to identify places that need to be cleaned from dust and dirt, and assess the condition of the heat exchanger as accurately as possible.
Periodic preventive maintenance and checks can increase the life of the device due to the timely detection of problems in the functioning of the column.
The work itself should usually be carried out once a year, but if the column is already old and often malfunctions, then if it is impossible to replace it, checks should be carried out more often.
It is better to entrust the annual inspection to professionals from specialized gas services, as they will be able to accurately determine the condition of the unit.
High-quality maintenance usually includes a complete disassembly of all equipment, searching for defects and areas of damage that can cause interruptions in the operation of the column.
Each main part is also cleaned (wet and dry cleaning), all components of the gas water heater are adjusted or returned to their original position, reconnected and tested for readiness for operation.