The traditional floor covering for the kitchen is linoleum. It is practical to use and has a beautiful appearance. However, recently the trends have changed significantly, and many are resorting to using a combined solution consisting of tiles and laminate. We propose to understand what requirements are imposed on the floor covering in this case, what advantages the combined option has, and what solutions can be used as an idea for subsequent implementation
Requirements for kitchen flooring
To understand why finishers and designers approached such a difficult combination of laminate and tiles in the kitchen, you can remember that the load on the kitchen floor is so great that any modern coating, laminate, and especially linoleum, rarely lasts more than four years.
You can use traditional oak floors, but this solution is not suitable for all kitchen interiors. In addition, kitchen floors have special requirements:
- The coating should not absorb liquid spilled on the kitchen floor. Ideally, the material should have a dense and at the same time smooth and non-porous surface structure. Anything that spilled could be collected, swept up, removed without much effort to remove stains;
- Floor safety, no slipping effect. Nobody wants to fall on wet tiles;
- Excellent abrasion resistance. According to experts on the ergonomics of modern housing, residents spend up to 40% of their time in the kitchen and living room in front of the TV.
Important! Don’t forget about hygiene; the kitchen floor must withstand treatment with special products without loss of color and quality.
In such conditions, traditional linoleum or wood flooring wears out very quickly, but often only a small part in the form of a path along the kitchen facade is worn out.
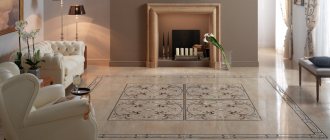
Instead of the most worn part of the laminate along the countertops and kitchen cabinets, the designers placed a small section of tile that has undergone a special treatment that makes it non-slip and smooth at the same time.
Installation procedure
Anyone can handle installation work. In this case, it is worth taking into account the recommendations of specialists and correctly performing each subsequent step:
- Before laying tiles, it is ideal to level the work surface to avoid subsequent deformation of the tiles.
- Lay tiles only on a dry and clean floor.
- The base for installation must be treated with a primer.
- Remove excess adhesive immediately during installation work, and use a rubber roller to remove air bubbles from under the tiles.
Tiles imitating laminate from the Elm collection of the Kerama Marazzi factory
Pros and cons of combined flooring
Installing just laminate or just tile in your kitchen can be a challenging task. The first one quickly loses its original appearance. Without special heating, tiles remain quite cold and uncomfortable. After laying a combined floor covering, several problems can be immediately solved. Therefore you can:
- create a safe sanitary zone near the kitchen cabinet, which even the most durable and high-quality laminate will not allow. In terms of strength indicators, tiles are two orders of magnitude superior to laminated panels;
- Do not allow the floor covering to swell when water gets under the cabinet. The tile retains its geometric shape after prolonged contact with water, unlike laminate, which swells, losing its appearance and shape;
- prevent the floor covering from pushing through under the influence of the load created by the metal supports of the kitchen unit. When laying laminate flooring, this problem cannot be avoided. A layer of PVC or pressed paper is pressed quite easily;
- spread a comfortable and practical laminate over almost the entire kitchen area;
- visually divide the floor into separate zones, designating a work area for preparing lunch and a dining room for eating;
- optimize repair costs without sacrificing the practicality and functionality of the flooring;
- Make it easier to keep your kitchen clean.
Despite a number of obvious advantages, this option also has disadvantages. You need to think carefully about the design of the floor so that the materials look beautiful next to each other. Otherwise there will be a feeling of incompleteness.
Attention! The ideal combination of two different materials can only be ensured by the correct selection of their color, texture and color.
Comparison of materials
In order to determine the optimal combination of coatings for the bath, kitchen, hallway, living room, bedroom, you need to compare these two materials.
Moisture resistance
This indicator is undoubtedly better for tiles. So granite absorbs no more than 0.05% moisture. Therefore, in places with high humidity it is worth using it. Such areas in the house are the kitchen, the bathroom, and part of the hallway near the door.
As for the laminate, in accordance with GOST, it should swell by no more than 20% when kept in warm water for 24 hours. But in practice, having installed this coating in the kitchen or bathroom, after a year it will have to be changed, and this does not really depend on the manufacturer and class.
An original combination of tiles and laminate
Hygiene
The tile is easy to clean and does not collect dirt. You don’t need any special conditions to wash it, just warm water. As for laminate, you need to work with it very carefully - no abrasives, chemicals or very wet rags. If installation is poor, it may be difficult to wash out dirt from them.
Note! Not all tiles are so easy to clean. Thus, matte tiles with roughness perfectly retain dirt. As a result, the non-slip and practical tiles get dirty very quickly.
Both materials have similar hygienic qualities, but this very much depends on the quality of installation and the type of collection.
Wear resistance and slip
Almost all floor tiles and laminates of class 32 have excellent wear resistance. That is why they are installed in high traffic areas. So, tiles and high-quality laminate in the hallway will be an excellent solution.
As for sliding, it will be comfortable in this regard on matte tiles and embossed laminate.
Combining tiles with laminate in a small hallway
How to choose tiles and laminate flooring in the kitchen
The process of choosing a material largely depends on the complexity of the future combined coating. The more complex the pattern and geometry of the seam, the higher the quality requirements for the tile material. Typically, a solid color porcelain tile with a rough surface is used to form a ceramic footprint along the cabinet wall and countertop.
Kitchen Runner Tile Options
The color matches the color of the furniture, most often coffee, cream or dark. Even under conditions of significant abrasive load, the ceramic coating will not change color and texture.
The second approach to choosing ceramics is to use a material with a multi-colored surface. Typically, multi-colored tiles and laminate are used in the kitchen and living room, where it is especially important to maintain zoning and avoid the appearance of colors on the kitchen floor that sharply contrast with the background of the overall color.
In addition, the tiles are selected taking into account the geometry of the transition line. Tiles are much easier to cut, and porcelain tiles can be cut as straight as possible.
Only moisture-resistant laminate is used under kitchen tiles. It is better to choose an office or commercial class, since the wear of cladding in the kitchen is always an order of magnitude greater than in other rooms.
Types of tiles for the kitchen
Manufacturers offer a large selection of tiles that can be used as flooring in the kitchen. It can be different in design and is divided into groups according to appearance.
All offered decorative facing tiles can be divided into several types, depending on the material of manufacture:
- ceramic tiles;
- glass;
- stone;
- porcelain stoneware
The tiles in the kitchen are matte, glossy, sprayed; The range of glass types includes clear or colored options.
Choosing a laminate
Laminate can be used as a kitchen flooring, but after the correct choice of type and class, as well as proper preparation of the base. When choosing laminate or porcelain tiles for your kitchen, you should keep in mind that the former is pleasant to walk on even barefoot.
Parameters to pay attention to:
- Wear resistance class. The higher it is, the greater the load the coating can withstand.
- Level of moisture resistance (presence in the description of markings with drops of water, tap, words waterproof, tight, aqua block, aqua protection).
- Block the connection type. A more reliable and affordable option is the Click folding system.
- Manufacturer and warranty. If your budget is limited, it is better to choose linoleum or tiles.
- Thickness. For a kitchen, hallway or corridor, a coating no thinner than 9 mm is recommended.
- Presence of chamfer. Models without chamfers are more suitable for the kitchen, since dirt and moisture are always retained in the recesses.
- Formaldehyde emission class. Health safety marking - E0 or E1.
- Non-slip surface.
The best choice is a moisture-resistant laminate of class 33, 8-12 mm thick, with a durable protective top layer, matte, slightly embossed, non-slip surface.
Some combination rules
- Don't try to match the coating color to color. Such a coincidence is only possible if the manufacturer of the materials is the same, plus he produces collections of laminate and tiles in the same style.
- You shouldn’t split up the combination - a patchwork stylist is not appropriate here. The zones must be clearly demarcated and not mixed.
- When choosing color combinations, you need to focus on the room as a whole, and not on specific materials and their combination with each other.
- When selecting, special attention should be paid to the manufacturer. You should not save on either one or the second coating. If one of them fails, the entire floor finish will have to be replaced.
Connecting molding
- The best connection option would be straight, clear lines. It’s simply not possible to create winding ones yourself and without experience, although they will look original and beautiful. Moreover, if there is any bend on the floor, then it should be a “projection” of the walls or ceiling.
- To join materials, you need to use a special molding. It covers the joints and at the same time holds the materials as one whole sheet. But although this element is reliable, it does not always fit into the overall style of the room.
- If, when combining materials, a problem arises with a difference in floor level, it can be solved by using special metal or plastic thresholds. They will make the transition smooth and barely noticeable.
Thresholds for material combinations Thresholds for material combinations
Key rules for combining
There are several unspoken rules regarding mixed gender. They will allow you to create a beautiful and noble composition that will become a worthy decoration of any room.
Light shades of materials should be used in small rooms with low levels of natural light. They visually enlarge the room and make it more spacious.
A dark floor is suitable for a large room with high ceilings. In most cases, it looks a little more luxurious and sophisticated.
However, dark coatings are dirty. Therefore, they will require more thorough and frequent cleaning, possibly also using special products.
We must not forget that warm tones should be combined exclusively with warm ones; The problem is also with cold shades. To make the composition look thoughtful and neat, it will be good if the laminate design contains at least one of the colors found on the tiles.
If your tiles have an intricate and eye-catching design, you should choose laminate in soothing shades. For multi-colored planks that have an unusual pattern, you will need a second solid material.
In order for such combinations to look neat and complete, it is necessary to take care of the correct finishing of the junction of materials. For these purposes they usually use:
- The most resistant metals are considered: aluminum, brass or steel. They are not subject to mechanical damage, but may look too rough in light, bright rooms with an abundance of textiles and glass elements.
- Wooden boards. They have a more aesthetic appearance, but are not suitable for compositions with rounded edges.
- Plastic moldings. They are distinguished by their low cost and a large number of colors.
- Cork substrates. Thanks to the plasticity of this material, it is possible to qualitatively fill the entire space between the slats and the tiles, while the seam will become almost invisible. It is worth noting that cork has excellent shock-absorbing properties, ensures reliability and stability of the structure and is easily hidden by any decorative elements.
- They are presented in a wide range, depending on the main component included in their composition. This can be construction foam, putty or silicone mortar. They are quite easy to use, hide the seam well, but have a short shelf life. This means that you will need to constantly monitor their condition and reapply them regularly.
- Specialized profiles. For example, Step Flex. Their advantage is that they can take any necessary shape, that is, they are suitable for decorating the most non-standard patterns. In addition, they have edges that are curved downwards, which ensures a strong and tight fit to other materials.
The combination of tiles and laminate will give your interior a stylish design that will remain relevant and in demand for a long time. These materials are considered very practical and easy to use.
Thanks to them, each space will acquire a new look that will delight you and your guests for more than a year.
Grouting joints
If the tiles and laminate are located at the same height and the gap between them is minimal, instead of using special layers and thresholds, you can try to rub the joint with a special compound. The butt-to-butt method allows you to implement:
- Sealant. Depending on the size of the gap and the desired effect, you can choose a transparent composition or give preference to a colored material;
- Conventional construction foam;
- Special grouting paste, available in a wide range of colors;
- Fugue for tiles;
- Liquid plug described above.
The characteristics of the listed compositions may differ significantly. When choosing the appropriate option, you should make sure that they have sufficient adhesion to the surface of the tiles and laminate. Otherwise, the desired effect will not be achieved.
How to combine laminate and tiles in the kitchen
The correct placement of the transition seam is rightfully considered the most difficult stage of the work. The joint between two types of cladding is necessary for technological reasons:
- The seam profile or material blocks the penetration of moisture under the laminate;
- The free space of the slot allows you to compensate for the expansion of the lamellas under load.
Theoretically, to meet the requirements, it is enough to make a groove 6-7 mm wide, which can be filled with any insulating material, most often it is silicone of the appropriate color. In practice, such a solution is short-lived; the filling material quickly darkens from contamination, fills with debris and peels off from the ends of the lamellas.
Sealing with caulk is a temporary solution to the problem, so this method is used in relatively small kitchens where the use of protective moldings and profiles is impractical. The transition strip often interferes with the installation of furniture or simply does not fit indoors.
In addition to molding and silicone, cork materials are used to seal the seam. Actually, this is a tape 3-10 mm wide, which is pressed into the joint groove. Cork is great for living room or bedroom floors, but in the kitchen it can only be used in transitions between adjacent areas of laminate flooring.
Curvilinear transitions from laminate to tiles
To design joints in the form of waves and arcs, a special design with a “kink” base is used. After cutting the gap between the laminate and the tile, a support strip consisting of many segments is installed into the resulting gap. This allows the structure to be smoothly bent in the form of arches and waves with a rounding radius of up to 1 m. A flexible molding with soft edges is placed on the supporting profile and fixed. When installed on a kitchen floor, the edges of the coating are additionally treated with silicone to increase water resistance.
Figured seam modeling
At first glance, the simple design turns out to be quite difficult to install and capricious to operate. Even experienced decorators do not particularly approve of this and, when installing molding in the kitchen, prefer to limit the number of waves and arches at the edge of the laminate and tile.
Straight transition lines
If you have little experience in installing laminate floors, then it is better to limit yourself to simple straight lines, without broken or curved transitions. This transition option may look no worse than the author’s zigzags and arches, and in practical use, a straight line turns out to be even more convenient and predictable.
The interior of such a kitchen with tiles and laminate, photo, is no less elegant; the simple transition configuration gives the flooring a more rational look, which has always been and remains in fashion.
Only a small part of the floor is intended for tiling
An expansion joint 6-12 mm wide is made between the tile covering and the laminate. The joint can be covered with a straight separation strip made of plastic or laminated aluminum. Since the line is straight, the protective molding can be provided with a clip and adhesive backing. This is a good way to prevent moisture from escaping and prevent your laminate kitchen floor from swelling if there is a water leak.
Where to place the joint
The bases of tiles and laminate have different rigidity and degree of expansion, so the joining line will appear in any case. There are several ways to solve the joint problem:
- The use of decorative aluminum strips used to secure linoleum near walls and thresholds;
- Masking the seam with a vinyl overlay;
- Arrangement of the podium at the junction.
When choosing a joining location, make sure that the seam line does not pose a danger and does not interfere with movement around the kitchen. The joint should be parallel to the movement of people or in a low-traffic area.
Often, tiles on the kitchen floor are laid in the shape of the letter L, with most of the material located under the set, and in front of it an area about one and a half steps wide is formed. This location of the joint allows you to move freely around the kitchen without fear of catching a seam or hitting the podium. The rest of the floor is laid out with laminated boards to create a more lively, cozy environment.
The joint between the laminate and the tile is sometimes designed in the same way as when laying linoleum in the kitchen. The seam is placed parallel to the kitchen unit, along the cabinets. When arranging the podium, the area with tiles is made 2-3 cm below the main surface.
Options for combining tiles and laminate
Both types of flooring, regardless of the size of the occupied surface, color and texture of the material, in any condition remain important details of the kitchen interior. Therefore, experts recommend making maximum use of the decorative capabilities of tiles. There is less and less of it on kitchen floors, but it is the tile fabric that frames the furniture facade, which means it can enhance and enhance the decorative effect.
Scheme of dividing the kitchen room with a joint line
When choosing the design of kitchen floors, the texture and color of the laminate, the size and method of laying tiles, it is important to find a solution to two problems:
- First, choose suitable tile and laminate colors, contrasting or in related color combinations;
- Secondly, the method of sealing the joints should make visitors to the kitchen forget that there are two different materials on the floors. The flooring looks like a single canvas with two zones of different colors or shades.
The simplest version of the dividing line between the tiled floor area and the laminate is made with a straight line.
If a furniture set fits into some kind of “pocket” in the kitchen, the easiest way is to make a joint along the existing border.
Advice! One of the most elegant solutions is to design the joint in the form of a curved line, arc or even a semicircle.
The straight arch type that borders the tiles can penetrate quite deeply into the laminate portion of the kitchen floor; Ideally, the dividing line should extend to the dining table in the center of the room.
With the reverse curvature of the arch, the dividing line minimizes the floor area under the tiles, and at the entrance to the kitchen and in the refrigerator or sink area, the size of the tile area doubles.
A seam can divide kitchen floors into two equal parts; the proportions and sizes are usually chosen by the owners among their preferences and the size of the steps. Old linoleum or laminate left over from a previous renovation is a valuable assistant in floor design. On the floor, as well as on the map, all the paths and paths of movement of apartment residents around the kitchen are clearly visible.
If tiles in the shape of a hexagonal honeycomb are used, the boundary between the laminate and the tile can take on very complex, bizarre shapes.
Contrasting combination of tiles and laminate
Separation with contrasting colors is considered one of the techniques that allows you to visually delimit the kitchen area into two independent zones.
For example, a strip of floor adjacent to the countertop and covered with light tiles is considered a “kitchen” area, access to which is limited to everyone except the hostess. The rest of the kitchen under the laminate is conventionally considered the territory of guests.
Using contrasting colors does not require special design skills. The darkest part of the floors is reserved for laminate, since a large number of slats are produced in gray and brown tones. In exceptional cases, light laminate is used on kitchen floors.
On the contrary, tiles are chosen in light colors. Even though marks and stains are clearly visible against a light background, cream, light brown and yellow stripes of tiles look much more expressive than gloomy dark red and gray tiles.
Contrast can be used not only in colors, but also in texture. An example of a combination of laminate with tiles is shown in the photo.
Tiles and slats of approximately the same size are laid perpendicular to each other. As a result, the kitchen floors are divided into two zones with different types of coverage, but visually the area looks like one.
Combinations of shape and texture
The combination of tiles and laminate should be made taking into account the color scheme, texture and general design style. To reduce visual noise and harmoniously combine materials, it allows you to select different shades of the same color. The tile should be a tone lighter than the laminate or vice versa.
Here are some tips for an effective combination:
- One part of the decoration should be expressive, and the other should serve as a background. For example, a combination of matte and glossy tiles of different sizes, but the laminate should have the simplest possible design.
- Hex tiles look elegant and unusual, especially as room zoning, as they create a unique broken transition with laminate.
- You can use tiles of any shape: transverse, longitudinal, diagonal, herringbone or checkerboard.
- If you choose tiles that imitate the texture of marble stone, textiles or leather, a laminate of a darker shade will emphasize the noble appearance of the decorated floor.
A good option for a modern kitchen is to combine laminate flooring with multi-colored honeycomb tiles.
How to combine flooring with furniture
Planning the layout of a kitchen floor with two types of floors should begin with choosing the color of the laminate, tiles and furniture front. In addition, all three color combinations must be selected and combined with each other before the renovation begins.
The easiest way to solve the problem is for furniture in light colors. White, cream or beige sets go well with almost any light tile, but always with warm tones.
In this case, the laminate for the remaining floors should be selected from the dark or red-brown color group.
If the kitchen has dark-colored furniture, it is necessary to carry out color separation. This means that the dark facade must be complemented with a contrasting coating of the apron and most of the wall. Light tiles on the floors and walls of the kitchen go well with dark cabinets and chocolate-colored laminate flooring. True, you will have to abandon the upper tier of wall cabinets.
If the kitchen interior uses light walls and ceilings, and the room is illuminated by huge windows, then the problem of combining dark furniture and brown laminate with light tiles can be solved by increasing the width of the surface allocated for the tiled floor.
Combination in the kitchen combined with the living room
An effective combination in the design of any stylistic direction.
The combination of tiles and laminate allows you to visually divide a spacious office or a small kitchen combined with a living room in an interesting way. The use of different materials allows you to simultaneously create several visual zones. This is an excellent solution for rooms where the work area is combined not only with a dining room, but also with a place to relax.
Styles
There are no restrictions when a creative designer gets down to business. He knows how to combine the incongruous in such a way that the combination of materials looks appropriate, demonstrating his commitment to any style.
If we take the ideas of professionals as a basis, we can perform this cladding in the style of:
- classic;
- modern;
- minimalism;
- high tech;
- avant-garde;
- English;
- Empire;
- Arab;
- art deco;
- loft;
- African;
- Biedermeier;
- bionics.
When choosing a style, color and texture are important: in some cases, the interior needs matteness and nobility, some modern trends breathe simplicity, ethnic styles need a touch of vintage.
Transition between tile and laminate in the kitchen
The main problem with arranging a transition seam between tiles and laminate is that you cannot do without a gap. The small gap between the tiles and the slats compensates for the thermal expansion of the floor material. If the joint is filled with concrete or resin, the laminate will begin to deform within a week.
Cork gasket
If the design conditions for kitchen floors do not require the installation of window sills or other overhead elements, you can compensate for the space by using a cork spacer. Basically, the padding material is a long cork strip with wedge-shaped side surfaces.
The cork is installed simultaneously with laying the laminate. After fixing the strip, the tape is securely fixed between the ends of the tile and the laminate.
Despite the fact that the strength of cork is lower than that of plastic and aluminum, today the most expensive brands of laminate are sealed with cork. In addition, cork flooring never squeaks or bends on the base.
Grouting joints
One of the options for sealing the joint involves the use of special types of abrasion-resistant colored silicone. The space between the tiles and the slats is closed with a PVC tube, and the upper part is filled with silicone mass and sanded with a special tool to obtain a smooth surface.
The advantages include the ease of laying the material; silicone effectively prevents liquid from entering the joint between the plates. The disadvantages include the rapid abrasion of soft material.
Sometimes, when installing an L-shaped decorative profile, silicone material is used; when laying slats, the sheathing is laid under the edge of the facing tile. The profile is essentially glued under the slab and fixed to the end of the laminate floor.
Aluminum sill
Of all the options for sealing a butt seam, this is considered the most durable, but it can only be used for straight joints. The decorative strip consists of a cold-drawn blank, the cross-section of which resembles the profile of a mounting mushroom.
On the back side of the rail there is a groove for attaching dowels. To close the seam, it is necessary to wind the required number of dowels into the floor, after which the strip with the dowels laid in the groove is carefully compacted at the junction of the tile and laminate.
The outer surface of the aluminum plank is always covered with a decorative film matching the color of the laminate, so when choosing a profile you need to find out the coating code; it must correspond to the coding indicated on the planks.
If the level of the tile and the tile are different, the joint is covered with a podium profile.
Vinyl sill
Decorative PVC plastic tape is considered the cheapest and simplest material for sealing joints. But of all the options for installing a tie-in, vinyl tape has one important quality - it can be folded along any curved path.
The installation process begins with cutting the joint; the ends of the tiles and planks are cut to the width of the mounting deck laid at the bottom of the joint.
A U-shaped plastic “track” is attached to the concrete base with dowels and dowels. The vinyl tape softens in a container of hot water and is quickly pressed against the laid U-shaped profile. When the plastic cools, the vinyl is held firmly in the seam.
Popular combinations
Here I would like to talk about combination options for different rooms. The most popular such combinations are for the hallway and kitchen.
Hallway
There are not many options on how to combine laminate and tiles in a large or small hallway. This refers to the arrangement of materials. So, the entrance area (where they take off their shoes) is, of course, tiles. Next, where a person walks already in slippers, there is laminate flooring; it would be appropriate in the hallway. Moreover, you can decorate the entrance area of the floor and walls in one color scheme, and the part of the room that follows can be contrasting.
Kitchen
Tiles in the kitchen need to separate the entire area where food is prepared: stove, sink, refrigerator, work surfaces. The remaining areas are quite suitable for covering with laminate. Here, too, you can play with contrasts, thereby clearly demarcating the zones of the room without walls.
DIY installation features
Despite the apparent complexity, most of the finishing work in your home can be done yourself if desired. Laying a combined floor with your own hands is no exception. There are some installation features that you should be familiar with in advance. This will allow you to avoid common mistakes and help you complete the planned amount of work efficiently.
To obtain a high-quality result, you should initially try to bring one part of the floor surface, finished with laminate, and the second, covered with tiles, to the same level. To do this, before you start laying tiles, you need to know exactly which laminate panels will be installed and what the thickness of the substrate will be.
If the difference is small and the tiles are thicker, the existing difference in height can be compensated by using tile adhesive. A layer of sufficient thickness is applied, and then the selected finishing material is applied. Otherwise, self-leveling will be required to level the surface and compensate for differences in height.
When laying laminate flooring, pay special attention to the manufacturer's instructions. It describes the procedure in detail and also indicates the need to compensate for gaps between the wall and the floor surface being laid. At the junction of the laminated panels and tiles, cut off part of the support and film, leaving about 10 cm of the base uncovered. We cut the laminate to size and check the quality of the joint. Remove the outer row and set aside.
We secure the outermost row of laminate flooring with plastic glue, which adheres well to both types of flooring and is sufficiently flexible. Apply the prepared composition onto a base previously cleared of substrate.
We lay a pre-sized row of edges on the applied glue. By laying the laminate, we ensure the formation of the same gap between the tile and the laminate. To achieve the desired result and simplify the work, special devices are used.
After a day, after waiting for the glue to dry completely, the joint can be removed. As a result, a perfectly flat surface is formed between the tile and the laminate.
Fill the space between the tile and laminate with sealant. It is advisable to choose a sealant that is similar to the color of the floor being installed. We ensure high-quality filling of the space between layers.
We level the sealant and use a special device to remove the excess amount. If desired, it can be placed at an angle and form a beautiful bevel in the passage of the laminate to the tile. A rubber spatula is constantly immersed in soapy water to prevent streaks from appearing on the floor surface.
This should be done as often as possible in order to ultimately get a high-quality result.
If you decide to use window sills to decorate the transition, then the work will be done somewhat differently. In this case, there is no need to align the mating surfaces in the same plane. We recommend watching a video that will help you get high-quality results without much effort:
The technique for forming a non-standard joint is presented in the following video:
Large bathroom
A spacious room will provide more opportunities for implementing a variety of design ideas. Here you can experiment with unexpected solutions and color combinations.
In a large bathroom, wall decoration in both white and dark colors will look beneficial. And patterns and large panels will help highlight the necessary accents.
Bright contrast and the use of several colors at the same time would be appropriate here. In this case, it is desirable that the floor is darker than the walls.
However, the color of the floor should be present at least in small quantities in the decoration of the walls of the room. The mosaic cladding will also look beautiful.
Design Tips
The combined option is used by many designers. This is a good opportunity for zoning space. Apartment owners are attracted by the possibility of simplifying the care of the floor surface.
When choosing a material, you should focus on the combination of shape, color scheme, and general stylistic design. In order for dissimilar materials to harmoniously combine with each other, it is worth choosing tiles and laminate of the same color, but in different shades. The difference should be one tone. What will be lighter - laminate or panels is not so important.
For a better combination, it is worth making one part of the decoration more expressive, and leaving the other instead of the background. Some designers combine glossy and matte tiles of different sizes. Laminate is chosen with the simplest possible design for maximum effect.
Hexagonal tiles look elegant and unusual. This is a good opportunity for zoning space. Thanks to the non-standard shape, it is possible to create a single passage along a broken line between two types of floors. In some cases, regular tiles are used, but they vary depending on the installation method. You can choose longitudinal, transverse, diagonal. Arrange in the form of a Christmas tree or in a checkerboard pattern.
The imitation of various materials deserves special attention. If you lay tiles with the texture of fabric, leather, or marble stone, then choosing a darker laminate will add nobility to the floor surface. A good option for a modern kitchen is laminate, complemented by multi-colored honeycomb tiles.
Materials of the same shade allow you to give the interior a laconic look. However, a competent selection of contrasting shades will not make it less harmonious. Some people use a combination of white and beige to soften the atmosphere.
When working on a design, you should pay attention not only to the color scheme, but also to the shape of the line along which the laminate panels adhere to the tiles. She could be:
- straight, curved or rounded shape;
- without a threshold or with a curb;
- at the same or different heights.
When choosing a joint shape, the following rules should be considered:
- the form must fully comply with the chosen style concept. If regular geometric shapes predominate in the interior due to rectangular cabinets and a square table, the transition should be made in a straight line;
- a connection along a wavy line is fully justified if a similar line is present on furniture and the design of other surfaces. A wavy line may be present in the design of a cabinet or ceiling surface;
- The transition along a zigzag line is easier to form if the laminate is offset.
Therefore, the correct selection of design will help to correctly delimit the space in the kitchen, add comfort and help make it more spacious and bright. You should pay attention not only to the color, but also to the texture and method of installation. With this approach, even a small kitchen turns into a large, bright room.
Placement methods
There are several methods for placing laminate flooring on hallway walls. Let's take a closer look at each of them.
Horizontally
By fixing the slabs parallel to the floor, it is possible to visually stretch the room and expand its boundaries. Corridors decorated in this way become more spacious, light and airy; such a solution looks especially impressive if it is reinforced with small inserts of darkened mirrors.
The slats can be placed exactly above each other, or they can be laid in an intricate mosaic - here everything depends only on your personal preferences and the stylistic decision of the decor as a whole. The panels can be the same or have different lengths, but in any case their thickness must be the same, otherwise the pattern will be shifted and the design will lose its decorative effect.
Vertical
Vertical fixation of the slats visually lifts the ceiling, especially when the shade of the boards is combined with the finish of the floor. Moreover, the smaller the ornament on the slab, the more conceptual the entire room looks. It is advisable to choose only one wall opposite the window for vertical design - solar lighting will create stylish accents on it and make it much more catchy.
Vertically located lamellas are most often used for cladding hallways - this room in typical high-rise buildings is small, and thanks to a simple technique this shortcoming is visually compensated.
If you like unconventional solutions in the interior, then try installing laminate diagonally - such a design looks harmonious in both large and small spaces, the main thing is that the slats have the same width.