There are many different housing layouts, and one of the most famous is the alcove apartment. Installing sliding doors in a niche is a good idea, which will help to properly zone the space and separate the available area. In a niche space you can equip a bedroom, dressing room, storage room or any other room if necessary. Installing sliding doors in a niche requires a professional approach, but if you approach the matter with special responsibility, you can do everything yourself. Next, read about how to install a compartment door in a doorway.
Sliding wardrobe doors in a niche: as easy as shelling pears
And most of the time, they are wrong.
Sometimes friends offer me to pay for the installation of sliding doors, which should be located in a niche (the filling of which they made themselves). And with all the desire to earn money (and this desire, oddly enough, is always present), somehow the hand does not rise...
The fact is that this procedure is so elementary that the most that such “customers” can use is advice, or, in extreme cases (if they don’t have a tool), help, which can then be “washed” with several liters of beer with fish (although doctors say that it is harmful - sometimes you can eat it, it’s very tasty...).
All these steps are quite simple and straightforward.
That is, you first need to prepare a place for installation, measure its dimensions, order sliding doors, and install them.
They are also very easy to install.
First, the upper guide is attached to the ceiling (holes are made in it through which it is mounted into the ceiling using fasteners).
Naturally, if the ceiling is suspended, nothing will work. It should at least be plasterboard (since the top guide does not experience much load and is intended only to hold the sliding doors in a vertical position). It is attached to such a ceiling using special “butterfly” fasteners.
And in the case of a suspended ceiling, you need to make a gap for the sliding system (as shown in the picture below).
In this position, by moving the lower guide back and forth, there is a position where the facades will be in a strictly vertical position in space.
Through pre-drilled holes in the lower guide, marks are made in the floor, the facades and the lower guide are removed.
Holes are drilled in the floor for choppers for self-tapping screws, thanks to which it is then secured.
At the end, between the fixed guides, the facades are installed.
So, if you need to close the opening with sliding doors, do not contact specialists (if your hands are “in the right place”), you will simply throw money down the drain, since, naturally, no one will do this for beer and fish.
Source
Curtain
The simplest version of a secret door, which you can make with your own hands, involves the banal use of curtains. Straight fabrics or drapery can simultaneously attract attention and, if designed correctly, disguise the passage to another room.
In order to secure the curtain you need to use a curtain rod. This can be a regular window version on brackets or hidden, for example, sewn into a suspended ceiling. It is best to choose curtains of the same design as the window ones. The ideal option for such disguise is to place the door under the curtain opposite the window. Then such a design looks quite organic. It is also a good idea to locate the entrance in a niche or an inconspicuous corner of the room. Even a draped bright curtain will not attract much attention. In this way, you can separate an area for work, rest, study, or hide the entrance to the pantry or dressing room.
The easiest way to hide a door is to use curtains
Sash design
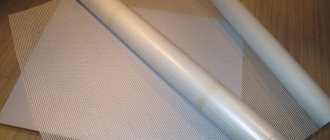
The wardrobe door leaf consists of profiles:
These profiles are placed between parts of the door leaf, but you can do without them - if the door is solid and not composite
All this together looks like in the photo. The door material you choose is inserted into this frame, into the grooves. It can be glass, mirror, chipboard and other materials.
Sash design without filling
Separating profiles are optional. They are needed if you assemble the sashes from different materials or you simply like them this way better. The maximum thickness of the filling material is 10 mm, the minimum is 4 mm. Thinner ones - glass, plastic, mirror - are inserted through a sealing gasket.
In order for the sash to be able to move, rollers are installed on it - at the top and bottom. The lower rollers bear the entire weight of the door, and the upper rollers stabilize the vertical position of the leaf, preventing it from deviating.
Rollers for wardrobe doors
The rollers are attached to the side profiles using special fasteners.
Painting
Another option, which you can also do yourself, involves using a work of art as a disguise for the door leaf. We are talking about the classic version of disguising a door behind a picture. To a certain extent, this method is similar to the previous option with a mirror. The picture will also not indicate that there is a passage behind it, and the frame will hide the gaps and joints.
You don't have to hang a Renaissance-style painting on your door, as it usually looks in movies. Photo wallpaper or some modern composition, abstraction or family photo in large format are perfect for a modern interior.
Using a picture, you can easily disguise the door
In order to set up such a disguise, you don’t need to buy an expensive, huge painting. Just choose a suitable image and stick it on the door like a photo wallpaper. For the frame, use wood, plastic, moldings or other materials.
Guides for sliding doors
As you understand, the sash is not everything. Guides are needed along which these very doors will move. There are two of them - upper and lower. In appearance they differ significantly.
The top guide for the wardrobe door The bottom guide is made of metal
When installing the door, first insert it tightly into the upper guide, lift the sash all the way and place the lower rollers in the corresponding slot. The entire structure is shown in the following photo.
Preparatory work
First, the rough opening is cleaned and leveling is performed. It is necessary to carry out such work for adjacent walls. This is important, as uneven surfaces can cause the sash to malfunction. Distortions or other unforeseen situations may occur.
After completing this process, you can begin installing the structure. Initially, we mark the places for the guides, and then fasten them there using self-tapping screws. The lower guide mechanism should be twice as long as the blade.
Guides for the structure
Then we fix the rollers to the canvas at the bottom with self-tapping screws and install them on the guide. After this, limiters with rubber shock absorbers are installed on the upper guide on both sides. They are important because they prevent the doors from opening arbitrarily. Cover the guide behind a decorative strip, which is attached with nails to the wall surface, and install plugs.
The last step is installing the doors. Tilt the canvas slightly and place it under the panel, installing the sliders in the guides, first up and then down. If the doors move smoothly along both guides, then this is a high-quality installation.
Size calculation
When assembling a sliding wardrobe door yourself, there are two options. The first is to measure the opening, think about how many doors you want to have and contact a door manufacturing company with this information. Just make sure they sell the parts without paying for assembly. The manager himself will count all the necessary materials for you, give you the dimensions and announce the amount. It's simple. But you will have to purchase everything from this office, i.e. choose from what is available.
The second way is to calculate everything yourself and look for the necessary components from different companies. It’s more complicated and more expensive, but there’s a wider choice. For those who do not like simple paths, we will describe the calculation of the components.
Doors
Calculate the width of the doors so that when closed, only one handle is visible, but it should not cover the door leaf itself. For a sliding door with two leaves, you calculate it like this: measure the width of the opening, add the width of the profile and divide in half. This will be the width of the sash.
Photo report on the assembly
First, all profiles are cut exactly to the calculated dimensions. The accuracy must be perfect. The cut is strictly perpendicular, at 90°. Holes are drilled in the handle profiles for installing rollers and fasteners.
The holes are made through two diameters. The exact size depends on the dimensions of the purchased fastener, but basically there are two sizes: 4 mm and 6 mm, as well as 6 mm and 10 mm.
How to drill holes
One such hole is made at the top, the center of which is located at a distance of 7 mm from the edge of the profile, at the bottom there are two holes - the first at a distance of 7 mm from the edge, the second at a distance of 42 mm from the profile cut.
Holes at the bottom of the side profiles
During assembly, all parts of the filling are assembled first. First, if there is glass or a mirror, sealing rubber is installed around the perimeter. It is simply put on the end of the part by pressing a finger. The seal is cut off along the edges and placed end to end, but without overlapping on the next side.
Seal on the mirror
A protective film is glued to the back of the mirrors. You can use regular self-adhesive. This film will prevent fragments from scattering if the mirror breaks.
If the sash is composite, we assemble it using connecting profiles. The filling parts are simply inserted with force into the profile. Sometimes considerable effort may be required. You can tap the end with the back of your hand or use a rubber mallet for this.
Simply insert the filling parts into the grooves of the profile and tap on the end
When the sash is assembled, the corresponding profiles are installed at the top and bottom using the same principle.
Top profile installed
Then it’s time to install the side handle profiles. Everything is the same: push the filling into the groove, make sure that it fits all the way along the entire length without distortion. When the frame is assembled, it is necessary to tighten it with fasteners. Let's start from the top. Take the fasteners and insert them into the previously drilled hole. If the distance was measured accurately, the screw fits into the groove of the upper cross member.
If drilled correctly
Tighten the connection using a hex wrench. Slightly not tightening it all the way, insert the upper rollers between the screw head and the profile jumper, then tighten the screw.
Insert the upper rollers
We repeat the same operation on the other side. Then we move down. Here the fasteners are installed in the upper hole. Just tighten it all the way. We repeat similarly on the other side.
Install the fasteners from below
Next, install the lower rollers. We insert the thrust plate into the groove and press it.
Installing the lower roller - insert the plate into the profile
We press the spring, tucking the roller body inside. We insert a screw into the hole, trying to get into the socket, and tighten it with a hexagon. You may need it in a different size - slightly smaller than the others - since this screw is usually thinner and longer.
Press the roller, insert the screw
There is no need to tighten it all the way. So that it goes into the plate half a centimeter or so. Then, when installing the door and adjusting its travel, this screw adjusts the position of the sash - the angle is raised or lowered.
Tighten the screw that fixes the roller
If you press the roller wheel, it will go into the housing, then return due to the elasticity of the spring. This simple mechanism ensures smooth movement of the sliding wardrobe door.
Having assembled all the sashes, we proceed to installing the guides. They must be located strictly one below the other, even without deviations of a millimeter. Use a plumb line or a laser level (read how to use a laser level here).
First screw on the top guide. It is attached either to the ceiling or to the top of the cabinet. The distance from the shelves is at least 100 mm, otherwise the doors will touch shelves, things, and hangers.
Screw on the top guide
We insert bumper springs into the grooves in the lower guide from the sides. They will limit the movement of the door. The number of springs is equal to the number of leaves; they are installed at both ends.
Door stoppers Insert travel limiter springs
If you don’t have a laser level, so you don’t have to worry about plumb lines, you can start by simply laying the bottom guide without fixing it yet. Then install one blade, placing its upper rollers at the top and installing the lower ones in the desired groove. This way the doors will connect the upper and lower guides.
Having aligned the sash vertically, automatically align the bottom guide
By aligning the canvas strictly vertically, you will automatically align the lower guide. All that remains is to screw it on. Just be careful that the doors do not move.
The last thing left to do is to glue the Schlegel on the sides. This is a fleecy self-adhesive strip that softens the impact of the sash on the walls of the cabinet (or simply on the walls, if the cabinet is frameless).
Outskirts of Ashina
- Where to find: Headless Cave
- Where to go: Demon Bell at Senpo Temple
Although all such passages are marked with silhouettes of people on the walls, finding them yourself can be problematic unless you carefully examine all the walls in the game. So, after killing the mini-boss named the Giant in the Stocks, head to the next courtyard, in which a hostile warlord and several ordinary opponents are wandering.
Now use the large doors located on the right side. You'll notice an ancient shrine with a note warning you about a headless warrior. Behind the temple you will see a tree that you can grapple to. Climb it and walk forward until you reach the Headless mini-boss.
It is unlikely that you will be able to kill this enemy when you first explore the region, so just go around him and go along the wall. This way you will find a small tunnel that leads to the required door. This route will allow you to reach Senpo Temple much earlier. However, this area is still closed from the main part of the location, in which you can unlock the pure white pinwheel that Kotaro needs.
Deal with the centipede and use the Carver's idol. There is also a Demon Bell here, which may be useful to you in the future.
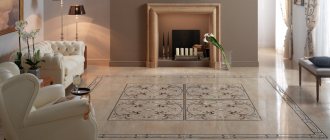
Arrangement of compartment doors in a niche
Often, when designing apartments or houses, small spaces appear in the form of a niche. In most cases, such recesses are simply empty, since placing any pieces of furniture in them does not seem convenient. In this case, an excellent solution is to install a compartment door in a niche to create, depending on the location, a full-fledged enclosed dressing room, bookcase or kitchen cabinet.
Preparation for installation
The main convenience of the niche and the main advantage is the presence of all the walls necessary to create a cabinet. Thus, the only need arises for the manufacture of doors and their installation. The only disadvantage of this solution is the systematic non-compliance with proportions and the curvature of the walls in the niches.
Based on this, it will not be possible to simply install a sliding door into a niche; in almost all cases, significant distortions will arise. The door leaf will either have a huge gap at the junction with the wall, or it will begin to open spontaneously. Eliminating such defects by simply adjusting the sliding system will be very problematic.
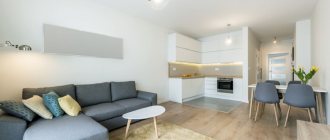
Application in the interior
A secret door in the interior has both direct and decorative purposes. Those who want to hide something from outsiders install such structures in secret rooms where antiques, art objects, weapons are stored, they hide rooms with safes, guarded rooms with jewelry. A barrier masking the passage will protect property in the event of illegal entry into a house or apartment.
In modern houses and apartments, such door leaves are installed to maintain a single interior style. An inconspicuous passage that merges with the wall will help visually expand the space of a small room. You can make invisible passages to dressing rooms, storage rooms, and protect the office from accidental “infiltration” of guests. An inconspicuous secret door can also be used to create a secret children's playroom.
Elimination of irregularities
For this reason, for proper installation of the sliding system, it is recommended to level the walls. It is best to do this during the process of renovating the room, since subsequent decorative finishing will easily hide all the shortcomings.
If it is impossible or impractical to carry out full repair work, there is another option. It is enough to secure the leveling bars of laminated chipboard to the wall surfaces where the niche doors will be installed. Such bars 10-15 cm wide, called feathers, act as false walls. Thanks to them, all existing surface irregularities are smoothed out.
To ensure the reliability of the structure, the installation of feathers is carried out in the most protruding areas. If necessary, such beams can be mounted on the surface of the floor and ceiling. Often such measures are sufficient to create a suitable opening.
If there is a significant distortion with the formation of gaps of more than 2 cm, it is necessary to align the installed beams using a grinding machine. Checking the correctness of the alignment procedure is carried out using a building level.
Visual correction of niche irregularities
If there is no grinding machine or it is impossible to carry out all the necessary procedures, there are ways to visually correct niche distortions. These include:
It is necessary to install the most even sliding door leaf at the front of the structure. Thanks to this, the curvature of the second canvas will become visually less noticeable.
Types of installed doors
In the process of making a door, almost any type of material can be used to cover the resulting niche in the wall. This can be either natural wood and wood-containing materials, or glass and plastic. In addition, it is possible to use a combination of materials.
However, it should be taken into account that the use of glass implies some risk of scattering of fragments in the event of damage to the product. To avoid such troubles, the glass inserts of the doors are covered with a special protective protective film. So, in case of damage, all fragments will be held on it.
The door itself does not require any special production techniques or methods. In fact, in most cases, the doors are simple dimensional sheets with a decorative and protective coating. Structures can weigh up to 160 kg. A special feature of the products is the use of a special set of fittings and fasteners, thanks to which sliding doors not only have a complete appearance, but are also easily installed in a niche.
Features of delivery of structures for concealed installation
The aluminum box, for hidden installation, is a welded U-shaped structure, with technical grooves and milling for fittings (hinges, lock).
The material and installation method of the door frame differs from the classic, wooden or MDF frame. Aluminum cannot be cut on site or connected rigidly, therefore, precisely to ensure the geometry of the structure and its rigidity, transportation and installation takes place in assembled form. With pre-installed hinges, locking mechanism, seals.
In the case of pre-installation, the door frame is delivered before the leaves, but still in a U-shape, according to the dimensions specified in the specification.
External view of the supply of hidden doors for further finishing
Fittings elements
All fittings for installing sliding doors for a niche are conventionally divided into mandatory and optional elements. Optional parts include various components that expand the functionality of the sliding system. These include:
The list of required elements installed on interior sliding doors in a niche contains quite a lot of various details. These include the side handle posts, which have several types of design, guide profiles of the upper and lower orientation, as well as door frames.
Roller systems of any of the available types can be installed as moving elements:
For long-term and effective use of the entire structure, silicone seals and tape-staples must be installed. The main functions of these products are to soften vibrations and shocks when using the structure. In addition, seals help protect the internal contents of the resulting cabinet from dust accumulation.
Installation of doors in a niche
After all possible alignment procedures have been carried out, the door leaf is installed. Due to some fragility of the products, their installation must be done very carefully. Sliding doors assembled according to the compartment type have two types of guides: ceiling and floor. In this case, the floor is the main one, holding the entire weight of the canvases. The upper guide is designed for an even vertical position of the door leaf in relation to the floor and adjacent walls. However, despite this, installing a ceiling guide is only possible on a hard, not suspended ceiling.
The procedure for installing the top rail consists of drilling mounting holes for screws or self-tapping bolts. The holes are prepared strictly on one conventional line and at an intermediate interval of 45-60 cm. After preparing the holes for installation, the guide is installed.
The lower guide is fixed to the floor in the same way. The installation procedure is carried out only with the top rail carefully prepared and adjusted. After installing the guides, the canvas is inserted into the grooves using carriages and they are finally fixed to the surface.
In most cases, roller mechanisms are equipped with a special rubberized coating. This ensures not only the absence of noise when using the structure, but also allows for a long period of operation without lubrication of the wheel mechanisms of the structure.
Source
Photo of a living room with a secret door
Sources
- https://design-homes.ru/idei-dlya-doma/skrytye-dveri-v-interere
- https://www.ivd.ru/dizajn-i-dekor/dekorirovanie/potajnye-dveri-za-i-protiv-ispolzovania-v-interere-28831
- https://FurniLux.ru/dizajn/skrytye-dveri-v-interere.html
- https://womanadvice.ru/skrytye-dveri-idei-dlya-oformleniya-stilnyh-komnat
- https://sdelaidver.com/mezhkomnatnye/dveri-nevidimki-v-interere-638
- https://happymodern.ru/dveri-skrytogo-montazha-foto/
- https://oboiman.ru/inside/skrytaa-dver-sovremennoe-dizajnerskoe-resenie-45-foto-mezkomnatnye-modeli-nevidimki-s-korobkoj-v-stene-varianty-pod-pokrasku-s-aluminievym-korobom. html
- https://www.interior-design.biz/skrytye-mezhkomnatnye-dveri-bez-nalichnikov-v-interyere
- https://secretdoors.ru/stilnye-dveri-invizibl-dlja-interera-v-jeko-stile/
- https://www.InMyRoom.ru/posts/18431-potajnye-dveri-v-interere-8-idej
- https://ODveryah.ru/vybor/skrytye-dveri
- https://RoomPlan.ru/dekorirovanie/dveri-skrytogo-montazha/
- https://dizajn-gostinoj.ru/gostinaya-s-potajnoj-dveryu/
How to make sliding doors hidden in the wall
Small apartments are often characterized by a lack of free space. In such conditions, even opening doors create discomfort, albeit minimal. Sliding systems partially solve problems, but furniture accounting will be considered a mandatory requirement. The recoil cassette design becomes the optimal choice. The partition allows installation in different conditions.
Single-leaf or double-leaf sliding door, which is better?
Double-leaf designs have the advantages of a single-leaf design, but at the same time provide free space. Sometimes the canvases are large, so space is also needed. If compactness is important, it is better to give preference to options with one leaf, less thickness. Folding doors can also contain one leaf or more. “Accordions” are an economical option that gives the feeling that there are no doors. There are pocket doors and sliding doors, each type with features.
What should be the thickness of the interior wall to install a sliding door?
The purpose, function and model of the door directly determine what the dimensions of the product will be in a particular case. The material of sliding interior doors hidden in the wall also plays a role:
The more massive the compartment door leaves in the wall, the higher their dimensions, including thickness. Sturdy roll-out mechanisms and extra space will be useful in this case. Technically, the thickness of the sashes can be increased, but such solutions are not always practical. After all, the structure will also have increased weight. The standard thickness of the walls themselves is from 130 to 160 mm. 15 millimeters is the minimum for internal clearance. Special boxes are installed in the opening in the wall, which are used for further installation. Subsequent finishing requires the presence of plasterboard sheathing, as stated in the standard scheme and device.
Ready-made boxes and pencil cases are designed for a thickness of at least 45 mm, including those from European manufacturers. They are often equipped with fittings and complemented with various decorations. Characterized by the presence of a spatial gap and the ability to accept door leaves no more than 60 mm. The sliding door leaf is in a pencil case inside the wall, optimal when going into the wall, when the structures are of sufficient thickness. Otherwise, you won’t be able to do without guides on the outside. 2.3 meters is the height, and 55 mm is the thickness of the doors, which are installed using ready-made pencil cases created in a factory. The development of individual projects involves focusing on the dimensions of the doors and the materials of the door leaves.
The more massive the compartment door leaves in the wall, the higher their dimensions, including thickness.
Camouflage options
In order to hide the sheet, a variety of design elements should be used.
- As a rule, this is painting or wallpapering.
- A drawing will look no less impressive in this area.
- Tiles can also be used.
Idea! It is not uncommon for doors to be disguised as other elements, most often these are cabinet doors, a mirror or something else.
14
The main feature of rooms with secret doors is to install it so that it does not stand out from the overall design. In other words, it is necessary to correctly fit such an element into the concept of the room. Today, there are a number of well-known companies that are developing these devices. They use imitation of a wide variety of means.
Disguised as a wall or cabinet
One of the most popular ways to make invisible doors is to disguise the panel with the frame as a wall. This option looks the most natural and minimalistic. If you want to create an interior in a minimalist, hi-tech or modern style, then this method is perfect for you.
How to disguise a door as a wall:
- The easiest way to disguise a door is to cover it with wallpaper. You must use the same wallpaper that you used to decorate the walls. If canvases with large patterns are used for such finishing, they must be matched to the pattern on the walls.
- You can hide the door by painting it. This technique is appropriate if paint was also used to decorate the walls.
- Interior doors can be disguised with panels decorated to match the color of the walls.
- If you use colored inserts in the interior, then the door can be decorated to match one of them. In this case, the junction of the door and the wall will be almost invisible.
- If you decorate the door with tiles, then thanks to the seams between the ceramic elements, the door leaf will be almost impossible to distinguish from a monolithic wall. This design is best suited for the bathroom. The tile must be chosen in such a way that it matches the style of the interior.
When disguising the door as a wall, you should think carefully about how it can be easily opened. Sliding doors can be installed even without a handle, and for opening doors, mortise handles or a special mechanism are suitable.
Another interesting option with which you can hide the door to the pantry or to any other room is to install a cabinet on the door leaf. This option was most often used in ancient locks, and in order to open such a mechanism, it was necessary to turn one of the books. Nowadays it is not necessary to complicate the design so much; you can order a standard opening door made in the shape of a cabinet.
All decorative elements located in such a cabinet must be attached to the shelves. For example, you can use mock-ups of books instead of actual literature.
A door decorated to look like a wall or cabinet is most invisible in the overall interior of the room. Such options are the most difficult to implement, but they look the same.
Exclusive invisible glass doors
In the interior of this bedroom, the doors are made of glass and repeat the design of other glass inserts in the wall decoration. They are quite distinguishable against the background of the wall and look very impressive thanks to this design move.
Our designers made two such doors in this interior (to the dressing room and to the corridor), which are almost indistinguishable from each other.
Hidden door to the dressing room from the bedroom
The modern style allows our designers to create invisible glossy doors that blend in with the glossy panels on the walls. Here the door to the dressing room, made in a colorful black gloss, is almost invisible!
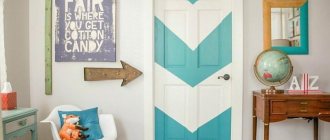
Secret interior door with panels
A secret door like this one in a child's bedroom with a mural of a fairytale forest and waterfall seems like something magical. You can only find the door using the handle!
Hidden doors with transom
One of our specialties is creating unique, invisible doors for your stylish interiors. Most people order hidden doors to match the color of the walls to achieve the effect of absolute invisibility. This design solution has a lot of advantages: it helps to hide unnecessary openings, visually increases the space, and so on. In addition, “invisible” ones are perfect for any interior style.
This project is different in that we created stylish doors not to match the color of the walls, but, on the contrary, that stand out in contrast against the background of the walls. To enhance the effect, a transom was installed above each canvas, right up to the ceiling. Very impressive and stylish!
Let's look at photos from this project:
Please note that here some canvases are painted with black matte enamel on one side, and either white enamel or veneer on the other. For example, door blocks installed in bathrooms, in the dressing room, in the master bedroom.
Selecting the color of the walls of interior doors for painting
In this version, the doors are simply matched to the color of the walls and wardrobe facades. In addition, white color itself attracts less attention than all others.
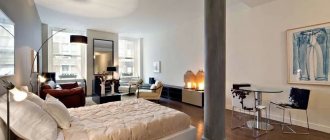
Invisible glossy doors for the bedroom
In the interior of this children's bedroom for a girl, we found an amazingly beautiful and comprehensive approach to wall decoration. Here, behind glossy pale turquoise panels, there are wardrobe closets and doors to the bathroom and hallway. For a child's room, such a bright option will be very attractive. In addition, you, of course, can choose any shade and even the design of the panels with panels.
Hidden doors under tiles
The entrance to the bathroom or kitchen can be tiled. A similar solution is often used for niches with household chemicals and plumbing departments. But a hidden door in the bathroom can be tiled and even complemented with mosaics.
This unusual and visually attractive design idea will transform an ordinary bathroom into something unique. You can choose large or small tiles - it all depends on the design of the walls and the preferences of the owner.
Glass doors for dressing room
In this bedroom, glass doors are part of a wardrobe box that stands in the corner of the room. Translucent glass is beautifully illuminated in different colors and looks very modern.
Door in the rack
They look like regular shelves for books and a sound system, but one of the shelves is actually a door handle.
Decor with moldings
An interesting way to hide a door in a hallway is to decorate it with moldings. The door practically merges with the wall, only the trim is visible to match the baseboard.
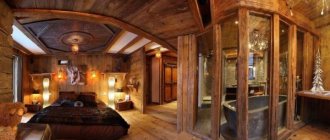
Wood paneling
The owner of the apartment wanted to create a secret dressing room. The designers covered the wall and door in the bedroom with wooden panels with colored chamfers. Now the entrance to the dressing room is only given by the handle.
Hidden doors to the bathroom and toilet
A bathroom is rarely spacious, so a secret entrance will help eliminate the feeling of cramping and correct the disproportion of the walls. Moreover, hidden doors in the interior can be used usefully - for example, as a rack for storing towels or household chemicals. You can even decorate the shelves with indoor plants.
To protect the canvas from constant moisture, it should be treated with a primer. The finishing touch can be tiles, moisture-resistant lining, paint, plaster or even a mirror. It all depends on the preferences of the owner. It is only important to choose a material that is resistant to constant indoor humidity.
Using Large Mirrors
A good way to decorate hidden doors in the interior is with mirror overlays. This option is especially in demand in corridors or other rooms.
The implementation of the method is very simple: a full-length mirror is glued onto a base made of MDF or chipboard, and the structure is further strengthened with an aluminum frame. You can install a decorative frame along the contour of the canvas, which will simultaneously hide the alignment line with the wall and serve as a handle.
A mirror will visually increase the space, which is important for owners of small narrow corridors.
Let's use a picture
Another simple way to hide the entrance to another room is to hang a picture on it. However, we are not necessarily talking about a full-fledged work of art. You can use photo wallpaper, abstraction or any other image pasted onto the door leaf and framed. As with the mirror, the frame will hide the gap and serve as a handle.
Such an invisible door will look organic in the interior of a living room or office, especially if there are other paintings hanging nearby.
An original option would be to decorate the door leaf with many family photographs hung all over the wall, including on the surface of the door.
Door under wallpaper
To hide the door in the living room, the designer covered the entire wall with wallpaper with an active print - and the door itself too. A small pattern distracts attention not only from the outline of the door, but even from the door handle.
In the kitchen
In small kitchens, you want to unload as much as possible and leave the maximum amount of free space. A secret interior door will help to expand the space a little, even visually.
How to install doors with a sliding mechanism into a wall with your own hands
First, determine the width of the doorway. The parameter determines the characteristics of the entire structure. The type of wall must also be taken into account. The recommendations of specialists are studied separately. The drawing assumes such an element as sound insulation. For strengthening, special bars are used if the frame is made of an inexpensive thin profile. And when the thickness is up to 0.5mm. Otherwise, the movement of the blades leads to vibrations, then the guide element simply falls out of the structure. The product will not move in correctly.
During the installation process, the doorway is temporarily fixed with a spacer tie. This helps prevent skewing and disruption of the vertical position of the jambs. A steel profile or beam is used to independently produce such an element. The width of the pencil case must be determined as accurately as possible, otherwise the door structure will be impossible to install.
During the installation process, the doorway is temporarily fixed with a spacer tie.
There are other tips that accompany the retractable mechanism and its installation:
It will be difficult to close the canvas if it extends completely beyond the niche when open. You can't do without additional devices.
It is important to decide on the extreme position. Ideal for treating floor surfaces; preliminary preparation is required. Technological nuances are considered before the lining of the pencil case begins. Drywall also requires this.
It will be difficult to close the canvas if it extends completely beyond the niche when open.
Stages of installing a sliding door in a pencil case
Equipment and skill are needed at any stage of construction installation. First, it is recommended to study the manual and prepare the tools, and then take action.
The instructions are not complicated:
After completing the work, there must be a gap of at least 5 mm for the sliding mechanism to work correctly.
The technology for installing cassette doors seems complicated only at first glance. But you shouldn’t take this issue too simply; such behavior will not lead to anything good. The designs of such doors will not allow noise and odors to enter the room. Closers add comfort during operation. This solution is especially convenient for residents of city apartments.
Preparing and painting the canvas
At your request, hidden doors, or rather their leaves, can be supplied without finishing, for further finishing. Whether this is so is up to you to decide at the time of placing your order. If you decide to paint the doors, or apply decorative plaster, or glue wallpaper, or cover the surface with wall panels, order the doors primed for further finishing.
The primer will protect the doors from weather conditions and also improve the contact of the paint with the surface of the door.
Preparatory work
You should start preparing for finishing work by removing the top layer of primer. Take fine-grain sandpaper 160 - 240 microns, without skipping places, we process the door leaf well. First remove it from the hinges if you installed it with canvas, this will make it easier for you to prepare and paint. Don't worry, they are easy to hang and adjust.
Let's start painting
It is best to paint doors with a roller, squeezing it well before applying paint. Treat one side first, then the other, then the ends of the door leaf.
It is a normal situation when after the first coat of paint the color differs from the desired one. Let it dry a little, apply a second coat.
The materials that make up the door leaf are made of wood or MDF; they tend to absorb moisture unevenly, so we paint the doors in one approach. First, cover completely with the first layer, then, after complete drying, with the second.
Important! The lock and hinges are not painted. Leave them in their original finish.
Preparation process, painting of the hidden door panel