Table tops are made from different materials.
Wooden
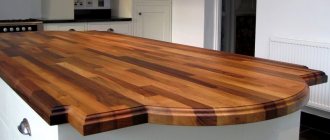
Wooden table tops have been very popular for a long time. Wood is one of the most commonly used materials in furniture production, so wooden tabletops will fit into the interior.
However, wood is a very demanding material. Wood quickly loses its original appearance if, for example, you place a hot container on the countertop or do not use a cutting board when cutting vegetables or meat. In addition, the slightest flaws and defects are visible on wooden surfaces, which also reduces the service life of the product.
Laminated
A laminated countertop can be represented by two types of materials: chipboard (chipboard) and finely dispersed fraction (MDF). The laminate is glued to these surfaces.
Among the advantages of laminate are its low cost, wide selection of colors, and ease of maintenance. But there are also disadvantages: exposure to high temperatures (through hot dishes) has a detrimental effect on the laminated coating, and the same applies to the interaction of the laminate with sharp cutting objects.
From stone
Stone countertops are made primarily from marble and granite. If marble is a more beautiful and luxurious material, then granite is characterized by durability and resistance to various types of influences. Stone is a safe and durable material that is practically resistant to high temperatures and cutting objects. It is for these reasons that stone countertops remain in high demand, despite their high cost. The only disadvantage is the weight of the product, which requires additional equipment during installation.
Metal
Metal countertops are gaining popularity every day, this can be explained by the following reasons: low cost, ease of use and care. Metal surfaces are resistant to high temperatures, there are no traces of water left on them, they do not deteriorate over time, and they are easy and simple to care for. But like many other materials, metal is easily damaged by sharp objects, which are so often used when cooking in the kitchen.
Glass
Glass countertops have become popular relatively recently. They have many positive properties. Firstly, these are their aesthetic qualities. Glass will not only fit well into any interior style, but can even visually enlarge the space due to its reflective properties. In addition, glass is an environmentally friendly, durable material that is easy to care for. Among the disadvantages of glass countertops are fragility and high cost.
Advantages and nuances of using the design
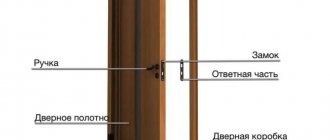
A folding table with wall mounting is a tabletop fixed with a special triangular or rectangular fastener. When closed, this design looks like a small bar. When unfolded, it looks like a regular dining table extending from the wall.
This model of furniture would be quite appropriate in the kitchen or on the balcony. Wall mount tables are popular due to the following advantages:
- Compactness. Such products, when folded, do not occupy a large area.
- Functionality. When unfolded, wall-mounted folding tables perform all the functions of stationary products.
- Stylish appearance. The models fit organically into almost any interior.
- Ease of installation. Folding tables with wall mounting are delivered to the buyer ready-made with full instructions. The owner only has to fix the product on a vertical surface, which does not require special skills.
A transforming table is more relevant for a kitchen where it is not possible to install stationary models, since it folds up and saves usable space. You can install a folding table in the kitchen on any part of the wall; the main requirement is that nothing prevents the product from folding and unfolding freely.
Transformable furniture will not hold tightly to plasterboard structures.
What it is?
Due to the relatively high cost, wall-hung kitchens cannot be found in every furniture showroom. Therefore, floating furniture for many still remains a mystery, causing a number of doubts. In fact, everything is quite simple.
The effect of a floating kitchen is achieved by eliminating the lower supports. The lower modules are hung on the wall in the same way as the upper kitchen cabinets or shelves. Naturally, both the fastenings and the wall on which such modules are installed must be sufficiently strong and reliable.
Hanging kitchen without handles. MDF kitchen with lighting. With electric drive SERVO-DRIVE Servo Drive Blum.
In some cases, manufacturers are cunning, passing off something else as floating furniture. They simulate the soaring effect in two ways:
- cabinets and tables are installed on transparent supports made of glass or durable plastic, which creates the effect of not being in contact with the floor;
- the legs are pushed further under the cabinets, so that from the height of an ordinary person they are invisible.
For authenticity, the lower part of the pseudo-floating kitchen is illuminated with an LED strip. The effect is quite convincing, but the operating features of a real wall-hung kitchen and its imitation are still different.
It is worth noting that the designers did not focus their idea only on kitchen units. Floating tables, beds and other parts of furniture sets quickly occupied their niche among other style solutions.
Mounting features
How you should attach the countertop to your kitchen base cabinets depends directly on the material you choose. Thus, for products made of plastic, stainless steel and laminated chipboard panels, the installation flow chart is almost identical:
- place the panel on the lower pedestals and check with a building level for any distortions;
- mark the proposed locations for self-tapping screws;
- treat the ends of the tabletop with silicone and fix an aluminum strip on them to protect them from moisture (for metal options this advice is no longer relevant);
- drill 2 holes in the upper crossbars of the kitchen cabinets - in the front and back, this must be done for each module of your set;
- fastening is carried out with ordinary self-tapping screws, at the location of the sink - with special triangular plastic fasteners with 2 self-tapping screws, and the joint is closed with a plug.
Requirements
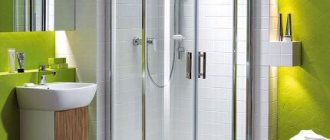
The bathroom has high humidity and changing air temperatures. This should be especially taken into account when selecting tabletop material.
If we talk about design requirements, here they are:
- Moisture resistant.
- Corrosion resistance.
- Chemical neutrality.
- Convenience, functionality.
- Beautiful view.
Design features largely determine ease of use. All possible options can be divided into 2 groups:
- One-piece designs, when the sink and countertop are a single unit. The material used is usually natural and artificial stone.
Important! The advantages include aesthetic appearance and hygiene. There is simply nowhere for dirt to accumulate. This design looks great in a large, beautifully decorated bathroom. Disadvantages include low functionality and excessive bulkiness.
- Countertops for mortise or overhead sinks. They have a sectional structure. As a rule, they have a compartment for detergent. Some designs provide a separate sector for the washing machine. Installing and servicing such a device is quite simple.
Comments: 17
- Like
- Save
ryllova
I just don’t want what you sent. That's why I turned to the experts
- Like
- Save
Dmitry Evgenievich
Just attach the tabletop to the wall, in the corner. To do this, even at the stage of wall construction, it was necessary to provide fastening elements. Otherwise, you won’t be able to do what you want.
- Like
- Save
ryllova
It's not too late for us to make these fasteners in the wall. It was just laid out to us. Yes, we planned to mount it in the wall and on the corner, where it would be adjacent to the cabinet wall. I'm worried about the other corner that will hang up, near the bathtub. What fasteners do you recommend? It seems to me that the letter G is a little dangerous, the edge will be hanging
- Like
- Save
SOS REPAIR
- Like
- Save
ryllova
Thank you very much for the recommendations. Some are just a mystery to me: “do it on the floor, but make the very bottom mirrored and a little ruined.” I can’t even imagine what it is and how it is :)
Do you have an example?
And about the lighter analogue. What did you mean? What could be lighter and more like a stone?
- Like | 1
- Save
Galina
- Like
- Save
SOS REPAIR
- Like
- Save
davidenko_olga_interiors
- Like
- Save
ryllova
Thanks for the advice. But in your example, the wall in which the frame is embedded is most likely concrete. In my case, both the side wall and the back are made of tongue-and-groove slabs :(
- Like
- Save
Evgeny S
In 1 comment they wrote to you the best solution to your problem, contact the countertop manufacturer so that they issue a technical specification for the installation of embedded parts. Or so that they themselves prepare a welded structure, for example, under a tabletop.
- Like | 1
- Save
solid wood doors
In order for the tabletop to hang in the air, a frame is made under it (chipboard, wood, if the thin option is only iron or stainless steel if the budget allows and an open design is required)
The frame is attached to the wall with anchors, screws, or better yet, a chemical anchor.
It is important that the surface is reinforced with a sheet of chipboard or plywood (they mainly make air - they save money).
The stone is very afraid of impacts when there is air under it, the overlaps on the sides are also not large (up to 30mm with a thickness of 30mm) if more, it is reinforcement during the manufacture of the tabletop.
Fastening to the frame - on a 50*50mm mesh made of silicone (holds firmly and can be easily cut if necessary.
It is better to polish the lower edge (protruding beyond the frame) during production - better aesthetics.
Connecting to the wall - silicone with a continuous 1mm seam on the slab (remove excess immediately) - under no circumstances should we make a silicone side - it turns black over time.
Let's sum it up
So, we found out how to join a wooden tabletop. As you can see, you can perform this operation yourself. However, no matter what kind of countertop connection is used (with or without strip), it is important to take measures for waterproofing. No moisture should be allowed to penetrate between the ends. Otherwise, the service life of such a structure will be short. By connecting the table top with ties according to the rules, you can get a durable and wear-resistant structure. The service life can be more than ten years. When connecting the tabletop with a strip one and a half millimeters thick, the aesthetic characteristics of the structure deteriorate slightly. But thanks to this bar, the gap is closed, and the structure itself does not bend.
Design and production of the table
First you need to figure out the configuration and dimensions of the future piece of furniture. In principle, there are no strict restrictions in this regard. It all depends on the size and clutter of the kitchen space, as well as on the number of people who will use this table. A rectangular table measuring 90x60 centimeters is suitable for three people. The long end will be attached to the wall.
The configuration can be semicircular, oval or curly. Therefore, it is necessary to transfer the dimensions and shape of the tabletop to a sheet of chipboard with a thickness of at least 10-12 millimeters. It’s better to make a template out of cardboard, and then use it to draw the outlines of the future product on the chipboard. Thus, you can avoid unnecessary actions associated with incorrect application of the folding table design for a small kitchen.
Then the tabletop itself is cut out from a sheet of chipboard along the contours. This is done with a jigsaw. After that, all the outer ends of the cut product must be sanded with sandpaper to get rid of irregularities and chips. Next, along the ends that will not be attached to the wall, PVC tape is applied in the form of tabletop decoration. In principle, the tabletop is ready. Now you need to think about the method of mounting it to the wall and the type of device that will support it in a horizontal position.
Basic fasteners
To install the countertop you will need several types of fasteners. Their number depends on the dimensions and shape of the plate attached to the table. The master must prepare in advance:
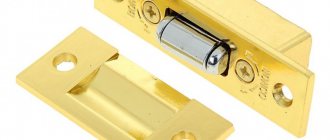
- Tongues. These are elongated parts with locks that connect several elements into one monolithic structure.
- Metal or plastic corners with self-tapping screws - two thin plates connected perpendicular to each other. Used to prevent deflections when working with chipboard.
- Eccentrics. These are cylindrical bushings with plugs for screwing the tabletop to the base.
- Eurobolts are long screws used for tightening corners.
Also, fastenings can be combined. To do this, two types of connections are used simultaneously - mechanical and adhesive. In this case, tongues are used together with corners. This method is considered one of the most reliable when working with chipboard. It is what is most often used by professional furniture repair and installation specialists.
Tongues
Corners with self-tapping screws
Eccentrics
Eurobolts
Tabletop installation
Modern countertops can be made of stone, wood, metal and laminated chipboard or MDF. More rarely, concrete countertops are used, which are manufactured directly at the installation site.
Finished countertops are installed in several stages:
- Preparation;
- cutting holes;
- installation.
Let's analyze all the stages in more detail.
Preparing the countertop
After manufacturing, the tabletop, as a rule, differs slightly from the specified dimensions. Therefore, before installation, it is necessary to completely adjust it to other kitchen furniture.
This process can be carried out according to the following scheme:
- all kitchen cabinets on which the countertop will be installed are assembled, mounted and, if necessary, secured;
- the surface of the cabinets is leveled. If the furniture is equipped with adjustable legs, then you can place pieces of furniture on the same level using the adjustment method. If there are no adjustable legs, then for leveling it is necessary to place wedges under certain places;
Determining the level of the tabletop position
- We determine the optimal dimensions of the tabletop. Depending on the type of wall covering, the tabletop can be installed close to the wall (smooth apron, wallpaper, textured putty) or with a gap of 5 mm (tiles, uneven decorative finishing);
- mark the cutting lines. The surface of the tabletop in front of the cutting line is covered with masking tape for additional protection;
- The table top is trimmed and holes are prepared for installing kitchen appliances;
Cutting the tabletop to size
- the sections are processed with a file or other tools to remove irregularities.
Removing irregularities and burrs after cutting
Hole preparation
The next stage of installation is preparing the holes for the sink and gas stove. The work is carried out in the following order:
- The location of kitchen appliances is determined. To do this, the tabletop is temporarily installed in place;
- the contours of the sink and stove are indicated on the surface of the countertop;
Determining the location of the kitchen sink
- for ease of cutting, it is recommended to remove the tabletop and install it on a stand;
- the surface of the tabletop around the contour is protected with masking tape;
- in several places (at least 4) holes are drilled around the perimeter of the contour, the diameter of which does not exceed 10 mm;
Preparing to cut a hole
- The hole is cut and the sections are processed.
Cutting out a hole for a sink
Holes for the stove and additional kitchen appliances, if any, are cut in the same way.
Installation
Fastening the tabletop can be done in two ways:
- using self-tapping screws (the most common method);
- into grooves on furniture (used individually by prior order).
To attach the tabletop using the simplest and most common method, you will need:
- self-tapping screws;
- mounting angles;
- screwdriver;
- silicone sealant;
- end edges;
- plinth.
Connecting parts
So, we already have the seats for the tightening products ready. Next we install the T-shaped profile. We apply it to the end and fasten it with self-tapping screws.
Screw in until the caps are recessed into the metal body. Experts recommend first lubricating part of the countertop surface and the end with silicone sealant. After installing the strip, the surface is also treated with sealant. It is important to coat blind holes and grooves. The better the insulation, the lower the risk of moisture getting inside.
Installing countertops in the kitchen: important points
To ensure that the product fits correctly and lasts a long time, it is placed only on the fully assembled lower part of the kitchen set. All cabinets are mounted and installed in place. Then they are placed so that they are equal in height. This is very easy to do if you adjust the screw legs of the furniture. The correctness of the work done is checked at the building level.
The upper part of the cabinets should form a common plane located strictly horizontally. Once this result has been achieved, all the cabinets are collected into a common block. To do this, they are tightened with special fasteners. Holes are drilled in the walls of the products through which the ties pass. There must be at least two such connections for every square meter. The base for the table top must be perfectly flat. To level out even the smallest differences, it is worth covering the ends of the cabinets with vinyl sealing tape.
Another important point is the choice of the type of apron for the kitchen. It may be different and this will have to be taken into account when working. The protective coating can be solid, that is, located from the ceiling to the floor. Most often, in this case, ceramic tiles are chosen. You need to be prepared for certain difficulties with the design of the joint. The base should fit as tightly as possible to the wall, so most likely it will need to be trimmed.
This is necessary if:
- the wall is “piled up” back;
- the tile has a pronounced relief surface;
- The cladding is glued unevenly.
In any case, you will need to process the end of the slab so that it follows the shape of the wall. It is best to do this using a belt sander. This way you can avoid chipping.
You will have to act somewhat differently if you choose an apron that covers only the space between the upper and lower tier of the headset. Most likely, no pruning will be required here. In any case, it is recommended to secure the base. The easiest way to do this is with corner-type brackets. If this is neglected, over time the unfixed product may sag and a crack will appear. Even if there is a plinth on top, it will not cover it. The defect will become clearly visible.
Preparing seats for clamps
To do this, we take Forstner drills. Their diameter should be 35 millimeters. Using them we make holes for the C-shaped washer. The depth of the hole should correspond to the thickness of the slab under the countertop. The clamp is placed so that it is located in the middle of the slab thickness. Next, four blind holes are drilled for two ties.
Then, using a drill with a diameter of 8 millimeters, holes are made in the ends. This hole will connect the blind grooves for the C-shaped washers and the ends. To ensure an accurate hole, it is recommended to first drill the product with a five-millimeter drill.
Next we begin milling. It is necessary to make grooves 8 millimeters wide. For this, a drill and a groove cutter are used. It is necessary to go through the cutter from the blind groove to the ends. This will remove the outer layer of the material from which the countertop is made.
Hand-assembled folding table
Assembling a homemade table attached to the wall is the simplest of tasks. If you follow the proposed algorithm, it will take a maximum of half an hour.
- The workpiece is applied to the intended mounting location to clarify the parameters.
- Ready-made support strips are attached to the tabletop with hinges.
- The tabletop is attached to the wall or window sill using hinges.
- The strength of the structure is checked.
In this completely uncomplicated way, you can assemble with your own hands a surprisingly compact, but so functional folding table that is attached to a vertical surface.
Double connection with trapezoidal part
This is a fairly convenient option for placing tabletop parts. The connection is at an angle of 135 degrees. This design has two joints. They can be connected with a euro saw. You can also use a profile to connect tabletops. But it’s difficult to make a trapezoid with your own hands. And ready-made factory options are very expensive. To get a comfortable work surface, you can connect the tabletop with the insert.
Fastening the table legs
The legs of the table are attached to the sides of the supporting frame, and the tabletop is, in turn, attached to them. In order to ensure a tight connection between the drawers and the legs and to compensate for the shrinkage of the wood due to fluctuations in humidity, the following fastening methods are used.
Joiner joint tenon-socket
Advantages : high strength, lack of additional fittings and unnecessary fasteners, ease of manufacture.
Disadvantages : the connection is non-separable and does not compensate well for shrinkage.
Wooden corner ties
Advantages : proper connection strength, the ability to disassemble, good compensation for seasonal deformations of wood, an alternative to purchased fittings.
Disadvantages : difficult to manufacture, rarely used for mass production of furniture.
Connections on dowels
Advantages : reliable carpentry connection without visible fasteners, as simple as possible to manufacture.
Disadvantages : inseparability, poor compensation of deformations.
Backlight
Pendant lighting is very popular. Soft diffused light coming from under the cabinets emphasizes the floating effect. Backlighting can be organized in two ways:
- LED strip. This option is the most popular. The color of the backlight can be either matching the tone of the headset or contrasting with it. Monochrome lighting is chosen for the minimalist style; bright and contrasting shades are more common in modern and high-tech styles;
- lamps. They are usually attached to the bottom wall of the cabinet, but sometimes they are placed directly on the load-bearing wall. When distributing lighting fixtures, you need to ensure that the lighting is uniform. Separate spots of light create a feeling of incompleteness.
When choosing a place to install the lighting, you need to control one point - the lighting devices should not be visible from a height of human height.
Also, do not forget about safety precautions. In the event of a flood, wiring located too close to the floor may short out. To prevent this from happening, wires and lighting fixtures must be located at a height of at least 15–20 cm from the floor.
Decor
There are many options for designing a kitchen countertop . However, without serious professional skills, you should not take on the installation of complex materials. Correct installation of an expensive countertop is difficult - it is better to entrust the installation of a stone slab to an experienced craftsman.
It is preferable for novice furniture makers to install countertops made of chipboard or MDF - less complex, although capricious materials. Let's consider all the difficulties that may arise when working with different materials.
Chipboard and MDF
Chipboard is lightweight and quite convenient to work with. It is recommended to install such a plate using corner brackets. In order to properly screw the plate to the base, it is necessary to press it with force. It is advisable to perform such work with an assistant. The most suitable option for your first experience in assembling a table yourself.
Tree
If handled inexperienced or carelessly, chips and cracks will form on the wooden slab. Mechanical damage can be eliminated, but such work requires professional skills. To prevent wood from rotting in a room with high humidity, it is recommended to fill all voids with sealant. Installation is carried out with self-tapping screws, the gap between the wall is closed with a plinth. Caps installed on the edges of the planks will protect the countertop and extend its service life.
Stone
Natural or artificial stone is the most difficult material to install. The large weight of the product, the special tools and skills required to work with stone - all this makes it difficult to independently install a stone countertop. It is advisable to entrust such work to a professional. It is very problematic to cut the necessary holes in a stone slab, and the seams must be carefully treated with silicone.
Glass
Spectacular and fashionable glass coating is increasingly being used to decorate kitchen worktops. However, the material is fragile and must be handled carefully. It is recommended to choose thick tempered glass due to its high strength. Vacuum suction cups and special glue are used for fixation. The holes are cut with a diamond glass cutter, and the glass slab is attached to the frame with special fittings.
Metal
Difficult material to process at home. It must be cut using special equipment and treated with a corrosion protective agent before installation. It is recommended to attach a metal tabletop with euroscrews and furniture ties.
This is interesting:
Postforming countertops for kitchen units - features, pros and cons.
About repairing a kitchen countertop: how to fix a hole with your own hands.
Attaching the tabletop to the wall: how and with what to attach it?
It would seem that such a simple question as fastening a tabletop with the modern abundance of building materials should not cause difficulties. But it’s the sheer number of options that makes you think about the best way. It’s also good when you just need to lay the work surface on the frame of the furniture module and provide it with only additional support. But cantilever mounting to the wall requires a more serious and balanced approach. Below we will look at both options, but for now it’s worth deciding in which cases you will have to attach the work surface at all.
- When is additional fixation necessary?
- Methods of fastening tabletops
- Mounting on brackets
- Beam installation
When is additional fixation necessary?
The countertop in the kitchen sometimes takes on very significant loads. When slicing food, it only requires sufficient area and a flat surface. But often we also load the table with small household appliances. Microwave, oven, portable dishwasher, coffee maker, mini-bar - all these items in the kitchen often “settle” on the table, and here you will need to secure it well.