Kitchen renovation is one of the most problematic issues for owners of small apartments in multi-storey buildings, as well as private houses. A combination of several factors: temperature changes, constantly high humidity, multifunctionality of the room - create problems in choosing materials for wall decoration. Lining is one of the preferred ways to decorate the kitchen space into a comfortable, stylish, easy-to-clean space. Finishing a kitchen with clapboard takes place in several stages, which will be discussed in this article.
Before purchasing materials, you need to decide on the amount that can be spent on repairs and determine the functionality of the room. For small rooms in old high-rise buildings, the kitchen performs two or three functions: a room for storing and preparing food, a dining room, and a resting place. The article will give examples of finishing for just such a standard kitchen.
Wooden lining - types and installation method
Eco-friendly materials are preferable for residential premises. Lining made from hardwood is used to decorate a long list of rooms, including kitchens. In order for the wall decoration to last for a long time, it is necessary to pay attention, first of all, to the type of raw materials.
Alder and pine lining is best suited for rooms with temperature changes and high humidity. Medium-density wood is not afraid of moisture, does not suffer from physical damage, and retains its shape for many years. Resinous pine is almost resistant to rot and does not suffer from fungus, so it can be used for finishing walls, creating fittings: cabinets for a washbasin or dishwasher, as a back wall for stoves, etc.
After purchasing the required amount of materials, you need to treat them with special means:
- Primer for better adhesion of antifungal agents;
- Antiseptic, anti-fire mixture (if there are problems with the wiring or there is a smoker in the house);
- Clear varnishes or stains to give the desired shade or color.
The mixtures must be applied in this order, applying the next layer after the previous one has completely dried. It is important to maintain the temperature regime: preparatory work is carried out in the same room where the repairs are being made. It is necessary to monitor changes in humidity: the lining should not be wet.
It is important to know that conscientious manufacturers impregnate their materials with antiseptic and other chemicals at the factory, before sending them to the warehouse. Having carefully studied the product passport, you can find that the cost of repairs will drop sharply - you can save on waterproofing and antifungal agents. However, when cutting lining sheets, especially if installation must be done at an angle, it is better to soak the cut area with products, since this is the most vulnerable spot.
It is better to make the mounting frame for wooden lining from treated hardwood timber 3x3 or thicker. It is attached to the wall with dowels and self-tapping screws. Aligning the frame on an uneven wall (relevant for old panel houses) can be done by loosening or pressing the screws or using pads - thin strips that are attached under the beam. The lining itself is mounted using hidden clamps. For budget finishing, you can attach the sheets using self-tapping screws or galvanized nails, but this will damage the appearance of the wall.
For horizontal finishing of the kitchen with clapboard, the frame is mounted vertically on the wall. The distance between the beams in the frame should not exceed 50 cm - this way the lining will be rigidly fixed, and large backlash and loads on the wall can be avoided.
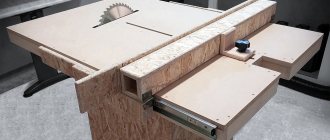
The technical process of making a kitchen by American DIYers is clear
Playhouse for children: step-by-step photos, diagrams, drawings
Let’s make a reservation right away, of course, not everyone makes kitchens this way, this is a kind of middle option, because the result can be achieved using various design solutions, and visually it will look the same.
Photos taken from the site https://www.addicted2decorating.com, which, by the way, is not the first one, for some reason, American housewives make furniture, skillfully using various tools. Whether this is actually true, we don’t know.
Although, we think that someone might like this kitchen manufacturing technology and refuse to use chipboard. In general, the whole process resembles a construction site with a lot of garbage, dust, and noise.
Making a kitchen module
As you can see in the photo, all the details of the kitchen modules are made of plywood, and not birch, like ours, but veneered with valuable wood. Assembling cabinets using a nail gun.
| Rice. 11. Side of the kitchen module and side of the support box |
| Rice. 12. Support box and kitchen module without back wall |
| Rice. 13. Kitchen module with rear stiffener |
| Rice. 14. Kitchen module with plywood back wall |
| Rice. 15. Kitchen cabinets with a fixed front frame |
| Rice. 16. Kitchen module for drawers |
Kitchen module with drawers and making a drawer
Drawers are made entirely of plywood. To install the box on ball guides, remember there is a front frame on the body, bars are attached to the side walls, and the guides themselves are attached to them.
| Rice. 17. Drawer assembly |
| Rice. 18. The support bars for the bottom of the box are secured |
| Rice. 19. The bottom of the plywood box is secured with brackets |
| Rice. 20. Ball guide screwed to the side of the drawer |
| Rice. 21. Special device for mounting a block under the guides on the side wall at a right angle |
| Rice. 22. Ball guide screwed to the block |
| Rice. 23. Drawers installed in the kitchen module |
| Rice. 24. Drawers behind hinged doors are installed in a column |
Making a countertop
The tabletop is made of hardwood parquet, with a strip glued to the end of the tabletop.
| Rice. 25. Parquet on the tabletop, the joints are then puttied |
| Rice. 26. Differences and putty were sanded first with a belt and then with an eccentric sander |
| Rice. 27. Stain was used to tint the tabletop |
| Rice. 28. The tabletop is prepared for finishing |
How kitchen facades are made
The author chose a simple method for making facades, no complicated milling or panels. The doors are based on a panel structure.
| Rice. 29. Pre-painted blank panel for the future door |
| Rice. 30. A layout of rounded wooden slats is nailed along the perimeter of the shield |
| Rice. 31. Another interesting device for drilling under hinge cups |
| Rice. 32. A device for drilling for hinges in operation |
| Rice. 33. The holes for the hinge cups are drilled |
| Rice. 34. Decorative layout is printed along the contour and inside of the future facade |
| Rice. 35. Facades with a stuffed decorative layout |
| Rice. 36. This is what the finished facades look like after painting |
| Rice. 37. An interesting photo that shows what kind of hinges are used to hang doors on the front frame, and with this design the drawers can be easily pulled out without touching the doors |
| The diversity of modern kitchen design - Americana from Brazil To create an article on modern kitchen design from South America, we analyzed a large selection of photographs of kitchens from rental and real estate sites in Brazil. As a result, we will highlight the main design features of the façade and the color design patterns of South American kitchens. |
What else is inside the kitchen modules?
And inside the kitchen modules there are drawers, pull-out modules for kitchen utensils and even a refrigerator that mimics the color of the kitchen.
| Rice. 38-39. The refrigerator is painted in the color of the kitchen |
| Rice. 40. Drawers for dishes and household appliances inside the pencil case |
| Rice. 41-42. Pull-out module made of plywood for kitchen utensils |
| Rice. 43. Internal drawers for pots behind hinged doors |
Plastic lining is a cheap, high-quality option
PVC differs from wood not only in price, but also in practicality. Spending on consumables will be significantly reduced - plastic does not rot, does not suffer from fungus and mold, has a pleasant appearance, and a smooth surface. The only danger for this material is temperature, so the wall behind the gas stove and near hot pipes must be covered with ceramic tiles or other material.
A metal mounting frame is better suited for plastic. It is more expensive than wood, but lasts longer; it is easier to level due to the fastening features. U-shaped brackets securely hold the metal guides. The distance between the fasteners is 50 cm. For a 3x2 m room you will need 7 vertical guides plus 35 mounting brackets (for horizontal installation of the lining).
Plastic is easier to care for; a damaged fragment can be easily replaced without dismantling the entire wall. The service life of plastic trim is 4-6 years. The main disadvantage of plastic panels is their low impact resistance. The plastic breaks under light loads; the mounting frame may be damaged by a strong push or blow. You can't lean on such a wall.
How to make a cabinet
Nowadays, homemade cabinets made from sheets of plywood are very popular among modern designers and property owners. You can make such furniture using the following materials and tools:
- sheet plywood;
- screwdriver and screws;
- four blanks for legs. You can prepare it yourself from wooden blocks;
- special glue for fixing wood.
To create the base of the bedside table, you will need to take four pieces of plywood of the required size. Furniture plywood blanks should be 15 by 45 centimeters for the side components, and 45 by 45 cm for the lower and upper bases. All elements are produced in duplicate.
A bedside table is considered easy to make. You can do it yourself in a short time.
The side panels are fixed to the bottom base using wood glue. The upper part of the cabinet with the prepared frame is fastened in the same way. The legs are connected to the base with self-tapping screws.
If desired, you can coat the finished furniture with varnish or paint.
MDF panels - an expensive but practical option
Pressed wood boards, better known as MDF, have recently appeared on the domestic building materials market. This material has all the advantages of its predecessors - the environmental friendliness and practicality of wooden lining plus the ease of installation and maintenance of plastic. The only problem is the high price and the unavailability of the material for remote regions of Russia.
MDF is mounted on a steel frame using hidden staples or galvanized nails (there is often a special place for them in the groove of the lock). MDF panels are light in weight; the outer covering is a plastic or natural film that can be washed with special products. Antiseptic and waterproofing treatment is not required. Cutting panels can be inconvenient: the MDF cut, like chipboard, crumbles under fast saws. Cutting is best done on a fine-toothed band saw, electric jigsaw or by hand. The cut area must be treated with sandpaper or a fine file. Experienced craftsmen prefer cutting in a factory or warehouse using special machines.
Finishing a kitchen with MDF paneling has significant advantages: simplicity, environmental friendliness, pleasant appearance and variety of colors. However, the price of materials puts off most owners. The service life of such panels is also not impressive: after 3-4 years of operation, the lining will begin to “spin” and burst; the outer coating can “peel off” under the influence of moisture or temperature changes.
Kitchen set assembly
Kitchen cabinet assembly diagram.
The plywood blanks are assembled quite simply.
Mounting options:
- Confirmed. The screws themselves are installed on the side walls of the cabinets, their heads are then covered with decorative overlays, matched to the color of the main panels of the kitchen unit. To increase rigidity in the corners of the connection, it is advisable to use specialized corners.
- Minifixes. Parts are connected in places that can be viewed visually.
Advantages of using minifixes:
- Reliability and durability. This connection can be disassembled and reassembled several times without compromising its strength, which is very convenient for different adjustments of elements.
- There is no need to use decorative caps, since the front side of the facade is clean.
- Easy to install. When installing using minifixes, only a screwdriver is used.
- If for some reason, when cutting the sheets, marking, drilling and subsequent milling were not done, then you can easily do this yourself. To do this, you only need a 16 mm cutter and a 10 mm drill.
The procedure for installing minifixes:
Scheme of an eccentric three-element coupler.
- the place where it is necessary to install the minifix is marked;
- a blind hole is drilled in the workpiece for a plastic coupling;
- using PVA glue, install the coupling;
- the eccentric rod is screwed into it;
- then another hole is drilled for the metal part of the minifix in the mating part of the connection;
- A hole is made at the end for the eccentric rod so that it fits into the minifix hole.
One of the above methods is used to completely assemble furniture cabinets. All that remains is to hang the doors on the cabinets, install closers and begin finishing the assembled kitchen.
Once the frame is assembled and each plywood piece is screwed to it, additional accessories can be installed. First you need to mark out places for handles and other additional decorative elements.
At the marked places, holes are drilled through using a drill and the corresponding elements are installed.
Which option should I choose?
For budget repairs, plastic lining is best suited. It has an acceptable appearance, the surface will last 5-6 years and will not cause unnecessary trouble to the owner of the apartment. Preparatory work and installation will take 16-20 man hours, so the entire repair can take 3-4 days, which is important for constantly busy representatives of the middle class or residents of industrial areas.
Wooden lining is better suited for large kitchens, which often serve as a living room. It is often used for finishing country houses and cottages. It is more expensive than its main competitor, but has a number of positive aspects: environmental friendliness, appearance, durability. Properly installed lining in a residential building can last a decade. The total repair time for a medium-sized room (5x7 m) will be 20-40 man hours, that is, almost a week.
MDF panels can be called an experimental material. It is chosen by lovers of minimalism and environmental friendliness. The average repair time will be 3-4 days, and its service life will be up to 5 years.
Based on your budget, room size, climate, and personal taste, it’s easy to decide on the choice of materials. Finishing a kitchen with wooden or plastic lining is not difficult; examples of the work can be seen in the photo. It’s easy to create a unique room interior if you choose multifunctional and easy-to-process lining sheets as the material.
Photo
Even if you decide to make your own kitchen, you don’t have to use plywood for this. We show several examples of photos where headsets were made independently.
DIY plywood kitchen
Corner kitchen made of plywood and glass
Another version of the drawing that can be used in practice.
Typical kitchen module design
As mentioned above, our fellow home-made kitchen modules are most often made from plywood; this material, of course, is many times more reliable and beautiful than chipboard, and the back wall of the cabinets is also made from thin plywood, and not from HDF or fiberboard.
The next difference is that the kitchen body does not rest on adjustable plastic legs, but on a box made of the same material as the kitchen module. This design reminds us of the principle of furniture support, which was widely used in Soviet times.
And finally, what we don’t use at all now is the presence of a front frame, which is attached to the end of the kitchen module, and hinged kitchen doors are hung on this frame with hinges of an original design.
The front frame creates certain difficulties when installing drawers on the guides, but even here American home-made workers have their own solution.
| Rice. 1. Design of a typical American kitchen module |
Kitchen cabinets for various purposes are manufactured using this principle; we provide examples of some of the lower ones. The dimensions in the figures are in centimeters, which are converted from the usual American inches, so the values are not whole numbers.
| Rice. 2. Kitchen module with two doors and top drawer |
| Rice. 3. Kitchen module with drawers |
| Rice. 4. Corner kitchen module |
| Rice. 5. Group of kitchen cabinets |
| Rice. 6. Kitchen made by American DIYers |
| Rice. 7. This is how the sink is installed |
Kitchen made of plywood: joining parts
Scheme of plywood screed with eccentric fasteners.
The most important stage in assembling furniture is joining pre-prepared parts into a single structure. Plywood, unlike other building materials, is attached to each other without any additional parts (such as hinges, corners), which saves both money and time on assembly.
You may be interested in: Self-connection to the network of an induction cooker
Assembly steps:
- On the 2 panels that need to be joined, the intended holes for connection are drawn with a pencil.
- Then, using a regular electric drill, holes are drilled in both parts.
- A sealant is applied to the drilled holes, which will protect the joints from moisture entering there, which often leads to the detachment of parts.
- Using screws or self-tapping screws, 2 parts are connected and tightly pulled together.
A special feature of this assembly is that veneer (plywood), unlike other wood materials, does not crumble, break or grind down when drilling holes, so there should be no problems when joining the parts.
Wall decoration
Several years ago, wall decoration with clapboard was associated exclusively with country house or bathhouse interiors. Today it can be found in the most fashionable design projects of city apartments and cottages. Wooden panels are easy to paint and brush, and go well with decorative plaster, brick, and in dark versions also with metal.
Depending on the task at hand, the lining is placed horizontally or vertically. The walls are sheathed at full height or partially, leaving the top meter and a half for wallpaper.
The diagonal laying of the board looks non-trivial. This move adds dynamics and style to the space. If you want to add even more accents or make the interior more playful and spontaneous, paint one of the walls a bright color. To complement the bright decoration, we choose laconic furniture and harmonizing textiles.
Prices
What is
7 USD?
2 USD
1 USD
1 USD
2 USD
| How many | Price | |
| Plywood, 10 mm. | 2 sheets (2.326 m2 each) | |
| Beam, 50x50 mm. | 3.24 m. | |
| Self-tapping screws | 30 pcs. | |
| Pens | 2 pcs. | |
| Furniture hinges | 4 things. | |
| Varnish + paint* | 5 USD and less | |
| Self-adhesive* | 5 USD and less | |
| Total: | 18 USD | |
Features of the room
The kitchen area is endowed with special functionality; it is used most often, and the decoration and furniture in it are subject to the most intense loads. Therefore, special requirements are placed on furnishings.
When deciding to make your own kitchen set, you will need to consider the following:
- Typically, the kitchen area is not too large in size, so special attention will need to be paid to the rational organization of the work area.
- All surfaces in the kitchen are exposed to moisture and temperature changes - this should be taken into account when choosing the type of wood and the method of processing it.
- The material of the kitchen set must be resistant to wear and mechanical stress.
Wood can be painted - this allows you to protect it from moisture and dirt, make it easier to maintain and choose the desired color scheme
Necessary little things
To make a girl feel like a real housewife, the children's kitchen should be supplemented with various little things. You will definitely need toy dishes, plastic cutlery, washcloths, and washed detergent containers. Also, a playroom can be supplemented with towels, napkins, oven mitts, and an apron. In the process of arrangement, you certainly need to consult with your child. Children's imagination will allow you to fill the kitchen with necessary and interesting things that will decorate the design.
Detailed master class on how to create a play kitchen on video.
Thus, with a little effort, you can build a kitchen for your child at home using improvised materials. Don't limit your flight of fancy. Involve your baby in the process, and then the creative process will become even more entertaining and interesting. Take your toy creation seriously. After all, a craft created with your own hands, and even in tandem with younger assistants, will become a real source of pride for all family members.