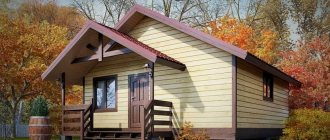
For a small area, a 5x4 bathhouse is the best option. If you approach the design competently and competently, then you can easily organize all the necessary premises in it. The location of the sink and steam room should be planned in different rooms - this will give additional comfort when visiting the bathhouse. But the remaining parts should not be ignored, because rest depends on it.
Material advantage
- lighter than logs;
- easier to install;
- minimal shrinkage;
- affordable price;
- easy calculation of the amount of material needed so as not to purchase too much.
For example, if you have a bathhouse made of timber 150 by 150 mm, the volume of material with a standard length of 6 m is equal to: 0.15 * 0.15 * 6 = 0.135 m3, and in 1 m3 = 7.41 pcs.
If you need a 5x5 sauna:
- 5 * 5 * 3 = 75 m3 - the total volume of the building.
- 75: 7.41 = 10.12 m3 – total volume of timber.
Taking into account window blocks and doorways - 9-10 m3.
Layout of a 5 by 5 bathhouse for a summer cottage
What must be in the bathhouse
The presence of bath paraphernalia depends on the preferences of the owner. In the traditional version, there must be a soap set for both sexes, if there are preferences in products. The sink should have a washcloth for each family member, sheets and sheet set. A basin, tub or font must also be present. The presence of logs, bath caps and a broom will create coziness and completeness of the interior.
A thermometer is necessary if there is a person in the family with heart disease. Scents are not required, but you can purchase flavors or use spruce branches to lift your mood. The necessary premises include a wash room, a steam room and a dressing room. The rooms are connected to each other or lead out into the main corridor onto the terrace. A living room or block house is located in large saunas.
The canopy should not occupy more than a third of the steam room or sink. In some bathhouses, the floor is cold or does not warm up enough, so they came up with a ladder or foot tray that can be removed if there is not enough space. The steam room requires a separate tub with a broom and stones for supplying steam. A water supply is installed for hot water and a tank is installed, which takes up unnecessary space.
Foundation
The reliability of the foundation is the key to the durability of the building. When building a foundation for a 5 by 5 bathhouse, you must adhere to the basic rules, and not think that the larger it is, the better. Particular attention should be paid to waterproofing, which will not allow moisture from below to penetrate the wood and quickly destroy it.
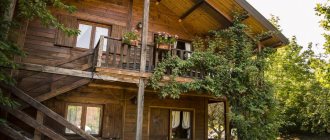
Layout of a 5x5 bathhouse with a veranda
Varieties
Each type of foundation depends on the soil at the construction site, the size and weight of the building. It does not have to be deep; for example, on heaving soils it is usually shallow.
Selection factors
- natural conditions;
- maximum load;
- soil freezing depth;
- groundwater;
- soil density and type.
Wrong choice of foundation will lead to distortion of the walls, deformation and destruction of the building.
Bathhouse plan 5 by 5 with a large relaxation room
Attention! The weakest foundation structure is made of brick, where even the densest reinforcement will not help. The concrete base deteriorates more slowly, but cracks and fractures may appear in it.
Depth device
For a bathhouse from timber, you can make a recessed base and a shallow base. If previously it was customary for wooden buildings to install a foundation whose base would be below the level of soil freezing in a given area, now it has been decided that this is impractical, since a wooden building does not have much weight.
In addition, the cost of a buried foundation is higher, which is what made the shallow-depth option the leader.
Bath plan 5x5 made of wooden beams
Construction type
- Columnar is an inexpensive base option. When constructing it, concrete blocks are most often used, which are installed at the corners of the building and under massive partition walls. The distance between the pillars is up to 1.5-2 meters.
The fastest option is from asbestos-cement pipes:
- drill holes in the ground;
- install pipes in them;
- pour concrete into them.
- Tape - the most common, strong and durable, located along the perimeter of the future building and along the line of partitions. During construction, reinforced concrete is used, where a reinforcement frame is installed in the center of the foundation to strengthen the structure.
- Pile is a good solution for swampy and unstable soils. Piles are driven into the soil to a depth below the freezing point of the soil. Then a reinforced concrete frame is made around the perimeter.
High bathhouse 5 by 6 by 5 for a suburban area
Design
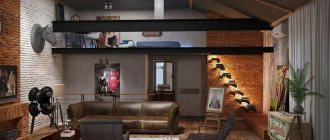
The interior of a relaxation room can be very different; it all depends on the imagination of the homeowner. Nowadays the Scandinavian style is in fashion, which is distinguished by its minimalism and simplicity.
Some prefer refinements in the Art Nouveau style. The presence of a wide selection of different materials makes it possible to decorate the bathhouse in any style. You can often find stone and wood in rest rooms. If you make a bathhouse in the Russian style, then you cannot do without a large number of wooden surfaces. It is more rational to use more than one type of wood in finishing.
If you build a chopped bathhouse, it can have a very original look. In this case, the wooden logs should be treated, this will be enough. Brick and stone are not afraid of high temperatures, so the presence of such materials in baths is far from uncommon.
Partitions are often made of red brick; this looks quite acceptable. Red brick and its cladding are now in fashion.
Often the walls are decorated with ceramic tiles; this is also a very practical material. The choice of tiles on the market is very large, finding what you need is a solvable task. Recently, floors and walls have also increasingly been finished with porcelain stoneware, which is stronger than tiles; this material is also in great demand.
Waterproofing device
Below are instructions for installing it.
- Apply melted bitumen on top of the foundation plinth.
- Place a strip of roofing felt on top.
- Apply a second layer of bitumen after the first has cooled.
- Place the 2nd layer of roofing felt.
What does a 2 by 5 by 5 bathhouse look like in cross section?
Furnace installation
For a bathhouse with a 4x5 attic, you can choose a metal or brick stove.
Metal stove
A metal stove heats up faster and provides quick heating of the room. However, it also cools down within a short time. Installation of a metal furnace does not take much time and is carried out as follows:
- The selected oven is installed on the prepared surface. Its power must correspond to the volume of rooms that are planned to be heated.
- a tank is connected to the stove, then a damper, then there is an adapter for a sandwich and an insulated sandwich pipe, which will go to the second floor;
- a ceiling groove is installed in the interfloor ceiling, through which a sandwich pipe passes;
- the pipes are routed through the roof through a special master flash, which will ensure sealing of the passage opening;
- in total, the chimney is mounted at least 4 meters in height.
Furnace installation
The wall near the stove should be lined with bricks or sheathed with asbestos and thick sheets of iron. If you plan to install a firebox inside the partition between the steam room and the dressing room, then it should be lined with refractory bricks. All pipe connections between each other should be sealed.
Brick oven
Brick sauna stove
A brick stove takes longer to heat up than an iron stove, but it retains heat for a long time. You can fold it yourself or seek help from specialists.
For independent masonry you will need:
- fire bricks;
- mortar for laying stoves;
- cast iron grates, valves, doors;
- row masonry diagram;
- metal sheets;
- trowel;
- wire.
Each row of bricks should be laid according to the chosen pattern, and they should be arranged in a checkerboard pattern. Coincidence of vertical seams between bricks is not allowed. Fastening the doors and installing smoke ducts must be carried out strictly according to the instructions, then the finished stove will serve for many years without any problems. Do not forget about installing cleaning doors and valves.
Wall installation
Advice: never tightly fit elements of wooden buildings. Drying the wood will reduce the height of the timber, so the bathhouse may warp if you do not leave gaps.
- Prepare slats 15 mm thick so as to cover the foundation with them in increments of 250-300 mm. They will additionally protect the timber from rotting.
- Install the crown beam on top.
- Fill the free space between it and the slats with mounting foam.
- Make sure that the crown has a horizontal surface before finally securing it. Use a building level.
- Secure the beams together with steel brackets from the outside. After construction, bathhouses are usually removed.
The crown beam is usually not fixed, since after the walls are installed, the weight of the building will guarantee its stability on the foundation. This will especially help when it needs to be replaced after a while.
- Lay insulation, for example, flax jute, on top of the crown beam.
Laying the remaining beams
- Prepare a beam with a cross section of 150 by 150 mm.
- Install and secure the second crown. Use metal pins or wooden dowels for this. In the first case, it is necessary to prepare unloading holes in the timber according to the diameter of the pins.
- Do not secure the 2 upper crowns, as they will have to be removed to install the ceiling beams after the frame shrinks.
Beam connection
Butt-butt
In this case, the beams are connected end to end, with the connecting seam overlapped by the next one. The reliability of the method depends on a perfectly flat end surface, which must be sawn off strictly at a right angle. Heat loss with this option will be high, even with a fairly tight connection.
Warm corner
Such a connection is also called “root tenon”, when a special groove is made in the end part of one beam, and a vertical tenon is made in the end of the other. You can also make several vertical spikes, this knitting is called “double or triple slotted spike”.
Advice: be sure to use inter-crown insulation for a bathhouse, which increases the joint density and thermal insulation of the log house.
Two-story bathhouse 2 by 5 by 2 by 5
Intercrown insulation
The best choice is flax-jute fabric. It is sold in rolls of different sizes and can be easily cut into strips. Thanks to the installation of this insulation during the construction process, after shrinkage the walls become a solid monolith.
Connect the crowns of the log house to each other at the corners and along the perimeter with wooden dowels. It is advisable that they be made of hard wood, such as larch.
How to make a dowel
- Prepare a board 25 mm thick.
- Cut it into bars of the required length.
- Remove sharp corners from the sides, giving the bars a rounded shape.
You can also use ready-made cuttings from brooms and rakes, which can simply be cut to size.
How to connect timber with dowels
- Drill through the top beam and halfway through the bottom.
- Remove the top beam.
- Drive the dowel into the bottom beam with light blows of a hammer until it stops.
- Put insulation.
- Return the top beam to its place by placing it on the dowels.
Window and door frames
Install the door block on a row of frames at floor level. To level it vertically and horizontally, use a plumb line and a building level, then secure it in the opening. The window block is installed in the same way at a predetermined height.
Tip: leave a gap of 80 mm or more above the door and window units, filling it with insulation. It is necessary for subsequent shrinkage of the material.
General requirements for the characteristics of bathhouses
The space provided by the bathhouse, measuring 4x5 m, is enough for a completely comfortable holiday for a family or a small group of 3-4 people.
In accordance with current regulatory requirements, each visitor to the steam room should have at least 1-1.2 m2 of free space if the person steams while in a sitting position. If the bath lover lies down or prefers to take some other possible position, the requirements for the dimensions of the steam room will change accordingly.
Steam room visitors
These points must be taken into account when designing a bathhouse in general and shelves in a steam room in particular. Information regarding possible body positions in the bath and recommendations for shelf sizes for each of them are shown in the following image.
Recommended shelf sizes for different body positions
Arrangement of shelves in the steam room
Regarding the area of the washing room, the recommendations are similar - at least 1-1.2 m2 for each visitor. In order to save space, the sink, as a rule, is made of relatively small sizes so that there is enough space for 1-2 visitors who come here at the same time.
A modern compact shower cabin will allow you to effectively solve the problem of distributing free space in the washroom. In general, the dimensions of the washing room can increase depending on its operating conditions. For example, if the owner decides to install a boiler here to heat water or even a washing machine (relevant when arranging a bath house), the size of the room will have to be increased accordingly.
Shower options
The recommended height of the steam room is about 210 cm, the washing room is 220-230 cm. When designing a steam room, you should adhere to the rule that there should be at least 110 cm of free space between the ceiling and the top shelf
It is also important that the top shelf in the steam room is arranged higher than the stove - the requirement is dictated by considerations according to which it should be the hottest on the top shelf of the bath. The heater itself (the most popular version of the sauna stove) is placed at an average height of 100 cm from the floor
For other types of sauna stoves, the requirements are determined by the individual characteristics of the units used.
Calculation of the minimum required parameters
Recommended steam room dimensions
To prevent water from splashing from one room to another, door thresholds are installed approximately 200-300 mm above the floor. The requirement is also relevant for the main entrance door; if the bathhouse is not equipped with a porch/terrace/veranda, then the high threshold will not allow melt water to penetrate inside the room in the spring, and will make the process of clearing snow more convenient.
For reasons of ease of use, it is better to orient the front door to the south - in winter you will have to remove less snow. Regarding the orientation of windows, everything depends on the characteristics of the individual user. For example, if the owner likes to go to the bathhouse in the morning, it is more advisable to place the windows to the east, if in the afternoon - to the west. If the bathhouse will be used after sunset, the location of the windows is not important.
Roof
- Place wooden beams horizontally on the top frame of the walls.
- Install rafters on them every 1 m. They should be flush at the roof ridge.
- Place roll boards on the rafters or make slate sheathing.
- Cover the ridge with galvanized iron.
- Cover the gables with boards or siding.
The final stage of construction is insulating the bathhouse. Use non-flammable materials, such as mineral wool, after protecting them from moisture.
Steam room
The steam room is the heart of any bathhouse. Accordingly, this room will reasonably have the highest requirements. With a bathhouse size of 4x5, the steam room is designed to be spacious and this room must be very well heated and maintain a fairly high temperature. To create a good temperature, it is recommended to install a stove-heater.
To place it, you need to think about the location in advance, even at the stage of pouring the foundation. This stove is quite profitable. The only negative is that it takes up a lot of space. Many people install electric heating elements in the steam room, but this is quite uneconomical and plus you will have to lay additional wiring. With this heating method, it is necessary to provide additional insulation and install more steam generators in order to somehow reduce energy consumption.
Depending on the location of the steam room, it can be rectangular or square-shaped. For shelves, use massive, narrow wooden boards. Be sure to round the corners on them (for safety reasons). You need to remember about ventilation and leave small gaps between the boards so as not to impede the free passage of air. When working on a paired compartment, it is important to take into account the comfort of movement. It would be rational to reduce the area of the shower and dressing room to increase the steam room.
A 4x5 bath allows you to experiment with the space inside. But this needs to be done thoughtfully, so that moving around and being in such a recreation area is comfortable for a family of 5-6 people or a group of friends.
Possible extensions
Additional buildings can be open or closed. In the first case, they are created for relaxation in the summer, but the second option is used when there is a desire to increase the area of the bathhouse by creating new rooms. But at the same time, the construction of extensions can be a continuation of the bathhouse or done in the form of a major reconstruction with the demolition of part or the entire wall.
Extensions for the bathhouse can be a gazebo, terrace, summer kitchen, vestibule, or dressing room.
As a rule, such buildings are postponed until better times. For open extensions, wood is most often used, as it has a more presentable appearance and does not require external finishing. But for indoor spaces, you can take any material at your discretion. But do not forget that capital extensions are built on a foundation.
Construction rules
Regardless of what material the owner chooses, it is necessary to create a good foundation. There are 2 options - strip and pile foundations. Before creating it, you should familiarize yourself with the standard indicators, because if you do not take this seriously, the structure will not be very strong and unreliable. It is first necessary to reconnoiter the soil and determine at what depth the foundations lie. Even when using the most popular strip foundation, which is poured in 3 layers with reinforcement, the structure can collapse in a few years if groundwater flows at its level.
Those who have chosen to lay out the frame from untreated wood, after building the walls under the roof, should allow the structure to stand for about six months. During this time, shrinkage processes occur, thanks to which the bathhouse gets rid of various minor flaws. Therefore, it will be easier to carry out work on insulating the bathhouse. And after the procedure, you don’t have to worry about door structures and window openings breaking.
It is necessary to carefully consider insulation, since small baths are very difficult to warm up if they have poor-quality insulation of the floor, ceiling and walls. If you plan to design an attic in the attic, you should insulate not only the lower part of the bathhouse, but also the rafter system. It is necessary to do insulation correctly, because due to temperature changes, condensation can accumulate, which causes fungal deposits on the tree.