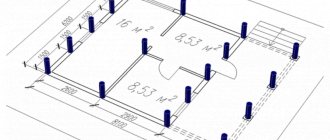
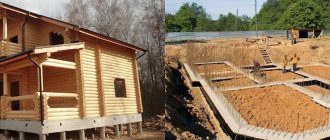
The heads of the pile supports are intended for fastening the strapping under the object being built. Depending on the project, various types of structures can be used to ensure the strength and reliability of the building. However, for their correct location at a horizontal level in one plane and to prevent distortions of the building, it is necessary to cut down the pile heads. A correctly completed felling stage will guarantee a stable position of the object and uniform distribution of the load on the supports.
Head functions
More often, square-shaped heads are always welded onto piles.
When installing screw piles to the designed depth, it is not always possible to achieve the same height of their location above the ground surface and ensure a perfectly horizontal plane for the construction of the facility.
Even small distortions can negatively affect the durability of the building. Therefore, a simple way out of this situation was found - to cut down or cut off the head of the support for each screw pile.
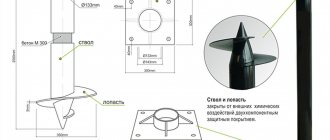
The size of the caps can be identical to the cross-section of the piles, but have different shapes: round, square, polygonal or T-shaped. The designer selects a suitable shape depending on the specifics of the project in order to ensure a strong connection with the grillage or supporting structure parts.
Selecting corrugated sheeting for a fence by brand
The implementation of piping has a positive effect on the performance characteristics of a pile-screw foundation. Her presence ensures:
- There are no load differences between adjacent supports, thereby reducing the risk of some pillars sinking into the soil or deforming them.
- Increasing the bearing capacity of the foundation;
- Ensuring a flat horizontal surface of the base for subsequent work on the construction of the building.
- The distance between the soil at the bottom of the building increases, thereby reducing the risk of contact with soil, moisture, and vegetation.
The disadvantages of a pile-screw foundation with a grillage are the increased costs for additional purchase of materials. Disadvantages also include the time required to complete the work. However, such shortcomings are not so significant compared to the advantages of a tied foundation.
Types of screw pile caps
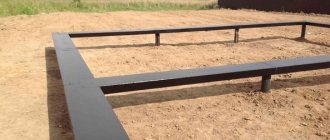
The grillage is fixed to the pile caps.
After cutting off the screw pile caps, it is necessary to attach caps to them, which are divided into the following types:
- T-shaped. To secure them, they are installed in the inner part of the pile and welded to the heads or secured with bolts. The upper part is designed to secure a slab or beam grillage.
- U-shaped. They are put on over the support and attached to the outer part of the pile. In this case, an important condition for installation is the coincidence of the external size of the pile with the internal part of the head to create a fixed structure. Designed for installing only grillage beams, the width of which is equal to the width of the support mounting.
The choice of welded connection for the caps is determined by maximum strength and the ability to isolate the inside of the pile from the external environment. Eliminating negative impacts on the internal structure of supports allows for the longest possible service life.
A detachable bolted connection can withstand lower loads than in the case of welding, but allows the repeated use of supports and the transfer of an object to a new location without damaging the structure. Therefore, they are used for the construction of low-rise buildings and auxiliary facilities.
Conditions for using a foundation on stilts for a private house
Pile foundations are used in the construction of both lightweight frame or wooden houses, and in the construction of brick and concrete structures of several floors.
The design features of such a foundation make it possible to carry out work in areas with weak soil, which include:
- clays, loams, sandy loams;
- silty sand and with particles of the middle fraction;
- soils mixed with peat, humus, etc.
Pile foundations are effective for construction in waterlogged areas, as well as when groundwater is close to the ground (when the impact of heaving forces on the load-bearing structure is compensated by appropriate technology measures).
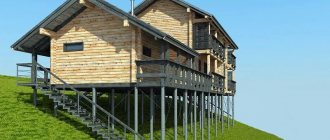
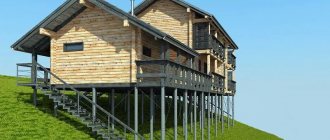
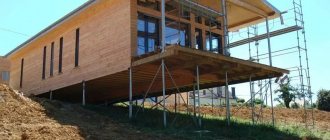
With your own hands, you can build a pile foundation for a house on a slope, as well as in an area with difficult terrain, without the need for a large amount of excavation work.
Head cutting methods
Cutting down pile heads can be done in one of the following ways:
- manual, using portable tools;
- automatic cutting mills;
- specialized hydraulic equipment.
The choice of a particular technology depends on the volume of work, the requirements for processing accuracy and the availability of sufficient space to use a particular tool.
Manual method
Trimming pile heads manually is done using a saw or cutter.
Processing pile heads manually is quite difficult and labor-intensive. Therefore, this method is not applicable in the construction of critical structures, but is quite justified in the construction of fences, low-rise buildings and ancillary buildings. It is inexpensive and does not require the involvement of specialists with special equipment.
Hydraulic shears are used for manual cutting of screw piles. The process is simple and does not require skilled workers. Its essence is as follows:
- A special ring-shaped attachment is placed on the pile and fixed to the cutting line.
- Using scissors, cut off the excess part of the support along the nozzle.
The entire cutting procedure will take no more than 15 minutes, depending on the diameter of the pile. However, the quality of the cut will not be ideal and additional processing will be required.
Method using cutting mills
The process of cutting piles with a milling cutter can be done either manually or automatically.
Equipment for cutting off pile heads using milling cutters is used for any type of piles made of any material. This will allow you to construct various objects on one construction site due to the versatility of the tool.
Cutting can be done manually or automatically, which allows a professional to perform the work as accurately and efficiently as possible. The main difficulty of the method lies in the correct selection of a suitable cutter and its positioning relative to the screw pile.
When choosing a cutter larger than the inner diameter of the support, there is a high probability of damaging the cutting part due to overheating or the pile wall, which may lose mechanical properties due to improper temperature conditions.
A smaller cutter diameter will not allow you to make a quality cut. Therefore, it is recommended to use a cutter with a diameter equal to the wall thickness and wisely select the operating modes of the tool.
The sequence of actions is as follows:
- The piles are being marked.
- The cutter is selected for specific working conditions.
- The tool is adjusted to the required number of revolutions.
- Cutting is carried out along the ring or towards the center of the pile.
- At certain intervals, a pause is made to cool the edge of the cutter.
If you use tools with water-cooled cutters, you can significantly increase labor productivity due to the absence of the need for periodic stops.
Watch the video on how to trim a pile using a cutter.
Method of cutting heads using hydraulic equipment
Unlike the previous two methods, the method using hydraulic equipment is advantageous not only in its versatility of application, but also in the high accuracy of cutting screw piles.
Attachments can be easily mounted on any equipment with a hydraulic drive of sufficient power, for example, an excavator or tractor. This allows you to significantly save money on renting additional equipment, as well as not clutter up space on the construction site.
The principle of operation of hydraulic cutting is to secure pistons with cutters along the diameter of the pile, which simultaneously and synchronously act on the material and, thus, remove the excess part of the support.
When the cutting tooth rests against the wall of the pile on one side, the tooth on the opposite side increases its pressure. Thanks to this sequence of operation of the mechanisms, a uniform cut with high precision is achieved.
We recommend watching how piles are cut using hydraulic equipment.
Attachable hydraulic equipment
Hydraulic equipment is simple and versatile, making it very popular. It can be attached to any hydraulic excavators and tractors. This equipment operates due to the synchronous movement of circular pistons. They apply equal pressure to the cutting teeth around the perimeter of the pile, and if one tooth hits the reinforcement, the other presses harder. Thanks to this, the head is cut without damaging the concrete and reinforcement of the piles.
There are a number of equipment models that are designed for piles of a certain size. In addition, there are universal models that fit most sizes. The cutting teeth are selected based on the type, design, reinforcement and frame of the piles. Only through the correct selection of tools will the pile heads be cut efficiently and correctly.
Specialists install piles, as well as accurately and correctly cut down the heads. We use high-quality equipment and qualified specialists in our work, who do everything accurately and efficiently, without damaging the pile. As a result, you get a reliable and durable pile field, ready for building construction.
Head welding technology
To weld the head, it is necessary to carry out preparatory work. They consist of removing the protective coating from the screw pile at the welding site. To do this, use a grinder with a special attachment or a metal brush. After this, the quality of the cut is checked by the building level and, if necessary, adjustments are made.
The head is secured by welding
Welding is carried out using electrodes with a cross-sectional size of 3 mm. The current value should be in the range of 95-100 A. The head cap is set to a vertical position, and then three welding points are formed along the diameter of the support, which allow the structure to be temporarily secured. After this, a weld is formed along the marking.
The weld should be made in such a way that a 1-2 cm long section remains unwelded. This solution will ensure ventilation of the inside of the support in order to prevent the formation of condensation in it.
What are they made from?
Reinforced concrete piles are a popular element in modern construction, which makes it possible to perform many tasks and achieve the desired characteristics of structures.
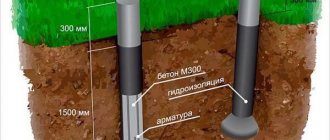
When you plan to build a small facility, it is permissible to use cement with low grade strength - M100. Precast concrete products are characterized by the simplest properties: frost resistance - 50, ability to withstand water column pressure - 2 MPa. The advantages of a mortar prepared from cement with grade strength M100: significant hardening speed, resistance to soil shrinkage.
Materials that provide higher structural reliability are more often used. For example, M200-M500, the frost resistance of products increases to 150. The moisture resistance index is 6 or more.
The strength of reinforced concrete makes it possible to build a foundation at a significant depth. Thanks to this property, it becomes possible to build houses on mobile, clayey, heaving, swampy, and weak soils.
Price
The price for each specific screw pile head can vary significantly. First of all, its cost will depend on the size, quality of the material and location of the manufacturer. Foreign end pieces are often more expensive due to the manufacturer's shipping costs for their products.
On average, round headbands cost from 200-250 rubles. Reinforced heads of large diameter have a lower price limit of 350 rubles.
When planning the costs of construction work, you should also include the cost of delivery to the site. If you do not have your own equipment for welding and cutting piles, you will have to rent it.
For information on how to trim screw piles, see the video below.
End to end connection
Connection to MZP
Reliable end-to-end connection of timber is provided by nail plates; the product is a metal plate 1.0-1.5 mm thick with spikes 8.0 mm high. Spikes are formed as a result of cold stamping using a special stamp; 80-100 spikes are formed on one square decimeter of surface. The plate is installed on the side surfaces of the mating parts with the tenons down, the tenons are completely driven into the wood. The model range is coordinated with the standard sizes of lumber.
If you liked the article, please share it
Previously on the topic:
Share
Metal
Fastening wood to metal has its own characteristics, let’s consider them in more detail:
- Often, when carrying out work with their own hands, developers choose a metal channel as a reinforcing element. This option is very attractive from the point of view of reliability and simplicity of the process, you need to lay channels, and then insert a wooden beam into them; for this, the configuration of the elements must match, so sometimes the ends of the elements need to be cut. It is very important that the beams adhere well to the shelf of the channel
- Special self-tapping screws for fastening wood to metal have a drill tip and thread so that they are securely held in the material. The head can be either a screwdriver or a wrench (most often 8); to carry out the work, purchase a special bit for a screwdriver in advance.
Important! If the thickness of the metal elements is large or they have increased hardness, then it is recommended to first make holes using a drill, the diameter of which should be 2 mm smaller than the self-tapping screws used in the work.
Fastening the board to metal using self-tapping screws
Fastening boards to metal using self-tapping screws is often used during the construction process. In the material presented, we will tell and show how this is done.
- Metallic profile.
- Padding material.
- Wooden block (detail).
- Round washer for wood DIN 440.
- Self-tapping screw with drill without washer DIN 7504 K.
- Wooden cork.
It should be remembered: Wood, when humidity changes, can change its original volume towards decreasing or increasing, so always leave a small gap to compensate for linear changes in size.
Geometric dimensions of the connection.
H – thickness of the wooden workpieceh – depth of the fastening hole L – length of the screw Sp – thickness of the metal profile St – thickness of the wooden plug Ss – thickness of the spacer material Sw – thickness of the metal washer K – height of the screw head D – diameter of the fastening hole d – diameter of the metal washer
Using the formulas we determine:
Mounting hole depth h = Sw + K + St + 2…3 (mm)
Mounting hole diameter D = d + 2…3 (mm)
Self-tapping screw length L = (H - h) + Sw + Ss + Sp + 6...8 (mm)
Help: If (Sp) of the metal profile is large, it is necessary to drill a hole in it with a diameter two millimeters less than the diameter of the self-tapping screw.
How to choose the right strapping material
When choosing a material for tying piles, first of all, you need to be guided by the construction project and calculate in advance the load on the foundation. It is impossible to make these calculations on your own; the probability of error is too high and, as a result, incorrect selection of material, which can affect the strength of the building.
If the design of the house is simple and there is no need to be tied to a specific material, then it is best to buy timber. Its installation is accessible to the most unadvanced builder, and this material retains heat well.
When choosing timber in a store, you should completely exclude lumber with traces of rot or fungus. Cracks and chips are also unacceptable, even deep scratches are undesirable.
The wood must be well dried, otherwise it may “lead” during use. As a rule, for tying a pile foundation, a beam with a cross-section of 15x15 cm or larger is chosen. When purchasing, you need to take into account a reserve of 10-15% of the calculated quantity, since adjustment still needs to be done.
As a rule, a wooden beam, a metal channel is used for the grillage, or you can tie the piles with an I-beam. Each of these materials has its own advantages, as well as disadvantages.
Beam-tied foundation
For example, a foundation tied with a metal corner will support more powerful walls. And the use of timber for tying eliminates the use of a welding machine. And even a non-professional can handle this type of work. The disadvantage of this method is that only a wooden or panel house can be built on such a foundation.
If according to calculations it is assumed that the screw piles will be tied with a channel, then you only need to purchase new rolled steel, with a predetermined cross-sectional size.
Channel tying
The metal piping can be made with a channel, a profile pipe of the required size, or an I-beam. All connections in such a harness are made using a welding machine.
If screw piles are tied with a channel, then it is laid on the pile heads in such a way that in section the profile looks like the letter P. It is this position of the material that can withstand heavy loads.
If it is necessary to install a concrete grillage, it is permissible to lay the channel on the head with the horizontal part. In this case, reinforcement is laid inside and concrete is poured.
A concrete grillage is made in exactly the same way when tying piles with an I-beam, the only difference is that the heaviest walls can be installed on such a foundation.
Channel-tied piles
The metal piping with a pipe or channel is secured to the ends using a circular seam. After welding, the metal elements of the grillage are treated with a primer. Before installing the walls, roll waterproofing is laid between the piping pipe and the future wall.
Self-tiring with timber
You can do the installation of tying screw piles with timber yourself. At the first stage, the material will be impregnated with special solutions - antiseptic and fire retardant, which will protect the wood from mold and fire.
After processing using a laser level, you should check whether the pile heads are in the same plane. If there are discrepancies, cut the corresponding pile and weld the head. In the final version, the heads should be positioned in the form of an inverted letter P.
The next step is laying waterproofing. For this purpose, roofing felt or polyethylene film and bitumen are used.
The process of directly tying begins with the corner elements of the structure: the first two beams are connected at right angles with self-tapping screws. Next, the wooden parts are laid close to each other using brackets or metal plates. The joints of the beams must be insulated with jute tape.
The double strapping method is considered more reliable and durable. The main difference from the first method is that the first level is laid with beams with a cross-section of 200 mm, and the second - 100-150 mm. To lay the second level, there is no need to cut special grooves for installing joists.
How to extend the service life of the harness?
If you use timber: buy softwood or larch. After treatment with special compounds, this material significantly increases its resistance to moisture and fungal diseases. With proper waterproofing, the service life of such beams can be eternal.
If you use metal: after welding, the seams definitely need treatment with anti-corrosion compounds, because the factory coating was damaged during the welding process. This way you will reliably protect the grillage from rust.
