Before implementing the wonderful idea of placing a sauna or steam room in the basement, you need to analyze how justified a bathhouse in the house is, the pros and cons of such a solution. The problem is much more complex than it might seem at first glance; in addition to purely construction problems, permitting issues will need to be resolved. First of all, this concerns fire safety and protection from possible negative factors associated with the proximity of the soil to the walls of the bathhouse.
Bathhouse in the basement
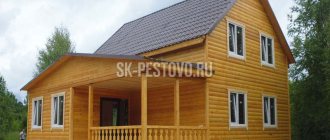
Undoubtedly, the layout of a bathhouse or sauna inside a residential building provides enormous advantages. In a classic building layout, a sauna or steam room is installed on the ground floor of the building or attached to a box in the form of a utility block. The option is quite reliable, but ineffective, since you have to give up valuable living space in the house for a bathhouse, or occupy the local area. Much more interesting is the scheme for moving the bathhouse to the basement of a private house. In this case, it becomes possible to save at least 20-25 m2 and at the same time insulate the basement of the building.
The prospect is tempting, but not everything is so simple. To arrange a bathhouse or sauna in the basement of a private house, you will need to solve quite complex problems:
- Waterproofing and insulation of the basement under the house, thermal insulation of load-bearing structures and ceilings;
- Combating high air humidity in the bathhouse, equipping with effective supply and exhaust ventilation;
- Equipment of the sauna or bathhouse premises with a special sewage system;
- A set of fire safety measures.
When building a bathhouse in the basement of a house, modern materials will be used for waterproofing and insulation, which either burn well or are capable of releasing toxic volatile substances during thermal decomposition.
Water filtration
In accordance with the filtration system used, it is customary to distinguish between two types of pools: overflow and skimmer. The choice of one type or another will depend on the shape of the constructed or assembled reservoir.
Overflow water filtration circuit.
If your home pond has a square or traditional rectangular shape, then a skimmer will do just fine. A skimmer is a special device that during operation absorbs the upper layers of water, where the main dirt accumulates. On the other hand, the same water enters the pool, but already purified and filtered. Recharge occurs through special holes in the wall.
Skimmer water filtration circuit.
It is not recommended to place an overflow pool on the ground floor, because when they are used, the water overflows into special side holes, and clean water flows through the holes at the bottom of the reservoir.
It is worth noting that the proper installation of a swimming pool on the ground floor will depend on a properly drawn up project, which should be developed by professionals. After all, it’s one thing to dig a pit, make waterproofing and put the basement in order; it’s quite another thing to think through the arrangement of communications and their connection to an artificial reservoir.
High humidity
The first factor, not particularly dangerous, but extremely important, is the high level of air humidity. Any baths, both free-standing and inside the house, are built from materials that conduct water vapor well. Logs, bricks, foam concrete - in all cases, part of the moisture leaves the room through pores in the walls. Even if left idle for a long time, the sauna room sooner or later dries out to its natural humidity level.
If you build a bathhouse or sauna in the basement of a private house, the reverse process will be observed; a certain part of the groundwater will seep through cracks and pores in the basement walls. Accordingly, the premises of the steam room, dressing room, dressing room, if special measures are not taken, will be damp and cold.
Therefore, when planning a bathhouse in the basement of a house, you will need to do:
- Drainage of the foundation and perimeter of the basement walls;
- Apply insulation to the outer wall;
- Lay waterproofing of the floor, walls and ceiling of the future bathhouse.
For your information!
Depending on the method of finishing and heating arrangement of the sauna, internal insulation and cladding can be laid according to a ventilated or non-ventilated scheme. In the latter case, a space or gap 4-5 cm thick is left between the concrete basement wall and the insulation of the bathhouse or sauna, through which condensation and the remains of leaked groundwater will be removed from the sauna. Since the bathhouse in the basement will be located in an isolated space, without artificial supply and exhaust ventilation, the insulation and wooden cladding will quickly fail.
Common Mistakes
You shouldn’t assume that if you turn to specialists, you won’t have to check or approve anything. There are often situations when builders fill a pool and do not provide for the placement of an overflow tank. It is located below the artificial reservoir itself (otherwise water will not be able to flow into it on its own). This means that a basement will be required, that is, a technical room for the pool.
It happens that some designers not only forget to take this nuance into account when building an overflow pool, but do not even include it in the project. Therefore, be sure to agree on all the details. If the installation is not carried out properly, then you will have to solve this problem by installing special plastic containers that are designed for a volume of up to 5 tons. If you require more products, you will have to call a specialist who will cook polypropylene directly on site, if the height of the pool allows. It’s not hard to guess that all this will result in another expense item.
Also, sometimes openings for embedded parts are not taken into account. This again happens more often in cases where a detailed design for the future pool is not drawn up. After this, the builder can say that he cast the bowl of the right size, and the rest is not his concern. But in addition to the tank itself, there must also be pipes, and therefore outlet openings in the form of mortgages.
It is important to make sure that the pipes are laid during the reinforcement process, immediately after the first layer has been connected. This applies to those cases when the bowl is not bypassed and is not suspended on special supports. If there are no openings for the mortgages, then you will end up having to drill and chisel the concrete. This will require jackhammers. It is not difficult to guess that their use is most likely to create a lot of cracks in monolithic concrete.
Healthy! Moreover, not only must there be openings, they must be exactly the size specified in the Specification of openings for mortgages. If they are smaller, then the mortgages will not fit into them, which means you will still have to use a bumper.
Fire safety
The most difficult issue that one has to face when arranging a bathhouse in the basement of a private house with their own hands concerns the problem of fire safety. It is known that among outbuildings, fires most often occur in saunas and steam rooms. The reason is always the incorrect installation of the heater in the bathhouse or violation of the rules of its operation.
In conditions when the bathhouse is moved to the basement, the situation becomes even more complicated, primarily due to the requirements of SNiP and fire safety rules:
- Firstly, the rules of SP 4.13130.2009 prohibit the installation of heating devices operating on the basis of fuel combustion in basements. As an alternative, an electric boiler or steam-water heating registers connected to a boiler on the ground floor of the house can be used to heat a bathhouse or sauna in the basement;
- Secondly, for heating the steam room and the entire room, only certified industrial stoves and heaters with automatic safety and blocking devices can be used when the heating temperature reaches an excessive temperature;
- Thirdly, the design of the bathhouse must include a fire alarm, a fire extinguishing system and a fire-resistant door that allows blocking the flame front inside the basement.
In addition, the bathhouse must have an emergency exit, providing the opportunity to leave the premises in the event of a fire. It is clear that in order to obtain permission from the Ministry of Emergency Situations to install a bathhouse in the basement, it will be necessary to use non-flammable materials or special fire-retardant impregnations for wood for finishing.
Types of pool designs
Today, monolithic, frame and inflatable pools are installed in basements. The last option should only be considered if you do not plan to swim often. But for regular use, it’s worth taking a closer look at the other two types.
Monolithic
Constructions of this type are the most solid and durable. But, setting up such an option will not be cheap. Such structures cannot be erected with one’s own hands, without proper preparation. Since this is a very heavy structure, there is a high risk of making a mistake that will lead to damage to the entire house.
Healthy! Monolithic pools seriously increase the pressure on the ground. If you install a 4-ton pool in a house that weighs 300 tons, the changes will not be significant. But if the weight of an artificial reservoir reaches 90 tons, then this is actually dangerous.
You will have to not only calculate the load-bearing capacity of the existing foundation (taking into account how long it has already been in use and under what conditions), but also purchase hydraulic concrete. It's not cheap.
Therefore, of course, it is possible to build such a pool, but it is better to give preference to the next option.
Frame
In this case, we are talking about a factory design, which consists of metal pipes, film, fittings and everything necessary. These are lighter structures that are much easier to install yourself. And most importantly, a frame pool can be installed on the surface. That is, the need to dig a pit is eliminated. However, in this case it is also worth making sure that the foundation can withstand the increased loads.
Among the advantages of frame pools it is worth highlighting:
- A huge variety of shapes and volumes of bowls. If you have doubts about the strength of the foundation, you can always choose a more compact pool.
- If the need arises or the structure was installed in the wrong place, it can be moved without any problems.
- Prefabricated pools are much cheaper.
- Constructions of this type last for quite a long time, since we are talking about a metal structure and a durable film that is located inside.
Healthy! Since we are talking about film elements, they can be damaged by sharp objects. Therefore, such structures must be used carefully.
If we talk about the disadvantages, then a significant disadvantage of frame pools is that they do not provide additional equipment.
Bathhouse in the basement: advantages
For a sauna or steam room built on the base of a building, the safety conditions are not so stringent. Standards remain for the installation of fire-resistant doors; walls and partitions inside the bathhouse on the ground floor must be made of brick, concrete, or in the form of metal frame structures with fire-resistant backfill.
You can use stoves with a closed combustion chamber to heat the bath. In this case, the loading hatch of the firebox is moved outside the walls, into an extension to the house. A stainless steel chimney is laid along the outer wall, or discharged through the ceiling of the house, as in the diagram.
The height of the pipe must be at least 5 m above the level of the combustion chamber.
Often, home owners strive to build a basement version of a bathhouse or sauna. This solution provides high-quality protection of the foundation from frost heaving of the soil. In addition, a sauna box buried in the ground in winter is much more economical in energy consumption compared to free-standing baths.
According to SNiP rules, it is forbidden to store flammable objects and things in the basement; it is forbidden to arrange living quarters and rooms in which a person can stay for more than eight hours at a time. Therefore, installing a steam room will be the best solution to the problem of rational use of space. Good thermal insulation of the floor and walls of the sauna in the basement reduces heat loss through the ceiling of the first floor, and in addition, regular heating of the basement bathhouse dries the outer surface of the walls well and protects them from dampness and overgrowing with moss without any finishing.
For your information! A sauna in the basement of a private house is safer than a basement, since improved ventilation and the presence of windows seriously reduce the risk of radioactive radon accumulation.
Sauna equipment
An electric stove, preferably factory-made, is used as heating equipment, the power of which is calculated based on the volume of the sauna. For example, with a steam room volume of 20 cubic meters, the power of the heating stove must be at least 10 kW.
The equipment must be equipped with an automatic shutdown. It must be installed at a short distance from the floor surface - approximately 20 centimeters. For the stove, a fence is arranged around the entire perimeter so that the boards rise slightly above the stove, and the distance between them and the equipment is at least 5 centimeters.
Special stones for the sauna, which differ from each other in their characteristics and healing properties, will subsequently be placed in this space. The stones should heat up very quickly and retain heat for quite a long time, having a positive effect on the human body.
Natural stone heats up, reaching a maximum temperature, then, under the influence of water, local cooling of the rock occurs. Therefore, stones must be selected with high heat resistance, which will not crack or split.
In addition to the stove, lighting fixtures, thermometers for measuring the air temperature inside, an hourglass and ventilation valves, which are fastened with screws to the internal wooden lining, are installed in the sauna room.
For those who do not want to deal with the installation of a chimney, the construction of a heating stove with the laying of stones, we offer the installation of a ready-made infrared cabin.
Of course, it does not have a high steam temperature, and the depth of heating of the skin is also small. Infrared waves do not penetrate inside, and the skin dries out, which is not very favorable for its healthy condition.
Important. It is recommended to stay in the infrared cabin for no more than half an hour.
Don't forget to prepare material for the sauna
Sauna in the basement of the house: project
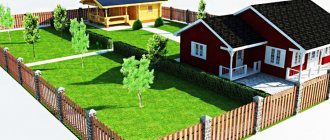
Traditionally, the basement area under the building is built over the entire area of the foundation. One of the layout options is shown in the project below.
In addition to a bathhouse or sauna, a boiler room or furnace room must be built on the ground floor; there may be a garage, a tool warehouse and a small recreation room. Small windows in the upper part of the relaxation room soften the cutting effect of artificial lighting well, so with proper equipment of a bathhouse in the basement or basement, the level of comfort is no worse than in ground-based steam rooms and saunas.
If you don’t want to bother with permits and fire safety permits, you can use the project shown in the diagram below to plan the room for a bathhouse and build partitions.
At first glance, there are not so many advantages from such an organization of the room; only a small part is used effectively, and even then, you have to steam in a sauna measuring 2x2 m.
There are no partitions in the basement, but there is a swimming pool, shower, washing machine and a place to relax. It is the absence of internal walls that provides the most important thing for a bathhouse located in a semi-basement - good ventilation, fresh air and enough space to participate in health procedures.
Pool finishing options
After installing the filters, finishing work begins. Their goal is not only to give surfaces special functionality, but also decorativeness. To perform the work, use a ladder and appropriate tools.
Finishing methods:
- Plastering and painting. This is the simplest and least presentable option.
- Ceramic tile. It looks more attractive than a painted surface. Porcelain tiles look no less beautiful.
- Mosaic. The most interesting finishing option. Mosaic surfaces reflect light, playing with it as the water oscillates.
- PVC film. A simple and inexpensive option. It is used only in small pools. The downside is fragility and fragility.
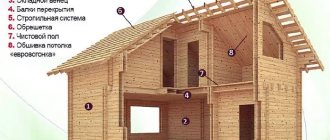
Construction of a sauna in the basement
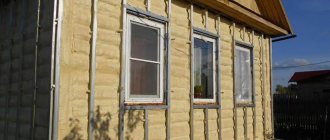
When arranging a bathhouse in a basement or semi-basement, first of all you need to take care of wall insulation and waterproofing. The primary layer of expanded polystyrene and roofing felt are laid around the perimeter of the outer surface of the walls.
This is followed by the application of a coating waterproofing mastic inside the future bathhouse. After the insulation layer has dried, they proceed to installing load-bearing sheathing on the basement walls, which will hold the thermal insulation and lining of the bathhouse.
It can be made from a galvanized profile or wooden slats; wood can be used for sheathing in the basement without restrictions, provided it is impregnated with silicone fire-resistant varnishes or fire retardants.
In any case, there must be an air gap between the wall and the layer of mineral insulation. The ceilings and floors of the bathhouse are made in a similar way. The laid insulation is laid with a vapor barrier and sewn up with finishing material. OSB-3 boards, which have high strength and are resistant to water and open flame, are traditionally used as a rough covering in the basement.
Construction stages
When building a pool, it is important to consider the type of soil. If they are mobile - sand or sandy loam - the walls of the bowl are strengthened.
Work is carried out in a certain sequence:
- Marking the site and pit. These works are performed using a tape measure, level, poles and cord. First, the points at which the corners will be located are determined, then pegs are installed in the gaps - along the lines marked by the level. When marking the boundaries of the pit, take into account that between the walls of the building’s foundation and the bowl there should be 1.5-2 m, no less.
- Strengthening walls. The rabbeting method helps to strengthen the side edges of the bowl. This procedure is especially important on unstable soils. To complete it, you need a hand drill, concrete and reinforcement. 2.5-3 m long passages are drilled into the walls, reinforcement is placed in them and concrete is poured. This results in reliable reinforcement along the perimeter in the horizontal plane.
- Depreciation. The bottom and walls of the pit are first leveled with shovels and vibrating plates, then a layer of sand - 15 cm is poured into it. Having compacted the sand layer, crushed stone - 15 cm is poured into the pit and compacted.
- Waterproofing the bowl. Waterproofing is laid on top of the shock-absorbing cushion. Typically, bitumen-based coating mastics are used for this purpose.
- Walling. For this purpose, a variety of materials are used - concrete blocks, bricks, foundation wall blocks. At this stage, the walls are also waterproofed.
- Reinforcement. After the walls are erected, their rigidity, reliability and durability are increased using a steel frame. It is made of metal rods with a diameter of 10 mm and wire for the bundle. The rods can be connected in other ways, for example, by electric or gas welding.
- Pouring concrete. When doing the work yourself, first make formwork from boards, then prepare hydraulic concrete and pour it into the pit. Each layer of concrete is compacted to create a flat surface. If the work is carried out by specialists, at this stage they lay a concrete slab on the prepared bottom using special equipment.
- Installation of service systems. All equipment is installed in a technical niche constructed under the bottom of the bowl. It is sealed and closed with a hatch.
The room must be equipped with ventilation that controls air flow.
Ventilation and sewerage
The second most important element of a sauna is the ventilation and ventilation system. For a bathhouse located below ground level, an exhaust air exchange system is used. This means that overheated and over-humidified air is removed through a ventilation pipe in the corner of the ceiling.
In a small sauna, it is enough to install one exhaust shaft to ventilate the gap between the walls and the insulation and two pipes for the interior of the bath. One of the vertical air ducts is located in the steam room, in the area of the shelves. Thanks to the exhaust pipe, part of the superheated air from the stove enters the sauna steam room in the shortest possible way and heats the shelves to 60-70 ° C.
In full-size saunas, ventilation ducts and ducts are hidden behind the ceiling sheathing and connected to a centrifugal fan located in a moisture-free area of the basement.
To remove dirty and waste water in the bathhouse, special collection containers are used, from which the collected material is discharged outside the basement.
Beautiful examples
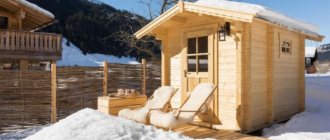
- An excellent bathhouse made of natural wood, which is made in a minimalist style.
- A luxurious bathhouse in a large basement, which includes a relaxation area.
- Bathhouse with a separate shower room and shower stall. The lighting inside creates a unique microclimate and allows you to relax.
- Sources used in the article:
https://stroy-banya.com/karkas/banya-pod-domom-v-podvale.html - https://stroyday.ru/stroitelstvo-doma/pridomovye-postrojki/sauna-svoimi-rukami-v-podvale.html
- https://stroypomochnik.ru/banya-v-podvale-01/
- https://o-vannoy.ru/banya/vse-o-saunah-v-podvale/
- https://PlanVsem.ru/banya/banya-v-cokolnom-etazhe.htm
- https://poparimsya.online/stroitelstvo/banya-dom/podvale-sauna.html
- https://bouw.ru/article/banya-v-podvale-chastnogo-doma
Sewage disposal system
Removing dirty water at the end of bath procedures is not as simple as it might seem at first glance. The reason is obvious - the basement itself is located below the level of the sewer pipes and drains of the house.
Therefore, all wastewater in the basement is collected in a sealed tank or cistern connected to the sewer riser of the house at the level of the first floor. An air compressor is connected to the container with waste water; after turning it on, excess air pressure forces the collected liquids into the general sewer system of the house.
Sometimes bathhouse owners take a more expensive and reliable route; instead of a compressor, a submersible fecal pump is installed in a collection tank in the basement subfloor, capable of pumping the contents directly into a septic tank or cesspool.
Disadvantages of a swimming pool in the basement
Although you won't have to think about add-ons or heating, you will need to organize many additional systems. For example, you will need high-quality ventilation, overflow tanks, drainage, etc.
Also worth noting:
- High humidity. The basement will need high-quality waterproofing. Otherwise, the artificial pond will become a source of mold and mildew.
- Often the pool is located asymmetrically in the basement. This leads to the fact that the foundation is not strengthened, but experiences increased loads. It may get to the point where the so-called folding of concrete strips occurs.
- If the soil breaks below the level of the slab or foundation support, then there is a risk of losing the stability of the foundation of the house. Therefore, you should not try to destroy the pool, which will be part of the foundation. It must have its foundation.
- At the excavation preparation stage, there is a serious risk of damage to the walls of the house. In the saddest situations, houses are simply piled into pits.
These are quite serious disadvantages. In addition, not every type of artificial reservoir can be installed in a used house.
Bath drainage system
Upon completion of the bath procedures, the problem arises of how to remove the remaining humid air and traces of condensation from the basement. If this is not done, then most of the water vapor will settle on the insulation and condense on the floor and ceiling of the sauna.
There are two schemes for the bathhouse drainage system. In the first case, for small saunas, the heat of cobblestones laid on the grid of an electric heater is used. The heat reserve of the stone heated to 150°C is enough to dry the steam room of the bathhouse, most of the walls and the washing tray. To speed up the process, an inlet window for fresh air is installed in the basement, next to the heater.
For large sauna rooms, a heater is clearly not enough, so to dry the basement, they use forced supply and exhaust ventilation. Most of the air enters through cracks in the basement flooring and is exhausted through the exhaust pipe.
If the size of the sauna in the basement does not exceed 10 m2, a conventional fan heater mounted in the lower part of the coldest wall of the sauna can be used as a dehumidifier.
Electric heating or wood?
It is not easy to answer the question: what type of stove to choose for a home bath in the basement. First of all, because it is very difficult to define specific criteria that would allow such an unambiguous assessment. Even if we take into account energy efficiency, cost or ease of use, this comparison can only be made on individual models representing a given type of heating.
What to consider when choosing stove types
| Varieties | Peculiarities |
| Single-component electric furnaces. | Dry sauna stoves, in which we pour water (usually with the addition of essential oils) onto heated stones to obtain higher humidity. |
| Electric dual-function ovens. | This is a stove with an evaporator (for example, from the Bi-O series), which will fill the bath with dry, humid air or steam. |
What to choose? The answer usually lies in the preferences of the person planning their own home bath in the basement. In technical questions regarding the possibility of using specific stove models in rooms intended for bathhouse needs, it is worth consulting with production and assembly specialists.
Heating
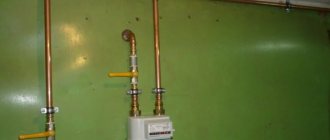
The heating system for a bathhouse in the basement can be divided into two independent circuits. The first is used for general heating of the sauna, providing hot water for the steam room and shower. For these purposes, a double-circuit gas boiler installed in the utility room of the first or basement floor, outside the bathhouse, is ideal.
If the house does not have water heating, then to heat the basement you can use an industrial solid fuel boiler with automation and a built-in heat exchanger. In any case, the source of hot water should be installed outside the basement and bathhouse.
The second scheme is used to heat the sauna. In this case, only a factory-made electric heater should be used for the basement. The wiring for connecting the electric heater is laid behind the wall cladding, always in asbestos or fiberglass sleeves. Metal or plastic corrugations cannot be used. The heater must be equipped with grounding and UDO, the control panel is mounted on the wall at the entrance to the steam room of the bathhouse.
According to the conditions of SNiP, an electric stove for a bath in the basement must be equipped with an automatic shutdown when the maximum temperature reaches 150 ° C and a timer that de-energizes the heater after 8 hours of continuous operation.
Features of constructing a swimming pool with your own hands
A DIY basement pool is double the fun.
But you need to understand that all operations should be carried out after agreeing on the project with specialists, since the ground floor is the foundation of the entire house. If you make a mistake in even one operation, you can weaken the lower, fundamental part of the house. This is interesting: How to make a sauna in a basement.
It is necessary to think through every step, using special concrete mixtures, waterproofing, and reinforcement. For more pleasure, you can use hydromassage, steam room, build a sauna and even a gym.
Materials for arranging a home sauna
As with most above-ground bathhouses, linden and aspen lining is used to line the steam room in the basement. Usually masters do not want to use fire retardant impregnations in the sauna, considering them harmful, but in vain. This coating increases the ignition temperature of the wooden cladding of the bathhouse walls from 180°C to 310-350°C. Otherwise, the fire inspector will be forced to install a dry pipe fire extinguishing system in the sauna.
To finish the rest of the walls of the bathhouse in the basement, OSB, waterproof plywood and plasterboard are used. The shower section in the sauna, if there is no cabin, is tiled. Apart from impregnated wood and mineral materials, nothing can be used to finish the walls in the basement.
To insulate a bath, two types of materials can be used. In the first case, the ceiling, walls and floor of the sauna can be insulated with special heat-resistant PBS-S foam, provided that the sheets of material are covered in the basement with cement screed or ceramic tiles.
In the second case, the insulation of the walls and ceiling is carried out with mineral wool with a two-layer patch of waterproof plasterboard and tongue-and-groove strips. Such a sandwich is not afraid of moist hot steam and at the same time protects the basement thermal insulation layer well from condensation.
Steam room assembly
After determining the location of the sauna and making an individual project, they begin to assemble the steam room. According to sizes:
- vertical and horizontal bars are installed;
- all corners of the structure are checked;
- outside the frame, the walls are sheathed with sandwich panels, clapboard or plywood;
- Insulation is laid on the inside, and a vapor barrier layer is placed on it;
- all joints are carefully covered with foil tape;
- internal walls are sheathed with longitudinal or transverse slats made of non-coniferous wood;
- similar actions are performed with the ceiling;
- the floor inside is covered with ceramic tiles, on top of which a grating is installed so as not to burn your feet;
- build two shelves for a comfortable position while sitting or lying down;
- a stove (floor or wall) is installed with an enclosing structure.
When assembling the steam room, do not forget to follow the instructions
We are drawing up a project
After we have analyzed all the nuances, we can proceed to creating the project and drawings.
The size of the room for the steam room depends on the availability of free space and the tastes of the owners, but it is recommended to focus on 12-14 square meters. m. Such an area will allow 3-4 people to comfortably stay in it at the same time, equip a shower stall and a dressing room.
The optimal ceiling height is 1.8-2 m. If made higher, it will complicate rapid heating, and if it is lower, it will create difficulties for tall people.
The average recommended steam room size is 3 square meters. m. Again, if you build more, it will require a more powerful and expensive heating system. Such rooms are characterized by the arrangement of several tiers of shelves, up to 50 cm wide, with the same distance from the floor.
Important! When including finishing materials in the upcoming estimate, it is important not to forget that all of them must be moisture-resistant and fireproof.
Two of the four walls of the steam room must be adjacent to the walls of the main building. It is important to have the ability to organize ventilation, water supply and drainage, and power supply.
Arrangement of the rest room
This room is no less important than the steam room itself. This is where intimate conversations take place, and the relaxation of steamed, heated owners takes place. The design of the room should be as comfortable and functional as possible. Usually, there are armchairs, a sofa or ottoman, a table, shelves, a kettle and a TV.
If the basement space allows, then the rest room is made large, where you can additionally place:
- billiards;
- large table for several guests;
- fireplace;
- a big sofa;
- bar;
- gym and other additional amenities.
Installation of a sauna stove
The most basic structure in a bathhouse is, of course, the stove. Usually they rarely make it with their own hands, but buy a ready-made version. This is because modern technologies make it possible to create very efficient and inexpensive stoves that, even in the basement, will quickly warm up the room and make it a full-fledged steam room.
But besides the purchase, it is also very important to install the stove. If it is installed incorrectly, it will have little service and efficiency will be low. The work is carried out according to the following scheme:
- We are digging a pit specifically for installing the stove. It should be 30-35 centimeters larger in size than the stove and must be at least 20 centimeters away from the wall.
- Crushed stone is placed at the bottom of the pit and compacted. Then everything is poured with concrete.
- The stove must be installed in such a way that the ventilation pipe goes out into the hole in the roof, and there is a place for storing firewood in the dressing room.
If you build a bathhouse with your own hands in the basement, it is better to use ceramic ducts for ventilation. They are more expensive, but will help retain heat in the house and reuse it to heat living spaces.
Building a sauna together with your home is a simple but very effective method of saving money on construction, as well as subsequently saving on heating the entire house. You won’t be able to build such a room for a large company, but it’s a very good option for a vacation for the whole family. Moreover, now there are a lot of interesting projects that almost everyone can implement.