Forming a laminated floor is, on the one hand, a process that requires strict adherence to technology and execution by professionals. On the other hand, you can do the installation yourself. Let's look at laying laminate diagonally and analyze the advantages and methods of this method in comparison with the usual direct formation of the coating.
Laminate floors have become extremely popular today. Many people decide to do all the installation work on their own, which allows them to get aesthetic pleasure from the result, while also saving money. But non-professionals lay out the floor, as a rule, using the simplest installation method, that is, placing the panels along or across the room.
This standard installation is good if the room has the correct geometric shape. And when the walls in the room are uneven or designed with a curve, another installation option will help out: diagonal laying of the laminate.
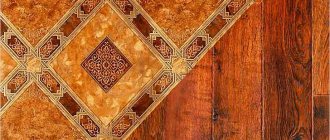
With the standard installation option, the lamellas are laid out parallel to any wall in the room, and with the diagonal method of laying the laminate - at an angle to the wall, usually 45 degrees. This is the optimal angle of deviation of the boards from the wall, but given that the adjacent walls are not exactly perpendicular, the angle of the panels inside the same room may deviate from 45°.
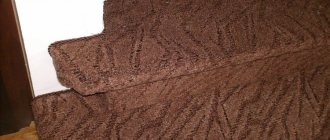
Diagonal laying of laminate
Despite the fact that installing a laminate floor is a technology that requires compliance with technical recommendations, it is quite possible to do it yourself. Let's take a closer look at how laminate flooring can be laid diagonally, what are the advantages and disadvantages of this process, and also compare different methods of laying flooring.
It's no secret that today laminate flooring is at the peak of popularity, so for most people there is a question of installation - and some prefer to do the work themselves, customizing the finished result to their needs and requests, as well as making quite significant savings.
Most often, those who do not have experience in laying floors do it in the usual direct way and lay out the panels in a straight line, along the walls in the room.
Installing laminate flooring is easy to do manually, following the recommendations
This solution is good only for those rooms that have the correct shape - if there are features such as an unconventional shape or rounded walls, the diagonal laying method will help.
While the standard technique places laminate panels so that they are parallel to one wall and perpendicular to the other, otherwise they are laid diagonally at an angle of about 45 degrees. As a rule, it is this angle that allows you to achieve optimal results.
Advantages and disadvantages of the method
One of the main advantages that I would like to highlight is the interesting and original appearance of the room, a good design solution that visually adds volume to the space while maintaining the usual length and width. Coverings laid out in this way look neat in narrow rooms that are very elongated in length. If the room has a hexagon shape, has niches or curves, then with the direct installation method most of the flaws will be noticeable immediately.
The diagonal method of laying laminate allows you to give an unusual look to the room
List of advantages:
- hiding wall imperfections - with a large number of corners or the absence of parallel walls, any imperfections will be much less noticeable;
- expanding the space visually in small rooms (especially if there is not a lot of furniture in the room);
- the coating looks much more natural;
- if the windows are located asymmetrically, the light enters the room more effectively;
- for standard-shaped rooms, diagonal laying will give an additional external effect if you choose several coating options that match each other in color;
Diagonal laying allows you to hide flaws such as uneven walls, asymmetry of windows - the effect of the floor transition between two adjacent rooms is also much less noticeable;
- Particular effectiveness can be achieved with a skillful combination of direct and diagonal methods.
Unfortunately, there are also disadvantages:
- first of all, the amount of unspent material and scraps is much higher than with the standard method - overconsumption is approximately ¼ of the total amount of materials;
- the process of drawing up a plan is quite labor-intensive and requires much more time for counting and drawing up drawings;
If you lay the laminate diagonally, you will have to purchase more material than would be needed with the “standard” method
- can cause difficulties, especially when installed in a room where the walls are completely unsymmetrical;
- you need to carefully monitor the humidity of the room where the work is being carried out - not all types of laminate flooring can withstand serious changes in humidity.
In general, with a competent approach, this method has many more advantages than disadvantages.
laminate
How to prepare
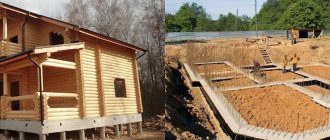
Every careful and careful owner should know that the foundation is extremely important when performing preparatory work. Having analyzed what material the base is made of, it will be possible to choose the right type of preparatory work. Usually we are talking about two different types of lower base.
Concrete
Usually we are talking about a concrete base if repairs are carried out in an apartment building with a large number of floors. In this case, preparation will begin with pouring a screed of cement and concrete - this is simple and accessible to everyone. There will be no need to attract external forces and employees.
It is necessary to properly prepare the base and, if necessary, fill the screed
Here's what you should pay attention to if you have a concrete base:
- the screed will dry for at least 3 weeks;
- to cope with drying faster, add plasticizers to the prepared solution;
- be sure to make sure that the screed is neat, without cracks or depressions - such parts can cause significant damage and cause problems in the future. To avoid this, it’s easier to simply replace the screed with a new one.
Remember that the screed dries completely only after 3 weeks, so it will not be possible to lay the laminate right away
If you take into account all these nuances, the result will be of higher quality and faster.
floor screed
Wood base
Of course, wood is a much less durable and stable material, despite the abundance of all kinds of impregnations and compositions. That is why, before laying the laminate, try to perform a few simple steps that will allow the floors to last longer:
- first of all, get rid of all floor elements that are affected by rot or mold - this kind of bacteria tends to multiply;
- if there are elements that do not hold well, be sure to additionally strengthen them with nails or self-tapping screws - this will allow the floors to last longer and prevent unsightly creaking;
- if you notice any major deformation, then it is best to re-lay the wooden covering of the base completely, rather than waste energy on a tedious and lengthy restoration;
If you are laying laminate flooring on a wooden base, you need to carefully inspect the subfloor for deformations and weak fixation of floor elements
- If the working surface becomes uneven, you can use sheets of chipboard or plywood.
Correct implementation of all prescribed recommendations will help extend the life of wooden flooring by almost a quarter of a century!
List of tools
First of all, we will need a saw with fine teeth; a special machine, jigsaw or circular saw will also work well. However, remember that hacksaws for working with metal and hand saws will not work.
Additionally, purchase a hammer, measuring tape, bars and wedges, as well as pencils and rulers for taking measurements.
You need to prepare the necessary materials in advance
How much laminate will it take?
It is very simple to accurately calculate the number of boards required for work using the classical method - just find out the ratio of the total area of the entire room and the area of a single board.
In this case, large panels are first laid out and finally trimmed to the desired size, then, in the second row, you will need to lay out whole panels, in addition to the last one - it is carefully trimmed until the desired size is achieved. The same is done with the third and any subsequent step.
In general, the installation principle will practically not differ from that of direct installation - the only difference is that the trimmings will be triangular, and initially the amount of material must be prepared in greater quantities. So, the amount is calculated from the area of the room, but it will be necessary to add approximately 15 percent of the amount of material for additional waste. For particularly experienced installers, this number can be reduced to 5 percent; average values will be around 10 percent.
Interesting! This amount of reserve will be required when laying at an angle of 45 degrees; if the angle increases, then there will be more waste. It is better not to deviate from gold standards.
How much laminate is needed for laying diagonally
Diagonal as a way of conveying the depth of space, dynamics and direction of movement - we understand the basic technique of constructing a composition in painting, photography and cinema.
Human perception of visual images occurs to a greater extent on a subconscious level. Looking at the image, the viewer involuntarily reads the rhythm, catches the direction of movement, and notices the internal roll call of elements. But he can hardly explain what exactly attracted his attention.
Compositional techniques act as a kind of means of manipulating the viewer’s consciousness - they attract the eye to plot-important objects, dictating the way to read them correctly. One of the most important compositional techniques is the rule of diagonals . Let's figure out how it works, what is the difference between the main and secondary diagonals and when it is better to avoid it.
What is the diagonal rule?
The rule of diagonals is the arrangement of important elements of the composition along lines running from one corner of the frame to another.
As a technique, the rule of diagonals was consistently described only in 2007. Dutch photographer Edwin Westhoff described it in his book The Diagonal Method. He came to the conclusion that in constructing a composition on a plane, it is not straight lines that are more important, but diagonal lines. This was another attempt to resolve the eternal dispute regarding the inaccuracy of the golden ratio rule. However, the diagonal method itself does not attach much importance to the location of the lines.
The diagonals may not be clearly located in the center of the composition and intersect at different points. It is much more important that the objects in the image are located exactly diagonally with a maximum deviation of 1 millimeter.
Functions of the diagonal in composition
- Increase the depth of space
Essentially, the principle of linear perspective combined with diagonal perspective works here. The longest straight line inside the image is the diagonal. It becomes the core that organizes the entire composition, allowing you to visually expand the space and increase the number of objects. When they are lined up diagonally, their scale relationships are easier to read by the eye.
Any elements of the composition can serve as diagonals: natural objects, architecture, shadows, position of body parts, direction of views. For example, in the photographs of Elliott Erwitt, diagonals in combination with other techniques (reflections, defocus) make the compositions multidimensional and deep.
Elliot Erwitt - Portrait of Marilyn Monroe (1954)
Elliot Erwitt - "California Kiss" (1955)
Elliott Erwitt - Wilmington. North Carolina" (1950)
- Strengthen the dynamics
Each line in the composition is given a specific meaning. Smooth horizontal ones - peace and regularity. Vertical ones are more dynamic, although they are not comparable in degree to diagonal ones. Being the most active line of the frame, the diagonal automatically gives the entire composition a more vibrant sound.
Eugene Smith, an American photojournalist, often builds his composition by relying on diagonals. To convey internal tension, he slightly changes the shooting angle, using a corner point.
Eugene Smith - Country Doctor series (1948)
- Emphasize the direction of movement
If the main elements of the composition are located along diagonal lines, it is easier for the viewer to read the direction of movement. It can be directed both towards the viewer and away from him.
For example, in most famous paintings by Surikov, Vasnetsov, Repin, the core of the plot is movement conveyed using a diagonal. Thanks to this, the frozen canvas gains mobility.
Valentin Serov “The Rape of Europe” (1910)
The rule of diagonals in cinema
The universality of the diagonal rule makes it applicable to any form of fine art where movement is required. However, in cinema there are more possibilities for conveying movement: changing angles, editing, camera zooms in and out, different sizes. In this case, the rule of diagonals is used as often as the classic division into thirds.
The diagonal construction of the frame allows you to emphasize the depth of space and enhance the dynamics of movement, since the object changes in several ways. For example, moving away from the front shooting point, it becomes smaller in height, width and length. As a result, the viewer gets an impression identical to the real movement of objects in space.
Still from the film "Citizen Kane" (1941)
When setting up the composition of a film frame, the operator has to think through not only the logic of the arrangement of elements, but also the degree of impact of the composition on the viewer. Depending on the meaning of the scene, the composition can be static or dynamic and evoke appropriate emotions - calm, peace or anxiety and excitement.
Still from the film “The Cabinet of Doctor Caligari” (1920)
Peculiarities of perception
A person simplifies the structure of visual images, so the ordered composition of a frame is easier to understand. The rule of diagonals makes the meaning of the composition accessible to the viewer. The main diagonal runs from left to right, from bottom to top. It is called ascending. It is believed that it gives greater dynamics to the image and at the same time is more positive in mood.
For example, in the painting “Stages of Life” by the German artist Caspar David Friedrich, the composition scheme consists of three plans. Along with the general static nature, it is the diagonal line that creates dynamics. Along it we enter the space of the picture. The movement begins with the figure of an old man in the foreground. This is the starting point for our view. We mentally take his place and begin to move towards the group of young people, discovering a sea panorama. The next stop is the central frigate. With a side glance we fixate small boats and rush further diagonally towards the sailboats on the horizon. The movement is complete.
Caspar David Friedrich "Stages of Life" (1835)
Downward movement - from the upper left corner to the lower right. Unlike the first diagonal, it is somewhat more difficult to read by the eye, since traditional perception (from left to right) is easier and more natural. The downward diagonal is more passive and conveys a calm and even dramatic atmosphere well. But these rules may not be observed with such precision: exactly where the diagonal will be directed depends on the author’s idea and the purpose of the composition.
In cinema, the position of diagonal lines often depends on the location, lighting and, in combination with other techniques, can take on different meanings. Roman Polanski in The Tenant uses diagonals to enhance the protagonist's sense of anxiety and illness.
At the same time, along with the diagonal in the frame, they use framing techniques, working with light and shadows and other methods of conveying a depressing atmosphere.
Still from the film “The Tenant” (1976)
When not to use
We associate verticals and horizontals with a calm, stable state. Diagonal is the opposite of static. Since it is inclined in relation to the boundaries of the frame, the viewer experiences a more acute sense of instability.
Often the construction of a composition is very closely related to the emotional atmosphere of the plot. If the goal is to convey a calm, harmonious or neutral situation, then the surrounding space must be appropriate. For example, the photographs of the German photographer Andreas Gursky, filled with the same type of elements, do not need diagonals. Smooth horizontal lines convey monotony more convincingly.
Andreas Gursky "99 cents"
Andreas Gursky "Rhine"
The state of melancholy and hopelessness that Oleg Yankovsky’s hero experiences in “Nostalgia” is also better emphasized by straight horizontal lines than by diagonals. Although some shots of the film cannot do without them.
Stills from the film “Nostalgia” (1983)
Source: tvkinoradio.ru
What rules should you follow?
It is better to learn these recommendations before you begin the actual installation - this way you will achieve the best result.
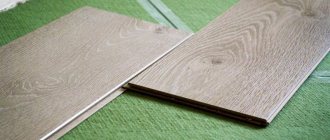
- First of all, let the laminate sit at room temperature - it should adjust to the microclimate of the room for about two days.
- Then carry out an inspection after unpacking the material - it must be intact and not damaged. All boards with facial defects must be discarded; only those with minor defects on the rear will be suitable.
- The air temperature in the room where installation takes place should be about 20-25 degrees, the maximum range can be from 13 to 30 degrees, but these conditions will already be quite extreme.
Laying laminate flooring should be done in a room where the temperature is at least 13 degrees (optimally 20)
- The main thing is humidity! It should not be too high (more than 70%) or low (less than 45%). Also keep an eye on the surface roughness indicator; it can be no more than 3 millimeters per square meter.
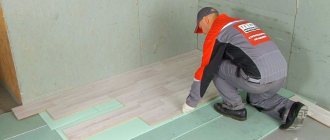
- The backing is required.
Its material depends entirely on your desire and possibility. The most budget option is a regular polyethylene film; for a high-quality coating, you should not skimp and purchase a good cork backing. underlay for laminate - Be sure to factor in the 10-15 percent laminate waste difference.
- Take care in advance of a diagram that will help you lay out the laminate correctly and avoid additional consumption of materials.
Be sure to lay a backing under the laminate - it will help extend its “life” and soundproof the floor
A little trick from the owner: the pieces of laminate that remain from the first laid row can be an excellent start to the next one.
It is best to stick to an angle of up to 45 degrees (about 30 is acceptable). This installation method is good for rooms with a width of up to 6 and a length of up to 8 meters.
We recommend that you first familiarize yourself with interesting design projects in order to develop your own beautiful and neat option. Show your imagination and rely on other people’s experience.
It is better to lay the laminate diagonally at an angle of about 45 degrees
Reliability above all: how to properly hang a mirror in the hallway
The wisdom of the ancient sages will not save the mirror from falling if it is not securely fastened. The choice of mounting method depends on the size and weight of the mirror, the surface and the ability to drill into walls.
Rectangular mirror in Chinese Feng Shui style
Installation without drilling or nails, is that possible?
Light mirrors weighing up to 10 kg can be glued, but not to every wall. Water-based paint, liquid wallpaper and lime whitewash are not friendly with glue and can peel off at any time. A mirror can be glued to drywall if it is first primed.
Suitable here
×
Round mirror in white frame Sheer
6 500 ₽
6,500 ₽ buy
Round mirror for the hallway according to Feng Shui
Wallpaper interacts well with glue only if it has been glued for a long time. A fresh canvas under the weight of a mirror can form an accordion and crawl.
Important:
to glue the mirror to the wallpaper, you need to make an intermediate screen for its back side. A fiberboard sheet 30-40% smaller than the mirror area is suitable. It is fixed to the wall using self-tapping screws.
Which glue to choose?
Of course, no one glues a mirror to the wall with ordinary stationery glue, because its average weight without a frame is 2.5 kg. It is best to choose a durable and elastic synthetic adhesive that has high adhesion to the coating on the back of the mirror. For massive objects, polyurethane glue is suitable; for lighter ones, you can use silicone or reliable double-sided construction tape.
Classic furniture and mirror for Feng Shui hallway design
Before applying glue, wallpaper and drywall must be cleaned of dust, covered with a polymer primer and strengthened with acrylic varnish or PVA.
Important:
is it possible to hang a mirror in the hallway on tiles?
Yes, but only with silicone glue. Examples of modern mirrors for the hallway
Features of installing large mirrors: that scary word “dowels”
No glue will hold the large mirrors in the hallway on the wall. For models over 10 kg, only mechanical fastening is suitable for adhesive.
How to hang a mirror on the wall in the hallway weighing more than 10 kg:
- on a wire like a painting. Well suited for medium mirrors and mounting on brick and concrete. Self-tapping screws can be wrapped into a thick frame or aluminum plates with hooks can be glued if it is thin. A nylon cord or steel wire is stretched between them with a slight sag. A dowel or plug is driven into the wall under an anchor hook, on which the mirror is hung;
- using a hook on beams screwed into the wall. Before wallpapering, a niche is cut out in the wall across the entire width of the mirror and about 20 mm deep, into which a wooden block is inserted using dowels. It should protrude from the plane by about 2 mm. Next, as in the first option, the wire is stretched and the mirror is hung.
Full length mirror for a large hallway
How to properly hang a mirror in the hallway is up to you to decide. The main thing is that it is reliable and safe.
In what cases is laminate not installed?
Laminate will not always be a good option for flooring. There are conditions that make this type of coverage impossible or impose certain restrictions on use.
First of all, you should not lay a laminate flooring with glue (or any similar method) - not only does it look terrible, it also reduces the durability of use. Shrinkage of the building or temperature changes will cause the coating to simply move.
Interesting! Laminate is not a suitable option for those rooms where the natural air humidity is higher (this applies to saunas or baths, showers, open spaces, balconies and terraces).
If the humidity in the room is high, it is better to avoid using laminate flooring.
If the room requires high traffic or the constant presence of a large number of people, then it is better to give preference to another material that is more resistant to wear.
Special cutter, guillotine for laminate
A home craftsman should definitely not purchase this expensive tool. Moreover, he is very bad at cutting laminate lengthwise. For the $40-50 they are asking for it, it is better to buy a more expensive jigsaw. The device consists of a base and a handle with a blade for cutting lamellas.
The principle of its operation is quite simple. Place the laminate board on the base and lower the handle down. However, there are some peculiarities when working with this tool. Here they are:
- As mentioned above, this guillotine does not cut lengthwise well;
- It does not cut very neatly; the cut piece looks like a stub. Even a sharp cutter blade literally tears the laminate;
- You need to apply a lot of force, and the blade quickly becomes dull. My hands get very tired. Thick laminate over 8mm may not be cut;
- Only used for cutting laminate. Those. This device will no longer be useful on the farm. This means it is not suitable for home use.
Laying technology: making the right choice
Remember that choosing the technology by which installation will be performed is a very important task that cannot be neglected. Here are the basic techniques.
| Method | Description |
| Adhesive installation | With it, laminate boards are secured using adhesive mixtures specially selected at the end. This method is good because it allows for good sealing of the joint areas, good waterproofing, lack of deformation and resistance to changes in temperature conditions. This installation is quite easy and simple. However, the disadvantages include the impossibility of replacing individual elements if they are damaged - only through complete dismantling. |
| Castle Click | This method is considered one of the most popular - the laminate is installed quite easily, the method is accessible even to beginners, and the boards using this system are attached at an angle, which allows you to quickly and conveniently dismantle the coating partially if damage or other deformation of the board occurs. |
| Castle Lock | The Lock method is similar to the “Click” method, however, the parts will be attached precisely in the horizontal plane - for example, when installing boards between walls or making a second row along the length, if the distance between the rows of boards is small. The boards are knocked down using a block and a hammer between two rows. All rows will subsequently be mounted in the same way, without changes. |
There are several ways to install laminate flooring
Installation features
It would be a good idea to pay special attention to how best to design the places where the panels come into contact with the heating pipes.
The first method is to drill a hole in the panel that will be about one and a half centimeters larger than the diameter of the pipe. This gap can be made on two joint boards by drilling a separate semicircle on each. Or, if you want, drill a hole in the board, and after that, divide the laminate sheet into two halves.
You need to drill a hole in the laminate board for the heating pipe
To seal the area where the panel meets cutouts and central heating pipes (or other elements that cannot be removed), use sealants.
As you can see, everything is very simple - laying a laminate flooring in a diagonal manner does not present much difficulty; it only requires accuracy and precision in drawing up estimates and counting the material. It is better not to start this method without planning. As a result, you will have a neat and beautiful floor with an unusual coating effect that you were able to create with your own hands.
The room looks more spacious, there is more visually defined space - this will be a huge advantage for apartments with small living space.
Laying laminate diagonally allows you to visually expand the room
During installation, please note that difficulties may arise when purchasing products from brands such as Cronotex, Berry Flour, Tarkett, Vitex and Pergo. The fact is that each of these companies has a number of developments that can affect how the panels move, what type of lock and its size. If you find that you have difficulty connecting blocks, then create rows with alternating short and long locks.
Interesting! The most accurate way to cut the material is with an electric jigsaw from the reverse side - this way you will protect the surface from chipping.
Laying laminate over a cement screed is usually done no earlier than a week after application. In winter, it is better to wait three weeks or even a month. To level wooden floors, use OSB boards, isolon or underlay.
It is better to cut laminate using a jigsaw
jigsaw
What is the best way to cut laminate flooring when installing it at home?
The floor covering should not have chips or cracks. To evenly cut laminate flooring at home, select a lightweight and compact tool.
Is it possible to cut laminate flooring with a grinder?
An angle grinder or grinder is used for grinding, sawing and stripping material. The laminate is trimmed in the following order:
- The panel is laid on a backing made of plywood or boards 6-10 mm high, face up.
- Apply the square to the adjacent perpendicular side along the marks and draw a line with a sharp construction or stationery knife, cutting through the decorative coating.
- The slab is cut according to the mark obtained.
- To prevent the wood from melting and the material from having the smell of burnt wood, diamond blades are used for metal.
When cutting with a grinder, a lot of dust is generated, which can clog the locking mechanism. Therefore, after cutting, carefully wipe the piece of laminate with a rag.
Panel trimming work is carried out on the street or balcony
How to cut laminate flooring with a jigsaw without chipping
The cut on the panel after using a jigsaw is smooth and without cracks. To cut laminate flooring with a jigsaw at home, set the machine to high speed and install a saw blade for laminated fibreboard flooring. If such a saw is not available, experts recommend using thin metal files with miniature teeth.
To ensure that the decorative surface does not have chips and the cutting line is smooth, the panel is laid on the surface with the decorative side down. Markings are applied to the reverse side using a simple pencil. The cutting line is moved to the edge of the table so that it is suspended. Holding the blade with one hand, the other makes a cut along the markings.
The cutting guide bar is used when cutting laminate flooring over 15 cm wide.
How to cut laminate flooring with a circular saw
An even and beautiful cut is obtained when cutting a laminated floor panel with a circular saw. At home, the instrument is placed on a table or on a base placed on the floor. The work is carried out outside or on a loggia, since sawing generates a lot of dust.
The laminate is laid on a solid base with the decorative coating on top. Strengthen it with a clamp so that the panel does not move when cutting. Markings are applied using a pencil and a square. A metal disc is installed in the saw and the cut is made with slight pressure on the saw.
The tool is smoothly moved in the direction of the line, without slowing down or rushing
How to cut laminate with a hacksaw
A hacksaw for metal has fine teeth, so the cut of the laminate is smooth and neat. The panel is laid face up on the base. Make markings and start cutting.
Attention! Experts recommend using mechanical tools if you need to cut out 1-2 parts. To cut when laying laminate in a room, use power tools or a construction cutter.
At home it is difficult to find the right power tool, but a hacksaw can be found in any household
A wood hacksaw is used extremely rarely for cutting laminate flooring, since large teeth damage the cut. Experts recommend using the tool only in cases where a sloppy cut can be covered with a plinth.
They start sawing from the edge, smoothly moving the hacksaw along the markings, without making any effort so that the edge does not break off
How to cut laminate with a construction knife
Use a utility knife to cut the thin floor covering. At home, laminate is cut using 2-3 sheets, since the process is labor-intensive and the sharpness of the blade may only be enough for one strip.
The panel is laid on the base. Make markings. Apply a square and, pressing the knife, carefully draw along the ruler. A deep, thin cut will allow you to split the laminate, like ceramic tiles.
A stationery or construction knife is used for cutting only in exceptional cases
In some cases, a knife is used for cutting. The blade is taken out of the stationery and a homemade one is inserted. The cutter is made from an old hacksaw. To cut a panel, cut the edge with a regular blade and then finish it with a cutter.
How to cut laminate flooring with a construction cutter
A professional tool allows you to make cuts efficiently and accurately. The cutter is designed like a guillotine. Using the handle, the knife is lowered and part of the panel is cut off according to the markings. Guillotine cutting is carried out only in the transverse direction.
The construction cutter works autonomously without electricity; cutting requires physical effort
The cut after the guillotine is smooth, without chips or cracks. Professionals who lay panels purchase a cutting cutter for the job. The panel is laid on the base of the tool, a cut is made according to the markings, pressing the handle to the floor.
How to cut laminate lengthwise
Most often, transverse trimming to fit the width of the room is required. But there are times when the last stripe needs a smaller width. In this case, a longitudinal cut is made.
To correctly cut laminate along the canvas at home, use various tools. The easiest way to cut is with a grinder or circular saw. The panel is placed on the base with the decorative side down, marked and sawn.
The construction cutter is designed for cross cuts. To cut the laminate lengthwise, additional supports are placed under the panel and, if necessary, the slab is moved along the markings. To get an even cut, a barrier is installed along which the blade is guided.
Using a guillotine, oblique cuts are made if necessary.
How to cut laminate flooring for a heating pipe
When laying flooring, difficult situations may arise for cutting the panel. You can cut a hole for a pipe in the laminate using a drill with attachments, a grinder or a jigsaw. To do this, the dimensions are carefully made. If necessary, make a template from a sheet of paper and try it on a difficult area.
The hole for the pipe on one laminate panel is drilled using a drill bit. To do this, select a nozzle of the required diameter.
After laying the laminate, the hole is decorated with sealant or grout
Using a jigsaw, they also make a hole of the required size if the drill does not have a crown attachment. Make a hole to the side using a drill. Place a jigsaw blade into it and carefully make a cut according to the markings.
For decorative cutting, use a blade with a fine-toothed blade.
Sometimes situations arise when the cut location falls at the junction of two panels. To do this, two strips of laminate are assembled into one and markings are made. Using the above methods, cuts are made and the floor covering is laid.
General Tips
Under no circumstances should you lay laminate flooring all over the entire apartment, especially if the flooring is installed in several rooms at once, in the hallway and in the kitchen. Try to ensure that each room has its own individual direction for laying the panels.
If parquet is used as a base, be sure to repair it so that it does not creak.
If you are still not sure that you will be able to lay laminate flooring yourself, it is better not to risk it and enlist the help of specialists. The overpayment for high-quality installation will more than pay for itself with long-term operation and no need for repair work.
Remember that laminate flooring is sensitive to water, so do not use water-based adhesives. Also avoid sand or fine gravel, which could scratch the finish. Once installation is complete, wipe the floor with a microfiber cloth.
You cannot use water-based glue, as most of the laminate does not “like” water
Laminate floors look noble, neat, they are durable and of high quality. Be sure to take into account the temperature and humidity in the room.
When laying, sort the scraps and try to use them as much as possible during installation.
Small-sized panels are well suited for diagonal laying.
Beauty is in the details. How else to complement the interior of the hallway
Feng Shui masters advise placing in front of the mirror something that evokes positive associations in you, thereby increasing your joy. However, no figures, symbols, talismans or trigrams should be placed in front of it, since the mirror will reflect their meaning the other way around. It is better to replace them with pleasant paintings with views of nature and fresh flowers.
How to place a painting in the hallway
Mirrors were endowed with special powers not only in China. There are a great many Russian folk legends about them. Even in the 21st century, when returning home to retrieve a forgotten item, many glance at the mirror at random. Similarly, Slavic tradition prohibits keeping broken, cracked and dusty mirrors at home. And when getting ready for a new life or moving, you shouldn’t take an old mirror, especially if it has seen a lot of grief, to a new place. To a new life with a new mirror!
You can have different attitudes towards signs and feng shui, but listening to the wisdom of generations can be useful. Moreover, modern designers agree with many of the ideas of their ancestors in arranging a comfortable hallway.
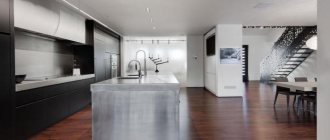
Diagonally laid laminate: interior solutions
Try to experiment: for example, panels of colors that contrast with each other or just shades that are slightly different look good - this gives the flooring expressiveness.
You can use several types of laminate at once, alternating dies with each other - it looks unusual and stylish
There should be a slight difference in color from the walls - this is a general rule for room design. Try not to overload the room with dark or light colors in the interior.
If you are using light-colored laminate, it is best to opt for panels with a noticeably expressed pattern - this option is considered the most advantageous.
How to choose laminate flooring for your home
Light laminate laid diagonally helps make the room visually more spacious.
This coating also looks good in small spaces.
Diagonally laid laminate flooring looks great in the bedroom
Designers recommend choosing light-colored coatings if you want to make the room more comfortable.
You can lay laminate flooring diagonally in the kitchen - this is especially “useful” for small spaces
For rooms decorated in a modern style, laying laminate flooring diagonally is ideal.
Of course, dark laminate can also be laid diagonally - it will look good in offices and bedrooms
Table position
Having become acquainted with the basic provisions, I realized that I had done everything correctly - the desk of an employee of any status should be located diagonally from the entrance. If you place it opposite the entrance, the Qi energy will not linger in the office.
It’s even worse if you have to sit with your back to the door or window, and you won’t lose your health for long. And the one who sits with his back to the door is the first candidate for dismissal. Sitting facing the wall means acquiring some narrowness of thinking.
Feng Shui of the workplace suggests that the best protection is a wall behind your back. It is advisable to hang a landscape with images of mountains on the wall, but only if they do not have sharp peaks. Any peaks or connections of straight lines are poisonous arrows that affect human well-being. For the same reasons, bookshelves and filing cabinets should not be hung above your head or behind your back.
Let's sum it up
In the article, we outlined the basic rules for installing and laying laminate flooring made in a diagonal manner. Despite the fact that this is a rather labor-intensive and sometimes more complex process than installation using the traditional direct method, the result is usually much more advantageous and creates room for creativity and imagination. The room will look much more beautiful and original, often the appearance of the room is truly transformed. Use different colors and feel free to find your own solutions.
We examined the main advantages and disadvantages of this method, as well as the features of its self-installation. If you want your flooring to look good and harmonious, then we recommend that you choose this method.
Feel free to experiment, learn new things and get acquainted with interesting design solutions - and good luck in transforming your home!