I have long wanted to make a soldering gun for myself. I'm not interested in ready-made ones. Since I started converting ATX power supplies into laboratory ones, it became possible to get 24-25 volts at currents up to 8 amperes. In reality, my hair dryer works up to 5 amperes. As a compressor, I used a hybrid of an axial fan, designed in a casing (volute) according to the principles of a centrifugal fan. There were also simply centrifugal ones, but I’m curious to try this option. The idea turned out to be quite workable. It blows no worse than my other centrifugal fans, even in the presence of aerodynamic resistance (the main problem of axial fans). I recommend it if you don’t find a suitable turbine.
Comments
We changed))) we already wrote above, the first thing is to go to the city gas department in Search and say there what you want... Everyone there will tell you what to do next)))
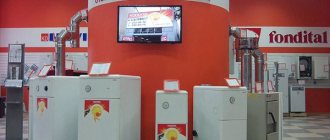
In our apartment we have a boiler, Vailant, German, for heating and hot water. Installed in 2009, the boiler itself cost about 35,000 rubles, the design and approvals cost about 80,000 rubles
we also want to install one like this
I don’t understand... what exactly do you want to remove... hang up the boiler? we need a gas project, call people and change it... and the nozzle is what gas is supplied through... there is such a boiler part
Yes, hang up the boiler. Our nozzle is a Russian stove converted to gas. There aren't even any pipes coming from it. It’s only warm in 1 room where it’s standing.
you need to go to your Gorgaz and get technical specifications for gas there, then order and pay for the project, then have it approved by the Gorgaz and installed... that’s it..
At first I didn’t read it carefully, I thought that “this rubbish” was my mother-in-law))))))))))))
Source
What is the reason for the ban on gas workers using a stove with a gas nozzle?
A ban by representatives of gas services regarding the use of stoves with gas nozzles may be due to the poor technical condition of the heating device. Or using a homemade nozzle.
This is due to the fact that there have been numerous accidents in furnaces with homemade gas sprayers. In this case, the actions of city gas representatives comply with directive materials on the safe operation of gas equipment.
If the owner uses a factory-made nozzle for reconstruction with all the necessary documentation. And the reconstruction itself to convert the furnace to gas fuel was agreed upon with Gorgaz, then in this case there should be no ban on the operation of such equipment.
How to choose, install and convert a gas heating boiler to liquefied propane
You have built a residential building and want to move in as quickly as possible and finish the interior arrangement. The question arises: how to heat water and heat rooms if the home is not gasified? The simplest way to quickly organize heating and hot water supply is to install a double-circuit boiler that runs on liquefied gas (abbreviated as LPG).
The heating unit must be reconfigured to a propane-butane mixture, and after connecting the main line, the factory settings must be returned. We will reveal the features of installation, adjustment and operation of a heat source using bottled gas.
How does liquefied gas differ from natural gas?
As is known, the main gas composition is dominated by methane, whose lower calorific value is approximately 9 kW/m³. The substance is transported and burned exclusively in a gaseous state; the transition to the liquid phase occurs as a result of cooling to deep low temperatures.
LPG – liquefied hydrocarbon gases, used in boilers, water heaters and internal combustion engines of cars, are a homogeneous mixture of propane and butane. Let us list the properties of this fuel:
- calorific value - about 6.4 kW per 1 dm³ (liter);
- gas easily transforms into the liquid phase under pressure;
- LPG is transported and stored in the form of a liquid, pumped into standard cylinders or storage tanks;
- Before combustion, the fuel must evaporate; propane-butane is supplied to the boiler burner or internal combustion engine cylinders in a gaseous state;
- Over time, condensation accumulates at the bottom of the container, taking away the useful volume of the container.
Addition. A significant advantage of methane over LPG is its price - natural gas is significantly cheaper. Even the higher calorific value and lower propane consumption do not cover the difference in cost. A more detailed comparison of different types of fuel is presented in a separate review.
When refueling with liquefied fuel, the container is never filled to the top. 1/5 of the tank (20%) must remain empty - this volume is used to transfer the fuel into the gas phase. If the vessel is filled to capacity, the evaporation area and the amount of LPG ready for combustion will sharply decrease. A standard 50 liter cylinder can be filled with a maximum of 40 liters of propane.
Construction hair dryer device
A construction or technical hair dryer is a power tool designed to locally heat surfaces with a stream of hot air. Outwardly, it looks like a regular household appliance, only it is slightly larger in size and creates a higher temperature - up to 650o C. The hot air gun consists of the following main parts:
- housings made of heat-resistant plastic with a pistol-type handle and holes for air intake;
- a thermal insulating casing, inside of which there is a heating element in the form of a nichrome spiral wound on a ceramic base;
- an electric motor mounted behind the casing, at the location of the air intake holes, and a fan impeller mounted on its shaft;
- nozzles through which hot air is supplied outside;
- tool power buttons;
- power cable.
A construction hair dryer consists of a thermal insulation casing with a heating element, an electric motor and a device control mechanism
Some hair dryers are equipped with temperature regulators and indicators, as well as the ability to turn off the heating function when the fan is running. The last addition to the design is necessary for cold blowing of heated parts in order to cool them faster.
Tips for choosing a gas heater
Despite the differences between main methane and liquefied hydrocarbons, the same equipment is used to effectively burn these substances. To switch from one fuel to another, the boiler installation is adjusted, described in the following sections of the publication.
Key moment. Any propane gas boiler successfully consumes natural gas and vice versa. It will not be possible to use both energy carriers at the same time or switch with one press of a button - the transition involves partial disassembly, replacement of the burner fuel nozzles and adjustment of the gas valve.
Accordingly, you need to choose and buy a heat generator for heating a private house according to the standard algorithm:
- Determine the power of the boiler unit. The best way is to calculate the thermal load for heating and multiply the result by a safety factor of 1.2. When buying a double-circuit boiler for hot water supply, set aside one and a half reserves.
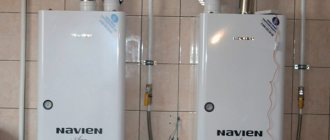
- Choose a floor or wall model of the heat source. For a closed-type pumping system, it is better to take a suspended unit; for gravity distribution, a non-volatile stationary boiler.
- The optimal solution in the absence of a chimney duct is to install a turbocharged version of the heater with a closed combustion chamber. The removal of combustion products is organized through a double-walled coaxial chimney laid horizontally through the nearest outer wall.
- If you have an outlet channel and a limited budget, feel free to take an atmospheric heater, it will cost less than a supercharged model.
- Among dual-circuit installations, it is better to choose an option with a separate plate heat exchanger operating on DHW. It is easier to maintain such a water heating device than to clean a heat generator with a combined counterflow heater.
Note. For country houses and small apartments (up to 100 m²), there is a budget option - the so-called parapet boiler with a power of up to 12 kW. The unit is placed near an external wall and does not require the installation of a chimney - a short coaxial pipe leads directly to the street. Moreover, the combustion chamber is open, there is no fan and no electronics.
Initially, any of the listed heaters is designed to work with natural gas - methane. Since the caloric content of LPG is higher, the fuel jets in the boiler need to be replaced (popularly called injectors). Hence the advice: when purchasing a unit, immediately request an additional set of jets with smaller diameter holes intended for liquefied gas.
Setting up boiler and pressure automation
The automation needs to be specially configured if it starts to operate randomly. This problem is also called clocking. The reason is often the high temperature of the coolant.
There is a backup method - remove the tap in front of the device. But you need to understand that when fuel does not burn completely, more harmful substances are released.
It is better to adjust the temperature of the gas boiler. To do this, you need to move the thermostat to a cool place, if possible, or reduce the temperature where it is. And also make more coolant. You can also replace the burner if the issue arises due to its high power.
The most common reasons for clocking:
- The tension has changed.
- The wind extinguished the burner.
- Problems with pipe patency.
- The pressure dropped.
In order to improve the operation of a gas boiler, you can configure the automation as follows. Turn the knob to "Spark". The burner will light. Next, leave it on “Iskra” for another half a minute, then turn it to “Off.”
Boilers are manufactured with regulators that can be used to set the time in the program for a period of 24 hours or for a whole week. When the equipment heats up to tedious degrees, it turns off on its own.
Subtleties of installation and arrangement of the boiler room
We would like to highlight an important point right away. Installation, connection and startup of the heating unit for LPG can be done independently, but taking into account the following nuances:
- If you expect to subsequently gasify the house and connect the boiler to the main line, the installation must be done in accordance with the requirements of the regulations, without violations. Otherwise, the provider organization will not issue permission to connect.
We install the water heating device in accordance with the requirements and recommendations of the manufacturer
- Another situation: there are no plans to connect to the gas pipeline. Then you need to install an underground container for fuel on the site - a gas tank, cylinders - a temporary option. Here you cannot do without a project, hiring a specialized company and putting the facility into operation. This means that the gas boiler must be installed according to all the rules.
- You carry out work at your own peril and risk. Therefore, you bear full responsibility for the safety of your home and your loved ones. We advise you to involve an intelligent engineer - a gas supply specialist, at least as a consultant.
Reference. Without documents confirming the commissioning of the gas tank and thermal power equipment, it will not be possible to organize the filling of the LPG tank.
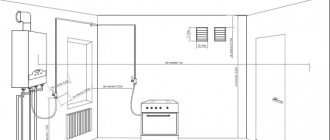
General requirements for premises and installation of gas-fired heaters are set out in a detailed manual on a separate resource page. Here we list the points related to the use of liquefied fuel:
- Propane + butane is a rather insidious gas; it is heavier than air and, in the event of a leak, accumulates in the lower zone of the room. The furnace ventilation will have to be adapted - place one exhaust grille at a height of 30 cm from the floor, the second - under the ceiling. Provide an inflow at the opposite end of the room.
- For the same reason, you should purchase and install a gas analyzer connected to a solenoid shut-off valve above the floor. The latter is mounted on a pipeline supplying fuel from cylinders or a gas tank.
- It is strictly not recommended to place propane tanks in the furnace room. The gas pipeline is led out through the wall, where there is a metal cabinet with cylinders connected to a common fuel rail.
- A gas holder cannot be dug closer than 10 m from a residential building.
- The minimum number of cylinders is 2, and preferably four. One vessel will not provide the required fuel consumption due to the small evaporation area. Liquid fuel does not have time to turn into gas, the pressure in the network decreases, the boiler turns off or the water does not heat up enough.
Tools and materials
A home craftsman with average plumbing and electrical skills is quite capable of making the device with his own hands. It is not very suitable for long-term professional use, but it can warm up a frozen pipe or remove a layer of old paint.
As a basis for assembling the tool yourself, you can take an ordinary household hair dryer. You will have to replace the heating element in it and throw away all the plastic parts - because a hair dryer will heat up much more. The case will have to be ceramic or made of metal.
To make the device you will need:
- nichrome spiral for electric heater;
- metal plates for fan blades;
- copper cable with a cross-section of at least 5 mm2;
- rubber tube for heat protection of the handle
- a piece of thin-walled metal pipe for the nozzle.
Homemade hair dryer
To make a hair dryer with your own hands, you will need a drill, a soldering iron, hand tools, a vice and a multimeter.
Conversion of a wall-mounted boiler to LPG
The procedure includes 2 operations - replacing injectors (nozzles) and adjusting the gas valve pressure in different combustion modes. To perform adjustment work you need to prepare:
Advice. It is more convenient to select the diameter of the tube after removing the front panel of the heat generator. The size should be sufficient for the pipe to fit tightly onto the valve fittings from the outside.
The first stage is partial disassembly of the unit and dismantling of the gas burner device. The goal is to get to the inner panel of the manifold, where the standard jets are screwed in. The sequence of work depends on the boiler model and generally looks like this:
- Remove the front panel of the device. On heaters of the Viessmann, Baxi, Buderus and similar brands, there is a control board behind it, which must be folded forward.
- Disconnect the ignition electrodes and pilot burner (if equipped).
- Unscrew the screws holding the main burner. Remove the part and set it aside.
- On the rear wall of the unit there is a manifold with nozzles. Change the jets by unscrewing with a flat-head screwdriver. Put the burner and electrodes back.
Recommendation. Before disassembling and adjusting, be sure to read the boiler operating instructions! The document often describes the procedure for converting to liquefied gas and indicates the pressure limits that need to be set on the valve.
After replacing the jets, supply fuel to the boiler and check the quality of the connections by washing. Set the pressure on the reducer to 36-40 mbar (the exact value is indicated in the heat generator’s data sheet) and begin adjustment.
To check the tightness of the joint, apply soap suds with a sponge.
The second stage - setting up the gas boiler is carried out in the following order:
- Find 2 diagnostic fittings and an adjusting element located directly on the valve. The adjustment bolt is made in the form of a hexagon with a screw or a second hexagon inside (depending on the model of the device).
An example of the location of fittings on a Baxi boiler valve
Important point. In parallel with mechanical adjustment, software adjustment is made. The algorithm is individual for each type of heat source and is outlined in the operating instructions. How to convert the electronics of the Proterm-Panther boiler to liquefied gas and adjust the pressure, watch the video.
Why is it important to study the operating instructions for the product? First, you need to find out the adjustment parameters. Secondly, in some models of thermal units, for example, Daewoo, there is a special switch on the control board; you don’t have to connect a pressure gauge and turn the screws at all.
Where to begin?
Decide on the power you can and want to receive. Less than 100 watts doesn't make much sense. It's enough for the little things, however, if you do the rest correctly. I came out at 100-110 watts. It's not enough to fix video processors.
Second. The current you can get from the power supply. The choice of nichrome for the spiral depends on it. I have nichrome 0.4 mm. If sclerosis does not change, it was sold on the market as a 1.5 kW tile spiral. I found it optimal. Thin wire does not hold its shape well, thick wire requires a large current to obtain sufficient temperature. For a 0.4 mm wire, a current of about 3.5 - 5.5 amperes is needed. So that the wire heats up to a yellow glow approximately. With intense airflow, its temperature will decrease. Let us remember that the diameter of the wire uniquely determines the current. But the power will have to be gained by voltage. Since my power supply supplies 24 volts for this purpose, I stopped there. The resistance of the cold spiral turned out to be around 3 ohms. In a heated form, according to calculations - about 4. The spiral does not care what kind of current, constant or alternating. You can power it directly from the transformer through a dimmer for adjustment. True, the trance will then buzz. And it must have sufficient power and a winding made of thick enough wire to hold the selected current.
An important element is the fan. Axial ones can be used as a last resort, but they do not cope well with pushing air through labyrinths. Their path is to blow in a straight line. Therefore, a centrifugal fan is preferable for a hair dryer. It is precisely designed to push air through significant aerodynamic resistance. It so happened that some time ago I visited a friend and he showed me a heating system of his design. Where there is also a centrifugal fan. Homemade too. It turned out that he made both possible mistakes there for fans of this kind. I incorrectly chose the direction of rotation for the impeller from the vacuum cleaner and incorrectly made the snail for it. I’m not a fan designer at all, but I studied physics at school, so I have an idea of how it works. Well, it seems like a well-worn topic, so while preparing the article I went to Google. And, to my surprise, I discovered that almost a third of the pictures on this topic contain one of two or both errors at once. Therefore, I will give my diagrams so that no one gets confused. Moreover, this makes direct sense for beginners.
This is the general principle for constructing centrifugal fans. Three different possible impeller options are shown. There are actually more options, but that's enough for us. Please note that these are three different versions of impellers. Just partially shown. This is by no means one. As you can understand from the diagram, the impeller should “push” the air to the sides, thereby creating pressure. (Oh, those “painters” from Google, they draw what they themselves do not understand).
Red option number 1 is the best. Green (2) is worse. Blue (3) is worse than the previous two, but it will work. If your impeller rotation direction is different, just mirror the diagram.
I did almost the same thing, only I installed the impeller from an axial fan.
The impeller, naturally, works to “blow” air inside. The difference from a simple axial fan is that the energy for swirling the air flow is not wasted, but is used according to centrifugal principles. In theory, such things should be patented. The resulting hybrid works quite adequately. It's noisy, but that depends on your luck. The fact is that with a small impeller diameter (either axial or centrifugal), in order to ensure sufficient air flow, you will have to give high engine speeds. With all the ensuing consequences. With a large impeller it could be quieter, but the convenience of a hairdryer will be lower. If you create a turbine, as I suggested, when choosing a base for a fan, preference should be given to small-sized blades with a high rotation speed, preferably straight blades (saber-shaped blades will work worse). The more blades the better. The steeper their inclination (angle of attack), the better. I used an impeller from a very old video card. 12 volts, about 1.5 watts. Impeller diameter 37 mm. Use what you find. Experiment. Suitable centrifugal fans in almost finished form, or as donor impellers with an engine for my snail. You can put it not “flat” like mine, but perpendicular to the hairdryer. In my first attempts I did just that. And the turbine from the laptop showed itself very well. And quieter too. But it was already very worn out and was designed for 3.5 volts, so I went a different route.
My hybrid compressor is larger.
The main body of the snail is made of polystyrene foam. It doesn’t matter what it’s made of, even wood. The structure is clearly visible. By the way, if you are planning to make protection for the impeller, I highly recommend not drilling small holes in the top cover. If you want to know why, google the device of a mechanical hand-held siren from the war. The noise level will be three times higher than with the shown option. I used a case from an 18650 battery as a sleeve for a hair dryer. The extraction technology is similar to that shown in this video (from someone else’s YouTube channel):
Only I didn’t bother with drilling, as the author suggests, through the bushings. Drilled it with a small drill. Drilled out 4 mm. Use a needle file to correct it if the center of the hole has shifted. I drilled further with a step drill, adjusting with a file at each step, if necessary. I also made the bushing differently. From some kind of chandelier there is a threaded tube with two thin nuts. I riveted one nut at the end so that it would no longer rotate, and I tighten the second one. I insert the fixed nut from the inside of the battery cup. I ground off the excess part of the thread for beauty. You can do without a bushing, but the flow will be worse. Not a jet, but a diverging torch. I don't recommend very thin ones. An internal diameter of 7-10 millimeters, I think, will be more convenient. And there is no need to create unnecessary air resistance. Mica is placed inside the 18650 cup. The spiral was wound on a glass fiber laminate plate 14 mm wide. Nichrome with a diameter of 0.4 mm. I wound 16 turns. If you use a different supply voltage, you will have to select the number of turns. The ends were bent at 90 degrees. Leave the ends longer, then cut them in place. And this spiral must be placed on a ceramic tube. I bought it at the Mitinsky radio market at one time. Diameter 4 mm. In principle, almost any one will do, but if the diameter is very different, you may have to experiment with the width of the winding plate. One end of the spiral is passed through a ceramic tube. The spiral placed on a ceramic tube must be “twisted”, shifting each subsequent turn relative to the previous one. If you can unwind these 16 turns a couple of turns, that’s not bad. Since the length of the spiral is short, we must strive to position it more evenly. To enhance the heating of the air, I additionally inserted an impeller made of galvanized iron (or tin), which additionally rotates the air flow against the rotation of the spiral, improving heat transfer. And at the same time it serves for some kind of centering of the ceramic tube inside the glass. The resulting spiral should be freely inserted inside the cup with mica. But it is advisable that it does not flop around there too much. I insert it tightly enough.
The picture shows the same impeller for twisting the air flow and you can see how I finished it with nichrome. I bent it in half, twisted it a little, put on and flattened the brass tubes from the NShvi 0.7-8 tips (you can use a tube from an antenna, for example). I wrapped the ends with a thin copper wire, soldered them, soldered silicone wires from some kind of heater (in principle, you can use ordinary ones), and also crimped the soldering area with brass tubes. All this is needed to reduce the heating of nichrome in the area of contact with the wire. On top there are fiberglass tubes. Can be found in dead energy savings, for example. Instead of soldering, you can use mechanical clamps. Which ones will you find? Keep in mind that the spiral and impeller for swirling air must be insulated to prevent short circuits to the housing and to each other.
The further “body” was assembled from a pipe (used in furniture and design) and a housing from a car cigarette lighter (it fits well on a battery cup), fortunately I had several of them accumulated after experiments with an infrared soldering iron. Use what you find, it doesn't matter. The tube was connected to the cigarette lighter body by soldering. There is no special heat, it will hold up. The ends of the body were cut crosswise to get something like a collet, for clamping a cup from 18650 through a piece of glass insulating tape, or just fiberglass for thermal insulation. I made the duct shell from tin and soldered it. A plate is soldered to it on top (I used foil fiberglass) to which the fan is attached with screws. I cut the threads for the fastening screws directly into it.
In the picture the spiral is not yet completely twisted.
In the final form it looks something like this. This photo more or less shows how the rest of the wire was designed. This is not the final version, without the impeller yet.
At the exit.
Assembled.
We reconfigure the floor heat generator
Non-volatile boilers of the AOGV type, equipped with automatic equipment of the 630 SIT and 710 MiniSIT series, are converted to liquefied gas in the same way as their wall-mounted “brothers”. The transition is made in 2 stages - installing new jets and subsequent pressure adjustment.
The burner on most units is removed along with the mounting plate and safety automatics
We will not consider disassembling and dismantling the burner - this topic is covered in detail in the publication on cleaning gas heaters. Install the nozzles from the liquefied gas kit and proceed to setting:
- Remove the top plastic cover from the 630 SIT valve. On the right side, find the screw for adjusting the fuel pressure supplied to the main burner.
- There are 2 fittings located on the left side of the automation unit. Connect the pressure gauge to the upper branch pipe, first unscrewing the plug.
- Light the boiler and turn the burner to maximum mode, setting the power control washer to the number “7”.
- By rotating the screw clockwise, increase the pressure of the propane mixture to the desired value (usually 26-28 mBar).
Warning. After unscrewing the plug, gas comes out of the fitting with a quiet hiss. To minimize leakage, quickly put on the hose that goes to the pressure gauge.
The igniter flame is regulated by a small screw located on the upper plane of the automation (see photo). Reduce the burning intensity, but do not overdo it, otherwise the wick will go out due to gusts of wind from the chimney. The pressure in gas convectors equipped with valves 710 MiniSIT and 630 SIT is adjusted in a similar way.
A little about the connector
I used COM dad-mom. From somewhere on the boards. I wired it like this: two groups of three contacts each for heating (more than enough for 5 amperes), one for the fan. Then I fixed it with hot glue and insulated it.
Thus, the power supply is stabilized (if it is not operating at maximum voltage), the fan power supply is stabilized, and therefore the outlet air temperature is stabilized.
I'm happy with the design. For amateur purposes it is quite enough. At maximum heating, the metal pipe in the area of the handle heats up quite noticeably, but the hand is quite tolerable. During normal operation, the pipe is simply warm. Those. nothing will melt there. The air flow through the tube does a good job of cooling. And it is advisable to place the air duct like mine, closer to the handle. To prevent backflow of air from the hot zone. The hairdryer was tested by turning off after maximum heating. I was simply deprived of power. Along with a fan. Nothing melted.
For beginners: to start constructions of this kind, you need to get into bins, stashes, etc. and contemplation of previously accumulated wealth. And with a high degree of probability you will find something that can be used quite easily. What I mean is that the design does not have to completely replicate mine. Good luck. 03/05/2017. Trishin A.O. Komsomolsk-on-Amur.
Reviews on the use of liquefied gas
An undoubted advantage of burning LPG is the convenience and ease of servicing heating equipment. The downside is the rather high price of propane compared to other energy sources. If a house with an area of more than 100 m² is heated from cylinders, then the advantage of convenience disappears - the vessels need to be refilled at intervals of 4-7 days, depending on the outside temperature.
Reference. The cost-effectiveness of autonomous heating using liquefied gas is a myth. As is the case with other energy sources, fuel consumption depends on the heated area, the degree of insulation of the home and other factors.
We propose to present the features of operating liquefied fuel boilers in the form of reviews from real homeowners:
- They decided to heat their house with an area of 120 square meters with liquefied gas from cylinders located in the street closet. The boiler is powered by 5 tanks, the sixth provides the hob. When a light frost arrived (minus 2 °C), the cylinders froze, the heater turned off due to lack of fuel. It turns out that the closet needs to be heated additionally.
- I only use propane in the evenings and on weekends, otherwise the gas runs out quickly. When I leave for work, I turn on the electric heaters. With this approach, 2 cylinders can be stretched for 7 days (the housing area is unknown - note).
- An acquaintance placed the balloon ramp in the basement, but did not install sensors or alarms. There was a leak and propane had accumulated in the lower area of the cellar. The owner, not sensing the smell, turned on the light and there was an explosion. The garage collapsed and the man suffered a concussion.
- I use liquefied gas as an additional energy carrier - the main heating runs on electricity. An LPG boiler allows you to reduce the load on the network on frosty days or sharply increase the temperature in the premises. During the heating season I make 4-6 refills.
Conclusion. It makes sense to switch the boiler to liquefied propane-butane in two cases: when installing a gas tank and organizing temporary heating until a centralized gas supply pipe is connected to the house. Our expert will tell you more about the nuances of installing and operating fuel equipment in his video:
How does a gas stove nozzle work?
Nozzles are used to form a combustible mixture of gaseous fuel and air. Next, the enriched mixture under pressure enters through special holes, thereby ensuring complete combustion of the fuel in the form of a fiery torch. The atmospheric nozzle functions like a regular ejector. Gas, passing through nozzles of a special configuration, creates a vacuum zone into which air is drawn and thus a constant thrust mode is created.
Nozzle control and regulation
Adjusting the operation of such a device depends on its design. Recently, low-temperature sprayers have gained particular popularity among consumers. They are most applicable for installation in furnaces, since they create a mode sufficient for the normal operation of brick structures.
The principle of nozzle regulation can be organized as follows:
- Single-stage, in which it operates in only one mode. In this case, automatic security is installed according to the “on/off” principle. When the maximum temperature in the furnace and the gas pressure in the line are reached, the boiler turns off; when the indicators drop, it turns on. Such a system reduces the life of the device due to frequent shutdowns.
- Two-stage - the device operates in two modes, creating different thermal power of the torch. This is a more economical option that saves fuel. Especially during the autumn-spring transition period, when outdoor temperatures do not fall below 0C. The nozzles with this design are easier to adjust. In addition, they are equipped not only with a safety unit, but also with regulation of the indoor temperature through thermal sensors.
- Modulating is a modern and economical operating principle of the nozzle. It allows for very precise and smooth adjustment of the operation of the burner device. These sprayers are supplied complete with a burner. They have three types of regulation: electronic, pneumatic and mechanical.