Pressure testing of a pipeline is a technological operation performed on a relatively small isolated section of the pipeline. This section is specially tested by applying high pressure, close in value to the maximum permissible. Carrying out pressure testing of pipelines allows you to verify the integrity of the line, the quality of installation work and installation of fittings.
Pressure testing is a necessary and important operation that allows you to identify weak points in the assembled pipeline
The concept of pipe crimping
Pressure testing means checking the readiness of an object for operation by applying increased pressure. The object of such a check may be a pipeline system, a container, an assembly or machine, or a separate mechanism. When we talk about increased pressure, we mean a value that is 2-3 times higher than the working pressure and is close to the maximum permissible. An object that has successfully passed pressure testing is considered suitable for use. Leaks identified during the inspection are repaired.
Important! The amount of pressure during pressure testing is regulated by regulatory documents for certain groups of objects.
Pressure testing must be carried out by a trained specialist. Relevant employees of industrial and utility enterprises are required to undergo certification. Upon completion of the tests, a report is signed indicating the date, pressure value, holding time and other information.
The pressure in the system for testing is created either by a standard pump or a special pressure tester. They check, as usual, with water. When its use, for some reason, is unacceptable, air pressure testing of pipes is carried out, which makes it difficult to detect leaks.
Why cross-linked polyethylene is not welded
Unlike polypropylene, which is easily welded with a soldering iron for welding polypropylene pipes at home, welding polyethylene of any kind is not used in everyday life due to the high cost of the equipment and impracticality.
Welding technology is used for joining large-diameter industrial and main pipes made of low-density polyethylene (HDPE), and two methods of welding polyethylene pipes are used: electrofusion welding using plastic electric welding couplings or butt welding, pressure welding after melting the pipe ends with a specialized butt welder apparatus.
Rice. 6 Features of connecting large diameter HDPE pipes by welding
Electric welding couplings for welding HDPE are expensive, and their use requires an expensive device that ensures the passage of electric current with the specified parameters. In the second, “cheaper” method, in addition to using a soldering disk with an electronic device that sets the temperature and time of its heating, the pipes are placed in a massive structure that allows their heated ends to be connected under pressure.
When is pressure testing of pipelines carried out?
All new pipeline systems, tanks, etc. are subject to pressure testing before putting into operation. All objects that have undergone repair or replacement of some element are also checked. Since the joints with installed fittings are considered to be the most unreliable sections of the pipeline, sections where coupling was used are subject to mandatory inspection.
All types of pipelines, domestic and industrial, newly built and already in operation are subject to pressure testing
Testing is also carried out in other cases:
- if the pipeline has been idle for a long time or operates in seasonal mode (like a heating system in the summer);
- if scheduled inspections are provided. In this way, the polymer sewer system is checked when the integrity of the outlet pipeline is monitored. Pressure testing of a plastic water supply is one of the most popular operations carried out after any pipe cleaning, since mechanical damage is very likely, especially at the joints;
- after flushing the pipeline, especially with the use of aggressive chemicals, which could cause damage to fittings or pipe walls;
- Wells are tested in a special way - to check whether perched water (water from the surface layers) gets into its shaft, because consumers are concerned about the quality of water, especially drinking water.
Do PEX products have any disadvantages?
Cross-linked plastic has disadvantages that the manufacturer eliminates at the production stage, the main ones being:
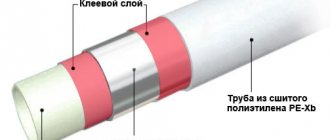
- High oxygen permeability. Technical operation rules regulate the oxygen content in water circulating in heating networks. Its presence in a liquid leads to the oxidation of metal products as a result of interaction, due to which metal oxides (rust) are formed, leading to accelerated destruction of metal parts. Therefore, during production, PEX is coated with a diffusion layer of synthetic components that prevent oxygen from entering the water.
- PEX is UV resistant. To protect it, it is painted at the manufacturing stage and used indoors.
- Installation of a pipeline requires the purchase of connecting fittings and specialized tools, which from an economic point of view is quite expensive, as is the cost of 1 linear meter of pipes, which is about 0.7 USD.
Preparation for work
Carrying out pressure testing is a responsible procedure that requires preparatory measures. Before starting pipeline testing, it is mandatory to:
- An inspection is carried out to identify visually detectable defects (corroded areas, missing parts, etc.). If violations are identified, they are eliminated. In cases where the system contains a working medium that is prohibited from being used for testing, it is customary to empty it (for example, the heating system is freed from coolant).
- The pipes are washed to remove rust, scale, and deposits of organic and inorganic origin. Some of the flushing methods require the use of a compressor. Upon completion of washing, the quality of its implementation is checked. The quality of flushing is checked by the condition of the inner surface of a half-meter section of the pipeline cut out at a randomly selected location.
To carry out work, a pressure gauge must be installed on the equipment to control the pressure.
If the injection device does not include a check valve that retains the working medium in the system, and a pressure gauge, then they are installed after completion of the tests.
It is important to know! Pressure testing of the heating system of an apartment building precedes an inspection of the work on preparing the associated heating unit. This is explained by the fact that the thermal unit is checked using high pressure values.
Video description
This video shows why pressure testing of the system is necessary.
To carry out the work, water with a temperature of 42 °C is poured into the heating circuit and air is released through special valves. Within 10 minutes, a test pressure is created, with which the joints are checked for leaks. After this, the pressure is increased to the required standard and a test is carried out for 10 to 30 minutes, depending on the material from which the system is made.
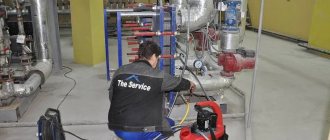
On private plots, the test can be carried out no more often than once every 4-5 years. To do this, you do not need to have a lot of knowledge and skills, and the entire procedure can be done independently, if you have the necessary equipment. In order not to spend a lot of money on purchase, you should rent a compressor or call a special service to check the pipes.
Checking pressure by a specialist Source inkrasnogorsk.ru
In a high-rise building
Pressure testing of heating pipes in multi-storey buildings is most often done in the middle or end of spring, after the heating is turned off. If complaints are received about low water temperature, then the heating company must carry out a calculation of the radiators. Under certain conditions, they can be replaced, removed or new ones added. During the inspection, all risers are checked for blockages and washed under high pressure along with the rest of the system.
Also, during inspections, insulating gaskets, seals on cast iron valves and stuck bolts should be changed. During this, the fittings in elevators and pipes are inspected. This is to check them for rust or damage. After all the tests, the condition of the heat-insulating materials on the line is analyzed.
At the end of the checks, it is necessary to carry out pressure testing of the pipes, taking into account the material from which the system is made and the operating pressure of the system. If the pipes are made of cast iron, then the pressure does not rise above 6 atmospheres, and if they are in the walls - no more than 10 bar, as with panel heating systems.
Example of cast iron radiators Source radiator-home.ru
See also: Catalog of companies that specialize in heating, water supply, sewerage and lighting
Pipe inspection is done in 2 steps. To do this, first the entire heating system is checked, and then its individual sections are tested under higher pressure. To do this, the heating circuit is filled with water, which has a low pH level, which avoids the formation of deposits on the pipes. The pressure is increased using electric pumps, since it is often impossible to manually fill such a volume.
If the pressure has not dropped within 30 minutes, then pressure testing can be completed. If there is a leak, it must be found and removed, and then the test must be repeated. Each node is individually checked in a similar way, only the pressure is increased to 10 atmospheres.
Mechanisms for carrying out
Crimping operators, i.e. Special pumps for carrying out relevant tests differ in design. Based on this feature, they are classified into three types:
- Porshnev.
- Vane-rotor.
- Membrane.
If testing of a pipeline (or other object) of a relatively small volume is required (for example, in private housing construction), then it can be performed using an inexpensive and easy-to-maintain manual pressure tester. This mechanism allows you to pump up to three liters of working fluid into the system in a minute.
To check the systems of a multi-story building, you will need a more powerful mechanism driven by an internal combustion engine or electric. The domestic UGO-30 is equipped with a 16-liter tank and allows you to develop a pressure of up to 30 atm. Manual two-stage pumps UGO-50 and UGO-450 are used when performing more complex tasks.
In domestic conditions, compact devices are used that can be manually controlled.
German-assembled electrically driven crimpers produced by Rothenberger (model ROTEST GW 150/4, for example, designed for testing drinking water and gas supply systems with air) and Ridgid (for example, model 1460-E 19021 are used in systems filled with as a working fluid water, oil or ethylene glycol).
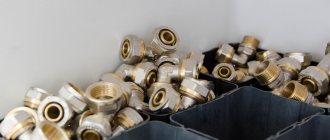
How to choose a good fitting and install it
The markings on the case will tell a lot to the connoisseur. Those companies that make high-quality docking elements simply will not use cheap printed fixtures. Therefore, any inscription, even a single symbol, is printed clearly and expressively, excluding the slightest vagueness or misinterpretation
It is equally important to evaluate the weight of the structures, since normal fittings are made from selected brass. If someone tries to claim that lightweight products are just as valuable, this is just a clever marketing ploy or some kind of misunderstanding
It is worth taking a closer look at the appearance of the fitting. If it is made of a thin layer of metal, it will not be possible to obtain a reliable joint. Professionals confidently say that by purchasing cheap elements from small retail outlets, especially those operating unofficially, people doom themselves to re-laying the pipeline. In this regard, investing in a high-quality and expensive variety of components is more than justified.
Using a gauge, the ovality that inevitably occurs during the cut is corrected. Following this, the inside is chamfered using a chamfer remover or a sharp knife. If you use a simple knife, you will still have to refine the desired area with sandpaper. Only when all this has been done can you thread the fitting onto the pipe, making sure to check whether it is seated tightly. There are models that do not require fastening of crimp couplings. Then these same couplings are placed on the pipe and a fitting is inserted into the part, on top of which sealing rings are fixed. At the points of contact between a metal-plastic pipe and a metal element, an insulating gasket is required to protect against electrochemical corrosion.
When connecting fittings of various designs, the sleeve is captured in a clamp and brought together until the handles stop. When the work is done well, the metal part becomes arched, and the fitting receives a pair of identical strips in the shape of a ring. Processing must be completed in one go. The crimping should not be repeated. This will only cause damage to the connection, so the defect will be irreversible. Therefore, you should prepare for work carefully and take into account all the smallest nuances, freeing up time so that nothing interferes.
Such connections, if done properly, can be of no less quality than when using welding - and their tightness satisfies all requirements. It is recommended to use fittings of the same brand as the pipes being connected. If the choice has not yet been made, you can safely use designs from Henko, Valtec. The products of these concerns are of high quality and are very popular. It is easy to use such parts even for beginners.
The fitting for a steel pipeline does not have a fitting; it is just a sleeve itself, which is crimped with pliers. An attempt to compress a metal-plastic pipe without a softening “intermediary” will end in its deformation.
In the next video you will see the principle of working with press fittings for Valtec stainless pipes.
SNiP and safety measures during crimp testing
The procedure for testing pipelines, technological diagrams of the pressure testing process and safety standards are determined by the relevant sections of SNiP:
- for internal sanitary systems - SNiP 3.05.01-85;
- for external drainage systems - SNiP 3.05.04-85;
- for heating, ventilation and air conditioning systems - SNiP 41-01-2003.
Industry regulations define the procedure for performing pressure testing on industrial pipelines.
The specified documents establish the pressure values permissible during testing. This value is determined by the material of the pipes, the minimum thickness of their walls, the difference in height between the lower and upper elements of the system under test and other factors. When conducting hydraulic and pneumatic tests, the pressure value can be (in atm):
- for pressure pipelines of water supply systems – 10-15;
- for cast iron sewerage – 1.5;
- for non-pressure polymer pipelines – 1.5 – 2;
- for heating systems of apartment buildings where cast iron radiators are installed - 2-5 (but not less than the value exceeding the operating pressure by 1.5 times);
- for input nodes of centralized systems – 10;
- for private houses - 2 (since the emergency valve is usually set to this level).
Pressure testing must be carried out in accordance with SNiP, taking into account the type of main line and the material of the pipes installed in it
Important! When conducting tests, the main safety requirement is to adhere to the recommended pressure limit. To avoid unpleasant consequences, it is recommended to use a crimping machine equipped with a special limiter when conducting tests.
Press-on method
The most correct method for installing cross-linked plastic pipes, which takes full advantage of the material’s qualities such as flexibility and molecular memory. When working, put a sleeve on the pipe and press the fitting into the pipe hole.
The connection is distinguished by the highest degree of sealing, in contrast to the methods discussed above, and ensures high reliability of the pipeline. The technology consists of flaring the pipe edge, after which a compression-type fitting is inserted into it. It is fastened using a metal sleeve, which is pulled from above onto the pipe at the location of the fitting.
Rice. 9 Compression method of connecting PE-X pipes
General procedure for conducting pneumatic and hydraulic tests
The testing scheme for air and water is general. The procedure is as follows:
- Within the test object, a part of it is isolated and closed using shut-off (regulating) valves (the sewer pipes are plugged with rubber plugs or wooden plugs wrapped in rags).
- The test object is filled with water. When testing heating systems, when filled with water, air is discharged through special air vents in the upper part.
- A pressure tester is connected to the system, pumping a certain amount of working fluid to create the pressure required by regulatory standards.
- Having reached the required pressure value, recorded by the observer on the pressure gauge, the pressure tester turns off.
- The system is left under pressure for a certain time (for heating systems - at least half an hour; in some cases, the holding time can be 6-8 hours).
- At the end of the designated holding time, the observer again takes the pressure gauge readings. A difference in pressure gauge readings is evidence of a leak in the system that needs to be detected and eliminated.
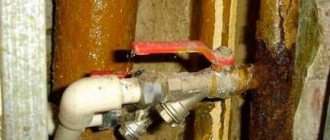
You can connect the pressure tester to the heating system by removing one of the taps
Note! After the leak has been eliminated, the pressure test is carried out again.
Need for hydraulic tests
Pressure testing allows you to identify leaks in the system.
The operation is performed on a small section of the line, which is isolated from the main line and subjected to testing with increased pressure bordering on critical. A large volume of compressed air is pumped into the branch or a water flow is started under pressure. If the branch passes this test and maintains its integrity, it is considered suitable for further use. A breakthrough will be indicated by a drop in pressure on the pressure gauge.
The following must be subjected to hydraulic tests:
- newly created highways;
- repaired networks;
- plastic pipelines after cleaning;
- pipe sections after replacing a damaged section or installing a coupling or tee;
- water pipes in the apartment after connecting water meters;
- heating systems before the heating season.
Pressure tests of wells are carried out in order to check that there is no contact of the transported liquid with the upper layers of water in the mine. This is necessary to accurately determine the depth of water intake.
Pressure testing of pipelines with air and water
To test the performance of a heating, water supply or sewerage system, you will need a pump (special or one that circulates liquid in the system). It is connected to the heating system either:
- directly to the tap designed to drain the working fluid from the heating system;
- to any of the radiators. To do this, the Mayevsky tap is removed, and in its place an adapter is installed, to which the hose from the compressor is connected.
The water supply test is carried out through the connection pipe of the taps through which cold or hot water is supplied. To connect to the sewerage system, you will need to insert the sediment fitting into one of the revisions, special tees mounted in the outlet pipeline every 40-50 m.
Purchasing a crimping machine for personal use that will be used once a year is hardly advisable. Which pump to use to pump air or water into the system is determined based on the pressure that needs to be created for the test (and it should be 2-3 times higher than the working pressure). To pressurize the heating system of a private household, a car compressor or an electric pump should be sufficient.
PEX connection using press fittings
Joining plastic pipes with press fittings is similar to these operations with plastic products and is performed in the following sequence:
- Cut the pipe ends with pruning shears and remove the internal chamfer using a reamer.
- A nozzle of the required size is inserted into standard press jaws; the most common outer diameters are 16, 20, 25 and 32 mm.
- Spread the handles of the tool 180 degrees and open its head, after which two halves of the press attachments are inserted into its grooves, they are secured with a push-button lock.
- Place the press fitting over the pipe until it stops (its location and accuracy of installation can be seen in the control window).
- They move the tool handles 180 degrees, open the lock, insert the press fitting and move the handles, for which they apply some effort.
- After aligning the handles of the device, crimping the press fitting in systems with crimping can be considered complete.
Rice. 7 Fragments of video of installation of press fittings
It should be noted that this technique is designed for rigid pipelines, since the press fitting is placed and crimped on the outside of the pipe surface, so its use for installing flexible PEX is practically not applicable.
What tool can be used
The selection of special pliers includes both the simplest manual and more powerful hydraulic models. At home, when it is necessary to install or repair a pipeline only occasionally, the functionality of a manual design is quite sufficient. In terms of the quality of the joint created, if everything is done correctly and carefully, there will be no difference from professional devices
It is important to consider that all models are optimized for a specific diameter. There are tools that come with inserts
Then a lot depends on what set of inserts are supplied. Along with the simplest press tongs, there are also more advanced designs. So, if a tool is marked with the letters APC, this means that the device automatically monitors the reliability of the joint being formed. It is impossible to open the press until crimping is completed. The APS marking indicates that the pliers can not only adapt to different sizes of fittings, but also distribute the applied forces most accurately. But if OPS is written on the pliers, then the tool is equipped with stepped clamps and is therefore capable of multiplying the applied force.
Production technology
The essence of the technology is to change the properties of the material due to the replacement of PE molecules with hydrogen atoms and the subsequent cross-linking procedure. The following production methods are distinguished:
- nitrogen - little used due to the ineffectiveness of nitrogen atoms for processing polyethylene molecules;
- silane - based on immersing the workpiece in a container with a prepared solution, in which hydrogen molecules are replaced by silane molecules, the cross-linked network is uniform;
- peroxide - mixing of polyethylene granules and peroxides with heat treatment at high temperatures is used;
- electronic - an effective method based on the bombardment of polyethylene molecules with electrons through X-ray irradiation, knocking out hydrogen atoms.
The technology is implemented step by step as follows:
- Polyethylene granules are pulled through an extruder, producing a cylindrical blank.
- When producing products for heating systems, the surface of the workpiece is treated with a solution of ethylene vinyl in alcohol. A protective film is formed on the surface, protecting the product from oxygen diffusion.
- Cross-linking of molecules.
Product made of cross-linked polyethylene (Photo: Instagram / teplegor)