When choosing a flooring option, many people choose laminate. The material attracts with its beautiful surface, fairly high wear resistance, and simple installation. But in order for the new floor to last a long time, it is necessary to strictly follow the installation technology, in particular, to properly prepare the base. To do this, you need a substrate for the laminate.
What determines the choice of substrate for laminate
In construction stores, customers will be offered not only a wide selection of laminates, but also a fairly wide range of substrates. You should choose them not based on price or appearance, but taking into account the conditions in which you plan to use the laminate. The following factors should be taken into account:
- base material – concrete screed or wooden subfloor;
- room microclimate – temperature, humidity level;
- how smooth the base is, are there any differences and are they pronounced;
- type of laminate chosen.
Advice! Many manufacturers give specific recommendations on what kind of underlay is needed for their laminate flooring. If you purchase a material of a different type, then in the future they may even refuse to consider claims regarding the rapid failure of the floor covering.
Why do you need a backing for laminate flooring?
Laminate is a material of artificial origin, but it is mainly made from natural raw materials. The basis of the board is fibreboard. Like ordinary wood, fiberboard and MDF do not tolerate being in a humid environment quite well.
In addition, the slab is rigid, so if you lay it on an uneven base, it may break over time at the bend.
Not a single one, even the highest quality laminate, will last long if it is laid directly on a concrete slab. This is due to the fact that when assembling the lamellas, locking connections are used, which create the impression of a solid surface.
And if the load is distributed unevenly, then the strength of the locking joints is lost, cracks form on the floor, and a creaking sound is heard when walking.
Thus, a special damper layer is required, which not only softens the load, but also redistributes it over the entire surface. As a result, the locking connections remain strong for a long time.
Checking the evenness of the floor
The condition of the floor is the main point in the laminate installation technique. Allowable differences are within 2 mm per meter of floor length. At the same time, it is very difficult to determine the condition of the surface; at first glance, it often seems that the floor is ideal.
Verification methods:
- Use a flat, straight strip, ruler or meter-long building level. By applying them to the floor in different areas, you can obtain information about the presence of differences or folds.
- The hydraulic level gives a completely accurate idea of the rise or fall of the floor topography relative to one point.
- The oldest and most effective method is stretched cords, which clearly show the condition of the floor, the presence of folds or bulges and other parameters of the old coating.
There are also methods for checking the floor with a laser level that give an accurate and high-quality result, but in the absence of this device it is quite possible to get by with these methods.
Substrate functions
The underlay is needed under the laminate in order to simultaneously perform several important functions:
Waterproofing
The cushion layer is used to maintain an optimal microclimate in the space between the subfloor and the finishing coating. Protects the underside surface of the lamellas from moisture (this is especially true if a concrete screed is used as a subfloor).
Vibration damping and sound insulation
Without the use of a backing, steps on the laminate will be very audible, and the presence of an air gap between the floor covering and the subfloor will only increase vibrations.
Thermal insulation
If you lay laminate directly on concrete, the floor will be very cold, especially if the apartment is on the ground floor.
Leveling the base
Even a new concrete screed may have slight differences in height, which can be compensated for by using a backing layer.
Depreciation
Despite the sufficient rigidity of the laminate, when loaded it springs a little, hitting the lower surface with the subfloor. This leads to loosening of the locks. The presence of a soft pad eliminates this drawback, since it performs shock-absorbing functions.
conclusions
Proper preparation of the base and the right choice of substrate are the key to the long life of the laminate. Using the wrong material will result in damage to the coating, increased floor noise and the need for immediate repairs.
It is not necessary to use the most expensive substrate; use the one that suits your conditions. This will improve the performance properties of the floor, eliminate conflicts with neighbors and extend the service life of the coating. The correct selection of material for the substrate will allow you to save money and not overpay for unnecessary qualities and brand popularity.
What influences the choice of substrate for laminate
In order to correctly choose which substrate is needed for a laminate in a particular case, it is necessary to take into account the operating conditions of the future coating. First of all, take into account the properties of the surface on which you plan to lay the laminate.
Advice! If the subfloor in the house is a concrete screed, then you need to choose moisture-resistant materials. Additionally, you can cover the floor with a special waterproofing mastic.
In addition, you should decide which underlayment functions are most important in this room. For example, if the apartment is located on the ground floor, and below there is a basement without heating, then it is important to ensure heat conservation. That is, you need a substrate for the laminate with high heat-insulating properties.
And if the apartment located down the riser has “loud” neighbors who like to play music or communicate in a loud voice, then you need to give preference to material with improved soundproofing properties.
Laying laminate boards
Well, now we are finally moving directly to laying the laminate.
A few words about what tool we need. Nothing unique is required. The minimum set will include a rubber mallet, a square, a tape measure, a fine-tooth hacksaw, a stationery knife and a pencil. For advanced users, a jigsaw and a hand-held circular saw will also be useful.
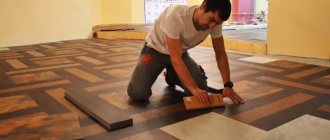
It is better to start laying from the wall from left to right, unless of course you are left-handed. But before installation begins, blocks of about 10 mm thick should be laid around the perimeter of the room to ensure the required gap between the laminate and the walls.
Next, you should assemble the first lamella along the entire length of the wall from laminate boards. To do this, you need to connect the locks at the ends of the laminate boards.
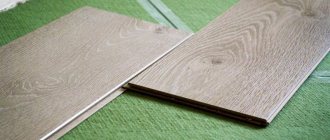
In passing, it should be said that there are two types of locks: the “Lock” lock, located in the photo on the left, and the “Click” lock, located in the photo on the right.
The “Lock” type lock has the only advantage that the laminate with these locks is a little cheaper. But these locks are less durable and are intended for installation only on a completely flat floor. Therefore, laminate with this type of locks is not very popular.
“Click” type locks are more durable, they are easier to connect, and allow for slight unevenness of the floor. And although laminate with such locks costs a little more, it is more common. Therefore, in the future we will consider this option in more detail.
We got a little distracted, so we continue the topic of laying laminate flooring.
Connect Click locks as follows:
- insert the lock into the groove of the previous board at an angle of approximately 30 degrees;
- carefully lower the board down to the floor until you hear a characteristic click;
- tap the joint with the palm of your hand or a mallet until the lock is completely connected.
It is unlikely that you will be able to lay a whole number of laminate boards in the first row. Most likely, the last board of the first row will have to be cut to the required length, and the trim, if it is no shorter than 30 cm, will be used to start the next row. In this case, material waste will be minimal. The laminate board should be cut from the side of the wall, and not from the junction with the previous board.
If it turns out that the remainder is less than 30 cm, then such a layout of the first row will not suit us. In this case, we take a laminate board, cut it in half and start laying the first row from it. We will start the second row from the remaining piece of the last board of the first row.
Once the first row is in place, we begin assembling the second row.
First we lay the remainder of the last board of the first row. Then we insert the next board into the end lock, carefully insert it into the side lock of the first row and hit the side edge of the board being installed with our palm. The board should fit clearly into place without gaps both on the side and the end.
Next, install the next board and so on until the entire row is installed.
All subsequent rows of laminate are installed in the same way.
If the room area is small, then you can completely assemble each row and snap it into the previous one. But this is the case if there are only 2-3 laminate boards in a row.
The technology for laying laminate flooring is actually not very complicated, but describing it in words so that everything is clear to you is not so easy. Therefore, I suggest you watch the video, which very clearly shows how to lay laminate flooring correctly and efficiently, and without assistants. You will see how an ordinary person lays laminate flooring alone in a fairly large room. And he does it without much difficulty. This means that everything will work out for you too.
This video consists of two parts, which shows the entire process of laying laminate flooring.
True, the master’s comments sound in a simple language, but without any advertising tricks and unnecessary pathos. In one place, what seemed to me to be a not quite literary word slipped through, so excuse me.
In the first part, it is useful to look at the preparatory work and especially the laying of the second row, as the most difficult to describe in words.
In the second part, the author clearly proves to his opponents that his installation method is of sufficient quality and does not lead to any damage to the locks of the laminate boards. It will also be useful to see the completion of the laminate flooring and, in particular, the installation of the last boards.
What types of substrates are there?
There are several basic types of substrates on the market. Depending on the manufacturer, the structure and properties of the material may differ somewhat.
When choosing the best option, you need to take into account the material of the subfloor. If it is a concrete screed, then you need to choose an option with good waterproofing qualities. On a wooden subfloor, you can lay a cork that does not tolerate contact with a damp environment.
Expanded polystyrene substrates
Extruded polystyrene foam is a popular substrate option. The material is durable and can withstand even the most severe loads.
The downside is its relative fragility. The material begins to lose its initial properties after 7-8 years of operation.
Foamed propylene
Foamed polypropylene is an inexpensive material, so it has also become very popular. The polymer substrate does not collapse under the influence of moisture; it smoothes out unevenness well. The disadvantage of the material is its relative fragility; under the influence of serious loads it collapses.
Therefore, this type of underlay is not recommended for use in high traffic areas or where heavy furniture is planned to be installed. To increase the level of thermal insulation, polypropylene is produced with a foil layer. This backing creates the effect of a thermos, retaining heat perfectly.
Cork
A natural cork substrate has many advantages: it is environmentally friendly, has high heat and sound insulation, is durable, and lasts a long time even under high loads.
The disadvantages of cork substrate include high cost and instability to moisture. To ensure a high level of waterproofing, it is worth choosing a bitumen-cork coating. In it, cork in the form of crumbs is applied to one side of the substrate.
Despite the high quality of natural cork, in rooms with high humidity levels it is better to use polymer or bitumen-based lining material.
Coniferous substrates
Another option for natural coating is a coniferous substrate. It is made from sawdust impregnated with resins. The material is breathable, it has excellent performance, but, like cork, it is quite expensive.
So, before you finally decide what kind of substrate you need for the laminate, you should familiarize yourself with the properties and qualities of different types of this material. When choosing, you need to take into account local operating conditions and the quality of the base, as well as the financial aspect, since prices for different types of materials vary greatly.