It doesn’t really matter what kind of tile you are going to lay: porcelain stoneware, ceramic or gypsum - these tips will help you get the job done quickly and efficiently. Even if you have no experience.
The information is intended mainly for beginners in this matter, but will also be useful for those who have already encountered tile laying, but are not professionals.
This material was prepared based on the author’s video from the YouTube channel “MIKHALYCH”.
Varieties
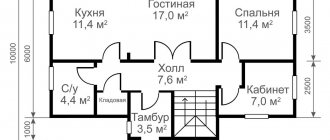
Renovations in rooms such as a bathroom, kitchen or balcony are rarely done, so it is important to approach the choice of finishing material with special care. Changing tiles every year (like we change wallpaper) will not work, so everything needs to be done efficiently and reliably.
Many people believe that a notched trowel or comb are not the most important elements in facing work, that glue can be applied with a regular tool, because there is no fundamental difference in this. But here you can argue, since the quality of the work performed will vary greatly. Experts recommend not skimping and choosing the right tool.
Combs differ in shape and materials from which they are made.
- As a rule, a high-quality tool is made of stainless steel, due to which it does not deform during work, does not deteriorate over time, and also allows for high-quality application of the composition on the tile itself.
- Very often you can find tools made of plastic. Of course, it costs several times less, but it also breaks down very quickly. After a small amount of work, you will notice that there are simply not enough teeth on it, as they wear out very quickly. In addition, such a tool can easily break down in the middle of the work process.
In addition, such devices differ not only in material, but also in the shape and presence of a handle. There are specimens whose handle is fixed directly to the working surface, which is very convenient. Professionals note that it is easier and better to work with such a tool.
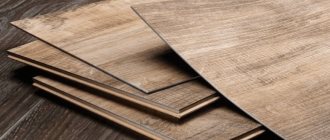
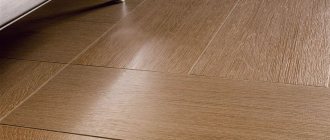
Types of porcelain stoneware
For modern homeowners, there is a huge variety of different forms of porcelain stoneware facing materials. These can be either the smallest five-centimeter tiles or huge large-format plates, the side length of which is more than a meter. Large-sized porcelain stoneware slabs are most often used for wall cladding in fairly spacious rooms. Small fragments are best suited for cladding window sills or some countertops.
Modern manufacturing plants provide consumers with the opportunity to choose the thickness of porcelain stoneware products. The greatest demand is for products whose thickness ranges from 9 to 14 mm. For ease of installation, the shape of porcelain stoneware products is most often rectangular and square.
Porcelain stoneware products can be classified according to surface structure:
- Without performing any additional processing procedure, a matte surface is obtained;
- The front side of the material becomes polished or semi-matte after a partial polishing procedure. The matte surface of porcelain stoneware is removed during processing only in fragments and not completely. This surface turns out to be quite pleasant to the touch;
- The polished front surface is formed as a result of complete erasure of the top matte layer. After the polishing procedure, a completely smooth surface is formed, visually similar to varnished;
- A small layer of colored glaze is applied to the surface, on top of which there is a special protective material, thanks to which the facing material ceases to be slippery;
- The relief front surface of porcelain stoneware is formed as a result of processing the material in special molds for pressing, the texture of which is very diverse. Thanks to such pressing molds, a wide variety of materials can be imitated. For example, to eliminate the possibility of slipping while walking, the front surface of porcelain stoneware steps may have a relief in the form of longitudinal lines.
Recommendations for choosing porcelain stoneware products are given in this video:
Each homeowner can choose their favorite cladding with any type of surface and color.
What to look for when choosing?
There are different types of combs for laying tiles. So what should you pay attention to when purchasing so that the tool does not fail during operation?
In order to be able to lay tiles efficiently, you must take into account the size of the tool and the shape of its teeth:
- A product with square teeth is typically used to apply 5 to 10mm thick mixture.
- Semicircular teeth are perfect for working with mixtures that have a synthetic composition. In addition, they can be used for better glue distribution. It is best to apply a compound with a thickness of more than 12 mm using a tool with semicircular teeth.
- In stores there are also specimens with triangular teeth. This type of comb is perfect for working with very liquid mixtures. It can also be used if it is necessary to apply a layer of no more than 5 mm. Thanks to its triangular shape, this type of tool ideally distributes the liquid mixture over the surface.
- There are also universal spatulas on sale that are suitable for laying standard tiles and mosaics, so before you pay attention to the shape of the teeth and choose the right tool, you must know exactly the size and thickness of the tiles that you are going to use for finishing work.
- Consider another important fact: the width of the tool itself must correspond to the width of the tile or be slightly larger, otherwise installation difficulties will arise.
- It is important to pay attention to the size of the teeth. If this parameter is less than a millimeter (0.6-1.2 mm), then this option is perfect for applying a very thin layer of the mixture.
- The 0.3mm size is ideal for working with mosaics.
- For installation of various types of ceramics, a size of 0.4 mm is needed.
- Teeth measuring 6 mm are excellent for installing larger tiles and wall laying.
- To install large floor tiles (thickness more than 12 mm), you need a comb with teeth of at least 10 mm.
Often, several different tools are required for repairs, since the owners plan to install tiles on both the wall and the floor. Moreover, the material comes in different formats and thicknesses.
If you choose a tool solely for applying glue, be sure to read the instructions on the package. As a rule, manufacturers give clear recommendations on the selection of construction equipment. The size of the comb and its features will be indicated on the packaging, which will facilitate the selection process.
Before you decide on a particular tool, be sure to hold it in your hands to make sure that it is comfortable and that the handle is comfortable and holds securely. Professionals prefer varnished holders - they are practical, do not slip, and do not leave splinters.
Another important point to consider is the price. In fact, high cost is not a guarantee of high quality, so pay attention not to the cost, but to the quality of the product.
Cross pads
To ensure that the seam sizes match and are perfectly even, special crosses are used.
- Cross pads can be of different widths, ranging from 1 mm to 5 mm.
- Crosses of 3-4 mm are used for wall tiles, and 5 mm for floor tiles.
The crosses must be of good quality and not break, otherwise they may get stuck in the seams and be difficult to get out. High-quality crosses are very elastic, but at the same time, they do not break.
How to use it correctly?
If you have already chosen the tiles, adhesive and even the necessary tools, then it’s time to learn about the intricacies of applying the mixture.
Before you begin the installation itself, you need to prepare everything. The surface must be ready for use. The covering of a wall or floor must be completely cleaned of small and large debris, dust particles and other defects, otherwise it will prevent ideal installation.
In addition, if the base needs leveling, then this must be taken care of in advance, since the tiles must be laid exclusively on a flat surface.
Next you need to prepare the glue itself. If this is a dry mixture, then dilute it, taking into account all the recommendations indicated by the manufacturers on the packaging. Be sure to make sure that there are no lumps, otherwise such a composition will ruin the quality of the installation, and the tiles will not last as long as you would like.
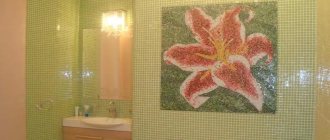
Myth 1. Large-format porcelain tiles are boring colors and faceless
This opinion arose at a time when large tiles were used only for finishing shops, offices, warehouses and ventilated facades. Today, manufacturers offer dozens of different textures and colors for the most current interiors. As evidence, here are a few collections:
- Grande Marble Look. An exquisite collection from the Italian brand Marazzi with a magnificent interpretation of marble design.
- Grande Metal Look. Another series from Marazzi with a polished metal texture for fashionable urban design.
- Iron. Spanish large-format porcelain stoneware with a patinated metal surface.
- Onice Giada. Porcelain tiles from Italy in extra large format with onyx texture for elegant classic interiors.
- Ultra Onici. Another variation on the onyx theme – from another Italian brand.
However, these are not all the options that manufacturers offer. Wood, stone, terracotta, semi-precious minerals and artistic panels are just some of the design options.
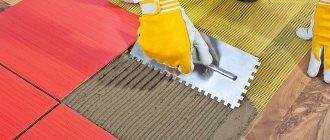
Why do you need a special spatula?
First, let's figure out why you need a comb for laying tiles. Everything is quite simple here. When applying the adhesive mixture, it is leveled with a notched trowel, resulting in grooves being formed. They also determine the uniform distribution of the adhesive mixture over the surface of the tile.
Due to this we get the following advantages:
- High quality styling. This is due to the distribution of the adhesive mixture in an even layer over the entire area of the tile. Accordingly, the material itself will lie as smoothly as possible, of course, if the base is previously prepared and leveled.
- This approach also increases the speed of work, since in this case you do not have to press the tiles in and remove excess glue every time.
- The strength of the connection is ensured. In the case of a lack or excess of glue, on the contrary, it decreases, and using a tile spatula helps to apply exactly the required amount of the mixture.
- And the last thing is cost-effectiveness, since the spatula will help eliminate waste of material by applying exactly the required amount.
A little advice on which tile trowel to choose. It is most convenient to work with a tool that has two serrated sides, while the other two are smooth, which allows you to do all the work with one tool, without constantly changing one to the other.
Why will large-format tiles also be popular in 2022?
Large format ceramic tiles are elegant, stylish and timeless, and the versatility of large format tiles has made them one of the hottest home decor trends.
There are many benefits to working with larger sized ceramic slabs for your projects.
Below are some of the biggest benefits of large format tiles that will convince you to install one.
First, let's figure out what large format tiles are?
Large size ceramic tiles are tiles that are larger than most regular wall and floor tiles, measuring 300mm x 300mm.
Using large format tiles or porcelain tiles (which can measure up to 120cm by 240cm), your home or office will instantly be transformed into a spacious and stylish environment.
Wide format tile installations are becoming a top contender for bathroom and kitchen renovations as they are contemporary and durable.
Characteristics when choosing a comb
Different types of combs can be determined by the shape of the teeth, since it differs in different cases, and here it is important to know which trowel is needed for laying tiles.
Tooth shape
The difference in shape is due directly to the thickness of the layer, and differs as follows:
- When laying tiles on a layer of adhesive from 6 to 12 millimeters, square-tooth combs are used.
- For larger layers, over 12 millimeters, tools with semicircular teeth are used. Because when using square ones, the path is difficult to comb, and in addition, the furrows fall off. In the case of a round shape, this is not observed.
- Also, sometimes there are spatulas with triangular teeth; these are used when laying tiles on a layer of up to 5 mm, in particular for PVC tiles.
Like any other tool, spatulas also have their own markings, which indicate the size and shape of the teeth. It is written in a combination of letters and numbers. Examples of markings are shown in the table below:
And now a little about decoding:
- Small triangular teeth with small intervals are marked with the letter - A.
- Tool with large spaces between triangles - B.
- With no spaces - S.
- With square teeth – C.
- For rectangular ones, the designation becomes R.
- And lastly, semicircular - M.
We figured out what kind of comb for tiles is used, but that’s not all.
Teeth size
The size of the teeth is also an important factor, since this is what controls the layer of glue. Thus, which comb to choose for laying tiles will depend directly on the expected thickness of the tile adhesive layer.
Let's look at the approximate dimensions of the teeth, depending on the area of the tile, with the condition that the spatula itself will be slightly wider than the width of the tile.
In the case of laying tiles on the floor, the dimensions must be chosen slightly larger than those indicated. Now you can decide which spatula is needed for laying the tiles, depending on the size of the material itself and the thickness of the adhesive mixture layer. Tile adhesive consumption calculator.
Price list for laying large-format porcelain tiles in Moscow (on a leveled surface):
| № | Name of works | Unit change | Price in Moscow | Price in St. Petersburg | Price in Kazan |
| 1 | Laying large-format porcelain tiles 600 mm × 600 mm | m² | 2200 rub. | 2000 rub. | 1700 rub. |
| 2 | Laying large-format porcelain tiles 800 mm × 800 mm | m² | 2800 rub. | 2500 rub. | 2100 rub. |
| 3 | Laying large-format porcelain tiles 900 mm × 900 mm | m² | 2800 rub. | 2500 rub. | 2100 rub. |
| 4 | Laying large-format porcelain tiles 1000 mm × 1000 mm | m² | 2900 rub. | 2600 rub. | 2200 rub. |
| 5 | Laying large-format porcelain tiles 1200 mm × 600 mm | m² | 3000 rub. | 2700 rub. | 2300 rub. |
| 6 | Laying large-format porcelain tiles 1500 mm × 500 mm | m² | 3000 rub. | 2700 rub. | 2300 rub. |
| 7 | Laying large-format porcelain tiles 1500 mm × 800 mm | m² | 3100 rub. | 2800 rub. | 2500 rub. |
| 8 | Laying large-format porcelain tiles 1200 mm × 1200 mm | m² | 3200 rub. | 2900 rub. | 2600 rub. |
| 9 | Laying large-format porcelain tiles 1500 mm × 1500 mm | m² | 3300 rub. | 3000 rub. | 2600 rub. |
| 10 | Laying large-format porcelain tiles 1600 mm × 800 mm | m² | 3500 rub. | 3100 rub. | 2700 rub. |
| 11 | Laying large-format porcelain tiles 1800 mm × 900 mm | m² | 3600 rub. | 3200 rub. | 2800 rub. |
| 12 | Laying large-format porcelain tiles 1600 mm × 1600 mm | m² | 3800 rub. | 3400 rub. | 3000 rub. |
| 13 | Laying large-format porcelain tiles 1400 mm × 600 mm | m² | 3800 rub. | 3400 rub. | 3000 rub. |
| 14 | Laying large-format porcelain tiles 2400 mm × 800 mm | m² | 3900 rub. | 3600 rub. | 3200 rub. |
| 15 | Laying large-format porcelain tiles 2400 mm × 1200 mm | m² | 4300 rub. | 3800 rub. | 3300 rub. |
| 16 | Laying large-format porcelain tiles 2600 mm × 1200 mm | m² | 4500 rub. | 4000 rub. | 3500 rub. |
| 17 | Laying large-format porcelain tiles 2800 mm × 1200 mm | m² | 4600 rub. | 4200 rub. | 3800 rub. |
| 18 | Laying large-format porcelain tiles 3000 mm × 1000 mm | m² | 4900 rub. | 4500 rub. | 4000 rub. |
| 19 | Laying large-format porcelain tiles 3000 mm × 1500 mm | m² | 5100 rub. | 4800 rub. | 4400 rub. |
| 20 | Laying large-format porcelain tiles 3200 mm × 1600 mm | m² | 5800 rub. | 5500 rub. | 5100 rub. |
How to apply glue correctly
And the last question that requires consideration after choosing which comb to lay the tiles with is the distribution of the solution over the surface, or more precisely the technology of its application.
- First, you need to understand the behavior of the glue; depending on this, the level of its application will be selected to avoid voids.
- Direct application of the mixture becomes important; the result should be perfectly straight furrows, without any curls.
- The glue itself is applied to the base at an angle of 30-40 degrees.
- After this, the comb is created, which is performed at an angle of up to 75 degrees.
- The mixture must be applied directly to the base. Some, of course, apply it to the tiles, which significantly slows down the progress of work.
- After the mixture is applied, the tile is applied and pressed, and to distribute the adhesive more evenly, it is compacted using a rubber hammer. Find out in detail about the quick method of applying tile adhesive.
Basic tile laying technologies
This publication presents technologies for laying tiles intended for finishing bathrooms and toilets. This will also be of interest to professionals, since non-standard examples are given below, as well as to owners interested in the essence of the issue for informational purposes in anticipation of a major overhaul.
Actually, there are only two classical technologies for laying tiles - “combed” and “slapped”
, the principle of which lies in the methods of applying tile adhesive to the back side of tile materials or to the surface of walls and floors. Details about the characteristics of tiles and professional nuances are published in the tips: rules for laying tiles.
Comb laying technology
This is the most effective method of laying tiles, used for leveled floors using a concrete screed (for floor tiles) and plastered walls under the “lighthouse” (for wall tiles). In this case, notched spatulas with a tooth depth of 6 to 8 mm are used, with the help of which the applied adhesive is “stretched” along the laying plane. The resulting uniform grooves allow you to quickly and accurately lay tiles without so-called “voids” in the adhesive mass, which is very important for flooring - tiles with mortar voids are most susceptible to damage, especially corners, in cases of accidental impacts and falls of even small objects.
This is also justified on heated floors, where elevated temperatures cause natural evaporation of moisture, and, accordingly, expansion of air in the sinuses of the solution voids, which can also, for obvious reasons, play a cruel joke.
Laying method "slap"
Among serious tilers, the technology in question is considered unacceptable, as stated above, due to the possibility of voids appearing in the adhesive composition and low efficiency during leveling.
The adhesive is distributed before laying in even piles according to the size of the tiles, which are placed on top of the mortar, pressed down, tapping with a rubber hammer until the required vertical or horizontal levels are achieved. The adhesive under the tiles, in theory, should be distributed evenly, but in practice this result is rarely achieved, since the mortar is applied “by eye.”
However, the practice of "slaps"
has the right to exist in the conditions of laying wall and floor tiles on vertically “littered” walls or uneven concrete foundations, which occur when bypassing a number of rough stages of major repairs: in the absence of cement-sand screed and plastering work. This is often found in practice due to cost savings on building materials and work.
But it must be remembered that the glue under the tiles in such cases can reach over 2 cm, which in itself does not contribute to high-quality installation due to the ability of the mortar mass to “spread” with a large layer. Therefore, before saving on the work of pouring concrete screed or plastering, it is better to think about the possible consequences.
Glue solution
As for tile adhesive for tiles, porcelain tiles, marble, granite, and other artificial and natural materials, today the choice of products is very extensive. We can only highlight a series of adhesive mixtures that have been proven in many years of practice by most tilers:
The latter is especially recommended when laying tiles on heated floors.
Good qualities of large format porcelain granite
- If you use large-format ceramic granite for facade finishing of structures and buildings, then you will be able to effectively protect the structure from premature destruction under the influence of adverse
atmospheric conditions. This is due to the amazing characteristics of the building material: its strength, durability, reliability, resistance to strong temperature changes, moisture, plus the effect of aggressive harmful substances on the coating. - Because large-sized ceramic granite is considered a stone of artificial origin, products based on it can be created in a different palette of colors and formats. The choice of granite tiles is so large that it can be used anywhere when laying. In addition, the impressive size of porcelain granite
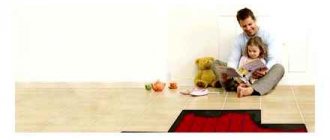
makes good kitchen worktops.
Countertop made of large-format ceramic granite
for the kitchen room
- Even taking into account that the cost of porcelain stoneware products has never been small, these tiles as a finishing material for the facades of buildings and the floor in the middle of the room will make it possible to save the owner from many different kinds of cosmetic or major repairs. Therefore, laying rectangular tiles with dimensions of 600 mm, 1500 mm and 1000 mm will give you the opportunity to save your material resources on the purchase of building materials.
- Because this building material for granite, or rather its structure, is considered to be virtually poreless, such a coating will almost not absorb dirt into the thickness of the ceramic granite. Therefore, if it is used as a flooring material, the flooring will hardly get dirty, maintaining its own beautiful appearance.
- You can clean the granite surface using any chemical cleaning agents. You are unlikely to be able to cause any harm to ceramic granite. This building material is characterized by a high degree of resistance to damage and chemical influences.
Observations from practice and our experience
We admit that the technology for laying tiles given below will raise doubts among some readers, but nevertheless, the trial, rather risky experience withstood all sorts of tests, including a 4-year period after the completion of the renovation and finishing of the bathroom. We will talk about laying tiles made of natural marble, dimensions 305x305x10 mm, laid using the “comb” method on pre-plastered walls with Teplon gypsum plaster.
Once, during the work, we encountered the peculiarities of marble tiles, which were difficult to install even with special Knauf-MARBLE adhesive, since the back side of the marble was not treated with special water-repellent chemicals. During the drying period, the subsequent, almost perfectly leveled tiles “sank” in the plane in relation to the previously laid and dried row.
As it later became clear, the reverse side of the marble tile, like a sponge, actively absorbed moisture from the slowly setting solution, due to which unplanned “shrinkage” occurred.
There have been attempts to treat the working side of marble tiles with primers in order to prevent increased moisture consumption. However, the result was still unsatisfactory, and chemical spraying in that case was not possible.
Unusual experience of laying marble tiles
Everything worked out using Flizekleber
solution from gypsum putty
“Pufas”
, used exclusively for preparing plastered walls for wallpaper, leveling plasterboard surfaces, sealing joints, etc., that is, for painting work. But it was the putty’s ability to quickly harden that helped solve the problem with laying marble tiles - moisture was also absorbed, but the putty set faster, preventing the marble tiles from “sagging.”