Most apartments do not have windows in the bathroom and toilet - and to create normal air exchange in the room, artificial ventilation should be provided. The operation of such a device allows you to ensure an optimal level of humidity, avoiding the appearance of mold and mildew on the ceiling and walls. However, periodically it will have to be removed from the vent for cleaning or replacement.
Knowing how to properly remove a fan in the bathroom and install it back, you can do the work yourself without involving specialists.
Fan on the bathroom wall
Types of bathroom fans
Which of the fans on the market would be best for decorating a bathroom? You should pay attention to their varieties
Axial models
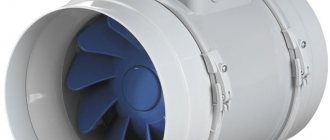
The devices are designed as a wheel in a cylindrical body. There are cantilever blades along the surface of the product. The structure is fixed on an axial electric motor. The operating principle is based on the rotation of the wheel, capturing air by the blades and moving it. Axial fans are installed in the shaft openings.
Advantages:
- high efficiency - 100 cubic meters are cleaned in 1 hour;
- ease of installation - into the wall surface;
- operate without an air vent system;
- suitable for low pressure communications;
- effective under variable load conditions;
- compact sizes.
Minuses:
- minimum pressure;
- risks of air circulation disruption during installation;
- work loudly - noise level from 30 to 50 dB.
Advice! To increase the aerodynamic characteristics of the device, install a manifold first.
Radial fans
The devices are made in the form of a spiral casing (hollow cylinder) with a blade wheel. The efficiency of the entire mechanism depends on the shape of the blades. Manufacturers produce several elements:
- curved forward in the direction of movement - high performance, but insufficient removal of mechanical impurities and gas;
- curved back - convenient speed adjustment and good efficiency;
- “paddle wheel” - a straight design that works under conditions of high pressure and dense impurities in the air.
Advice! Straight-bladed models have high noise and low efficiency. Radial fan for bathroom
The principle of operation of the fan is based on the entry of air masses into the holes of the blades, directing it radially, compressing it and then pushing it through the spiral casing into the supercharger.
Advantages:
- saving up to 20% of electricity;
- avoiding power grid overload;
- processing 1 m3 of polluted air in 1 second;
- corrosion resistance;
- presence of a protection relay and speed controller;
- connection to a network with a voltage of 220-240 V;
- ease of installation and maintenance;
- minimum noise level;
- take up almost no space.
Minuses:
The greatest efficiency is only in spacious rooms.
Centrifugal units
Powerful devices with low noise levels are installed on the ventilation flow path. The devices consist of a wheel with blades, channels with a round or rectangular cross-section, suction and discharge mechanisms. Air masses are sucked into the blades centrifugally and pushed out perpendicular to a new portion of air.
Important! For home communications, only channel models designed for rooms of 15 square meters are suitable. Installation of centrifugal fans is hidden. They are fixed under the ceiling and masked with plasterboard overlays
They are fixed under the ceiling and masked with plasterboard overlays
Installation of centrifugal fans is hidden. They are fixed under the ceiling and masked with plasterboard overlays.
Advantages:
- reliability of rigid and semi-rigid air vents;
- installation in the center of communication or in front of the air intake;
- work in highly polluted areas;
- withstand constant temperature changes.
Minuses:
- low energy efficiency;
- risks of engine explosion due to voltage fluctuations;
- the need for additional installation of an anemostat.
Roof structures
Fans act as exhaust hoods. The design consists of a fan, vibration-insulating gaskets, an electric motor, and automatic adjustment devices in a single housing. The main unit is axial or radial with blades that suck in air from one or both sides. Installation of the ventilation structure is carried out simultaneously with roofing work and includes the installation of deflectors, pipes, and passage elements.
Advantages:
- regular supply of fresh air;
- maintaining normal humidity;
- removal of specific odors and moisture;
- preventing mold growth;
- eliminating sewer odors.
Minuses:
- the need for insulation in winter;
- complexity of installation work.
Ventilation hole on the outside of the suspended ceiling
In houses where the air duct opening is located above the level at which a suspended slatted or suspended ceiling is mounted, an exhaust duct or axial fan is inserted into a standard air duct in the wall, and another hole is made on the ceiling sheet opposite it.
The standard width of the slatted structure is 84 mm, so the hole should have a diameter of 80 mm so as not to crush the slatted profile . A hole is drilled in the rail with a drill equipped with an 80 or 82 mm “ballerina” cutter.
You can take a larger grille, with a diameter of 100 mm, holes for self-tapping screws are marked on it. It leans against the markings, and mounting holes for fastening are drilled through it . It is not recommended to immediately screw a self-tapping screw into the ceiling (without pre-drilled holes for it): the slightest misfire, it will stick in the wrong place. The screw caps will be hidden by the decorative element of the grille.
In a similar way, you can do ventilation in tension fabrics with your own hands, only here the hole is carefully cut out and not drilled. The grille is attached to the ceiling with special clamps or silicone glue.
Reasons for lack of ventilation
If the result is negative (the paper deviates from the grille into the room or falls down), the question of how to clean the ventilation in the apartment is resolved, because... it is clear that it is clogged. Although the reason may also be the destruction of the ventilation duct due to improper redevelopment of apartments on the floors above. Often, in order to expand the usable area of the kitchen, the ventilation duct is disassembled. The freed up space is used for installing household appliances. This affects general building ventilation systems.
Ventilation duct in a multi-storey building
Deterioration in air exchange may be associated with the installation of fiberglass bags without ventilation valves to replace cracked window frames that block the natural penetration of air into the apartment. Therefore, owners of wooden windows should not seal them hermetically for the winter. It is better to seal the cracks and spaces between the frame and the sash with an adhesive strip with foam rubber as insulation.
The cause of the blockage can also be construction waste (hardened mortar, fragments of bricks, wooden blocks, etc.)
DIY repair
To replace the granules in the carbon filter, the air intake grille is carefully removed. Immediately behind it is a carbon purifier. The used granules are removed, and new ones are poured inside. If the carbon cleaner is not dismountable, it is simply replaced with a new one. Replacement process:
Be very careful when disassembling the device
- remove and place the air intake grille “face down” on the table;
- disconnect the old cleaner;
- carefully lay the new filter;
- install the grille in place.
If a light bulb burns out, it is replaced with a new one of the same type. If your new kitchen hood light still doesn't light up, then the problem is with the switch. One of the wires “comes off”, so the light in the kitchen hood does not work. If the halogen bulbs do not light up, the cause may be a burnt-out transformer in the device housing.
How to disassemble an exhaust fan?
After three and a half years of almost continuous use, the S&P Silent 300 stopped working.
Electricity is supplied to it, the light is on, but there are no signs of life. The impeller rotates easily with the incoming air flow.
Before buying a new one, I decided to be curious, maybe some nonsense inside has been sealed off? I dismantled it and can’t figure out how to take it apart? It was not possible to tighten the impeller with reasonable efforts; on the reverse side there was a casing with four small holes. IMHO the back parts of the studs can only sit in such holes, that is, I suspect that the studs are still screwed in somewhere under the impeller.
Can anyone tell me exactly how to disassemble S&P fans?
photos from different angles in the studio! Let's think!
Jerome02 wrote: photos from different angles in the studio! Let's think!
The motor is attached to the housing with self-tapping screws from the front side (see under the impeller). And then disassemble it (including removing the impeller) without damage - I couldn’t find a fastener/method.
THIS IS A CRAP TO DISASSEMBLE. I DON’T REMEMBER HOW, but it’s simple. I’ve taken apart just such things many times. In the second photo, blow off the dust and screws should appear for disassembly. In extreme cases, everything will be glued together. The fan is removed from the axis by hand, the motor is hidden inside two halves, like like a nesting doll, then ring the windings and everything will become clear.
In general, tighten the impeller, and then depending on the circumstances, did I understand correctly?
I can’t pull it off, I’ve already torn off all my fingers
The mounting screws are clearly hidden under the impeller.
There are no tricks, it’s probably just glued on with super glue and that’s it. You need a careful but strong tug.
Second option. If the mounting screws are really under the impeller, wouldn’t it be easier to first drill one hole with a diameter of 10 mm in the impeller housing (then do the same thing symmetrically) and unscrew the screws through these holes?
Alexander Ro wrote: tighten the impeller, and then depending on the circumstances
Only one way and no other way, the impeller must come off the bearing or the engine axis, and then everything else. But after 3 and a half years it is very difficult.
Similar situation. As soon as, once again, the (third) warranty expired, the fan stopped working. The light is on but doesn't want to buzz. It was decided to figure out what was happening to them. Fortunately, I didn’t throw away the ones that had previously failed, but carefully stored them in the pantry. The impeller, although with some effort, was “pulled” from the shaft; there was only a spring there. There are four self-tapping screws under the impeller; we unscrew them and the engine is in our hands. A certain element (choke?, fuse?) was found on one of the motor windings that refused to “ring”. I decided to short-circuit it with a jumper and the assumption was justified - the fan started working. The only question left is, what is this element? And, just in case, I powered the fan through a regular fuse, you never know.
Who should clean the ventilation in an apartment building?
18.04.
2018
- scheduled inspections and elimination of all identified system faults;
- replacement of broken exhaust grilles and their fastening;
- eliminating leaks in ventilation ducts and shafts;
- eliminating blockages in channels;
- troubleshooting dampers and throttle valves in exhaust shafts, umbrellas over shafts and deflectors.
5.7.1. Design temperatures, rates and air exchange rates for various rooms of residential buildings must comply with established requirements. Natural exhaust ventilation should ensure the removal of the required volume of air from all premises provided for by the project at current outdoor temperatures of 5 degrees. From and below….
How to clean ventilation in apartment buildings
Judging by the even flame, which does not deviate towards the decorative grille covering the ventilation hole, we can conclude that the shaft is clogged and needs urgent cleaning.
With normal air circulation in houses, the flame leans towards the shaft, and in some cases simply goes out.
With this behavior, cleaning the ventilation is not necessary, but if it was last cleaned at least six months ago, it is still advisable to do a little work.
Cleaning ventilation in apartment buildings and in production
Cleaning the ventilation in an apartment building should be done regularly and much more often than many owners believe. Specific deadlines are set by specialists after analyzing the condition of the air ducts. The recommended frequency of cleaning is 2 times a year (summer and winter), preventive inspection is quarterly.
Ventilation: what, how, why, when and who
At the dawn of mass housing development, each apartment had an individual ventilation duct, which eventually connected to the exhaust shaft. Over time, when houses became higher and higher, horizontal channels began to be installed between floors, and from them they directed air upward to the ventilation shaft.
Ventilation cleaning: cleaning ventilation ducts in an apartment building
The decrease in ventilation efficiency in old houses is, in principle, a fairly predictable process. The main reason is a simple blockage of the ventilation duct, which over time accumulates debris, dirt, dust and other waste coming from the premises. As a result, the outlet narrows and becomes unable to fully process the dirty air taken in.
Periodic inspection of smoke and ventilation ducts
c) during operation of smoke and ventilation ducts (periodic checks) - at least 3 times a year (no later than 7 calendar days before the start of the heating season, in the middle of the heating season and no later than 7 days after the end of the heating season) ;
Ventilation system maintenance
- Carry out maintenance at strictly approved intervals. You must not violate the terms of technical inspection of equipment and the manufacturer’s recommendations;
- start and stop the operation of the ventilation system in a certain sequence (such measures ensure the complete release of accumulated harmful substances from the air ducts);
- check fan units once a month;
- Check the duct heater for leaks once every 2 weeks;
- control timely oil changes when servicing oil filters;
- check ventilation grids and grilles for blockages once every 3 months;
- monitor the integrity of the sound-absorbing material.
Cleaning the ventilation in the apartment
Ventilation can be called the lungs of a living space. The benefits of an efficiently operating air exchange system are obvious to any person living in an apartment or private house.
It directly affects the well-being, health and safety of residents.
Regular cleaning of the ventilation in the apartment will ensure a comfortable stay in the house, and will also reduce the possibility of dangerous situations associated with ventilation shafts.
We recommend reading: How to rent land from the administration
Installation of ventilation and shafts in multi-storey apartment buildings
If an apartment building is not equipped with a ventilation system, all waste products of people remain in the premises. Conditions are created that are dangerous to people’s health and the safety of their property. Mold eats away walls and furniture, and residents suffer from allergies and asthma. Children and the elderly feel the worst in such apartments.
Who should clean the ventilation in an apartment building Link to main publication
Ventilation hole inside a suspended ceiling
Moisture should not be retained inside suspended rack and tension structures, so a ventilation system is required there.
Stretch and slatted ceilings in some houses are mounted along the lower edge of the ceiling beams located at a height of 19–21 cm from the ceiling. The ventilation hole is located inside the hanging structure.
In this case, it is enough to equip a suspended or slatted ceiling with passive ventilation: cut a hole in the ceiling, decorate it with a decorative grille or a special lampshade. Several such holes can be made. An exhaust fan, installed in a wall opening, will draw air through the ceiling vents. This will allow you to choose a device of greater power and, accordingly, noise: the ceiling design will muffle sounds, and the air flow will be stronger, which will compensate for the small size of the ventilation grille in it.
History and design of the hood
Since the beginning of ancient times, people have thought about ventilating indoor spaces. This was especially true in food preparation areas. Initially, all actions were reduced to simple ventilation or such an arrangement of the cooking area that naturally removed combustion products.
With the development of house building, kitchens also changed. They began to use stoves and fireplaces in which chimneys were used to remove combustion products. In the 19th century, the Russian scientist E. H. Land suggested that high-quality ventilation is impossible without artificial air exchange. The production of hoods was mainly developed thanks to the Italian company Faber, which released the first plastic hood in 1958.
Modern hoods fully cope with the tasks assigned to them. Without losing performance, they have become compact and easy to use. Competition between companies leads to constant improvement of product technical characteristics, such as performance, noise reduction, and reliability.
Types and principle of operation
A kitchen hood is a device designed to clean the air from smoke, odors, particles of fat, and moisture that arise during the cooking process. Depending on the operating mode, kitchen hoods are either flow-through or circulation. The first type involves exhaust mode, when the exhaust air is drawn outside from the room, most often into the ventilation shaft. This mode is more preferable than the second. The circulation mode is based on passing air through a filter system and returning it back to the room.
According to their appearance, exhaust devices are divided into the following types:
Despite their appearance, their operating principle and structure are the same. The main part of a kitchen appliance is the motor. The quality of air purification depends on its operation and location. Having an exhaust fan, it ensures the creation of air flows passing through the filter elements.
An asynchronous motor is used as a motor. Its axis follows the movements of the pumped or discharged air flow. Such an electric motor consists of a rotor located inside the stator. The distance between them is no more than two millimeters. The stator is a core with slots on which the winding is wound. The rotor, the moving part with the shaft, consists of a core with a short-circuited winding. This design resembles a squirrel wheel in appearance.
When alternating current is supplied to the stator winding, according to the laws of physics, an alternating magnetic field appears. Electromagnetic induction occurs on a closed conductor placed inside this field, which leads to the appearance of a current, and this, in turn, causes the rotor to rotate. Due to the fact that the stator has several leads, connecting different numbers of them leads to a change in the fan rotation speed.
Structural elements of the system
A special element of the hood is the check valve. It can be electric, with a motor opening when starting, or mechanical, triggered by the pressure of the air flow. Its job is to pass air in one direction and prevent it from passing in the opposite direction. In addition to the electric motor for the hood and the valve, the device includes:
- frame;
- power unit;
- control board;
- control unit panel;
- motor holder housing;
- backlight lamps;
- filters.
The body itself is made of sheet steel and is powder coated to prevent rust. The power supply is designed to start the electric motor and provide the required voltage to the control board and backlight lamps. The motor holder is used to reduce the level of vibration and noise from its operation, as well as to securely fasten it. The filters have different designs, but in all cases a perforated aluminum mesh is used as the primary element. It effectively protects parts of the hood from contamination with grease. The control unit is made in the form of mechanical buttons or touch surfaces.
How to avoid damage to the hood: tips for proper operation
In order not to resort to kitchen hood repair, you should adhere to the operating rules for this equipment, which are established by the manufacturer. Let's highlight the main points:
Location above the stove.
If a gas stove is used in the kitchen, the hood should be installed at a height of 70-80 cm from the hob, if electric - at a height of 60-70 cm. If the hood is located below this mark, overheating of the structural elements with subsequent deformation is possible. At the same time, a higher location will reduce the efficiency of the device.
Start the fan.
If there is a manual speed switch, it is advisable to start starting from the lowest stage. Setting the maximum speed right away will increase the load on the electric motor, which can reduce its service life.
Filter care.
Untimely cleaning or replacement of filter elements leads to the fact that grease particles begin to penetrate inside the device, covering the engine, control board and backlight lamps with an oil film. In addition, practically no air passes through a clogged filter, so the efficiency of such a hood is zero.
Protection against voltage surges.
Like any other electrical appliance, a kitchen hood must be protected from power surges. Of course, a fuse is usually installed inside the device, but it cannot always protect the equipment from an unstable network. This can be better dealt with by additionally installing a protective relay, which instantly turns off the power if the voltage deviation from the norm is too large.
Voltage relay – additional protection of equipment from power surges
The complexity of repairing a kitchen hood depends on the nature of the problem. Anyone can change a burnt-out light bulb, but restoring the operation of a fan can pose serious difficulties. If there is no experience at all in repairing electrical appliances, then it is more advisable to turn to specialists so that you do not have to buy new equipment.
Device assembly
The last step is to install the fan in reverse order. To assemble the device you should:
- Install the motor and connect the terminals.
- Carefully secure the impeller.
- To secure the fan, lubricate the back of its housing with glue.
- Install the device into the hole, pressing it tightly against the wall or box.
- Attach the mosquito net back first and then the front cover. Basically, it is mounted on self-tapping screws or special fastenings in the form of latches.
- Connect the fan to the electrical network - making sure that the electricity is turned off and using terminal blocks rather than twists.
Various circuits are used to turn on the device. One of the simplest is a regular button or cord on the device. The second option involves combining the startup of the device with turning on the lighting - in this case, the ventilation starts working simultaneously with the light, which makes control more convenient. Turning on the fan separately has a more rational consumption of electricity - although when entering the toilet and bathroom it will have to be started separately. By making the device turn on automatically based on sensor measurement results, you can save time, although you will have to spend more money on installation.
Electrical connection
Each model has its own installation features. Therefore, before starting installation, it is recommended to carefully read the instructions. Installing a new fan, if the device is being replaced, is practically no different from installing an old model - especially if you choose a fan with the same geometric dimensions.
Having examined the features of restoring the functionality of the old fan, we can draw certain conclusions. Firstly, installation and cleaning are unlikely to take more than half an hour, and secondly, most problems can be solved by removing contaminants and lubricating old equipment. Thirdly, without periodic removal and reinstallation of the device it will not be possible to do without reducing the efficiency of the ventilation system.
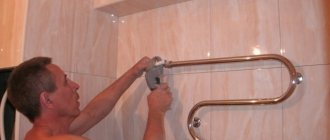
Installation and fastening of fans with self-tapping screws or dowel-nails
- Remove the top grill.
- We place the fan housing against the wall and mark on it with a pencil the locations of 4 holes for fastening with self-tapping screws.
- We drill holes with a hammer drill exactly according to the marks and insert plastic spacer dowels into them, which are often included in the kit.
- We connect the fan to the electrical wiring according to these instructions, observing electrical safety measures.
- We check its operation with precautions by briefly turning on the power supply.
- We insert it into the ventilation duct and screw the fan itself to the wall with self-tapping screws.
- We put the grate in place.
Household chemicals for cleaning hoods
Professional products are used for old stains. If the hood has not been treated for more than six months, home methods cannot cope with the problem. The following products are needed: Fairy, Shumanit, Green&Clean Professional, AmWay, Sano Forte Plus, Topperr, Mister Muscle, Silit Banks, Mole. They certainly have their advantages: they are narrowly targeted (they act on a specific type of pollution), require virtually no effort, and are used economically. But at the same time, these solutions can be aggressive towards metal and other materials from which the hood is made.
The method of processing components does not require more than 10 minutes and consists of soaking the hood parts in professionally prepared solutions. If there are no contraindications in the instructions, you can wash the grill and accessories in the dishwasher.
The mole cleaning method is considered the most radical. It can be used a maximum of a couple of times during the entire service life of the hood. It involves immersing the parts in Mole's solution (be sure to wear gloves while doing this). The reaction begins immediately. After treatment, you need to rinse the hood parts under running water for a long time. The alkali contained in the product should not remain on the components; it “eats” the metal.
Preparatory actions
Installing an exhaust fan is a fairly simple job and can be easily done correctly with your own hands. Its installation will be correct if the following rules are followed:
- ventilation of the room will be effective if there is a small gap between the threshold and the door, or the doors have slots;
- the air shaft should not be clogged; it is necessary to check whether there is air movement through it;
- installation is carried out only after connecting the mechanism to the electrical network;
- Sometimes it is necessary to widen the hole for the device, and if it is larger, a plastic pipe or similar gasket is inserted there as a seal. After this, the voids are filled with foam for installation;
- you need to check whether the plastic grill covers the area without finishing; if not, you need to putty and tint these areas of the wall;
When calculating the diameter of the fan, take into account that it is necessary to leave 5–10 mm around its circumference for reliable fixation with sealant, sealant, or polyurethane foam. Power is supplied to the device in advance; any lighting or switch will do. It is most convenient if the power cables are pre-placed in the ventilation duct when laying the tiles. External wiring is also used.
The air shaft must not be clogged. A gasket may be required.
If the fan has touched the finish, the area needs to be restored.
Typical causes of decreased cravings
If, after you managed to wash the hood in the bathroom, its performance has not increased to nominal, it is worth identifying the reasons why the device is not working properly.
In addition to normal wear and tear on equipment, many different factors can affect suction levels. But most often the root of insufficient air exchange lies in decreased draft. So why does a serviceable and clean forced air hood fail to remove moist air?
Reason #1 - poor air exchange
To exhaust air flows, a wall hood needs an influx of fresh air. To do this, there should be special openings with grilles at the bottom of the door, through which air from other rooms will enter the bathroom.
Doors with ventilation grilles fit quite aesthetically into the interior. To ensure air flow, it is enough to choose a leaf with three to five holes located at the bottom of the door
If there is no opportunity or desire to replace the interior door, you should leave it ajar more often, widen the opening between the door leaf and the door frame, or cut the ventilation holes yourself.
Installation of plastic windows, careful insulation of walls and reliable entrance doors with good insulation significantly prevent the penetration of street air into the home
Therefore, even in winter, it is important to periodically ventilate all rooms. And also install windows with an inlet valve
Reason #2 - clogged ventilation ducts
If the ventilation shaft is clogged with contaminants or blocked, even a powerful forced-air exhaust will not cope with its tasks. Therefore, it is necessary to check the presence of natural ventilation. If the built-in hood does not have a check valve, this can be done in the simplest way. Such testing can be carried out in the cold season, since in the summer, when the air temperature indoors and outdoors is too high, a sufficient pressure drop will not be created.
After turning off the fan, provide fresh air by opening the apartment windows and the bathroom door. Place a napkin against the hood grille. If a piece of light paper is attracted to the hole, then everything is in order with the functioning of the ventilation. And if there is no draft at all, you need to contact the management company, after which a special service will check the ventilation ducts and clean them.
The difference between a dirty and cleaned ventilation shaft is clearly shown in the photo. However, such a thorough cleaning will require special equipment, so calling in specialists cannot be avoided.
Additionally, you can determine the presence of traction by the condensation that falls on the mirror after taking a bath. If the steam quickly disappears after opening the doors to the room, it means that natural ventilation is functioning properly.
Reason #3 - installation of powerful hoods by neighbors
If neighbors living on the floors below install too powerful fans, the draft in the duct may drop significantly due to the formation of a rapid air flow. In some cases, a reverse draft phenomenon may occur, in which air from the bathrooms of other residents will be blown into the rooms on the floors above.
To get rid of these problems, you should either negotiate with your neighbors or install a more powerful forced air removal device.
However, the latter option risks creating inconvenience for the residents above and may require widening the hole in the wall leading to the shaft. This is due to the fact that the nominal performance of the exhaust fan is also affected by the diameter of the duct inlet.
Reason #4 - presence of a check valve
To prevent unpleasant odors from neighbors below from entering the bathroom, users often complement the design of the wall-mounted exhaust system with a special part - a check valve. It cuts off air flow from the ventilation duct.
But in the absence of normal inflow and installation of an unsuitable hood, it will completely block the air duct, thereby depriving the room of a natural path for air extraction
Step-by-step instructions: how to remove the cover from a water heater
Malfunctions of a household heater deprive you of many conveniences. In order to repair an electric heating device yourself and not contact a specialist, you must strictly follow all procedures. You can carry out some work yourself. We invite you to familiarize yourself with useful information.
Required Tools
There are several reasons why you need to disassemble the equipment:
- warm water is cloudy, there is a foreign odor;
- scale flakes are visible;
- when touching the body, a current discharge is felt;
- when the tank is turned on, the machine is activated;
- the device takes a long time to heat water or does not heat up at all;
- water is slowly rising;
- weak pressure of warm water when exiting;
- the housing is leaking.
To disassemble and subsequently assemble the Termex, Aquaverso es30v, Oasis water heater, you need to use the following tools:
- Screwdrivers - straight and Phillips.
- Wrenches. You need a universal gas wrench or a socket wrench - horn size - 22; 14; 10; 8, for some models you may need 32, 24 mm.
- Slotted screwdriver.
- Hexagon 4 mm.
- With pliers.
- Indicator screwdriver.
Additionally, you will need water-absorbing material to wipe the parts.
Step-by-step instructions: remove the cover from a domestic water heater
We recommend disassembling the structure in the following sequence:
- Turn off the water supply. In most cases, the valve is located at the bottom of the housing.
Cold water valve location
- It is necessary to disconnect the equipment from electrical networks. If the device is not connected directly, but through a surge protector, it is better to completely unplug the extension cord from the outlet and take it out of the room, since devices connected to the network only increase the likelihood of a current short circuit.
- Next, you need to drain the water from the hose attached to the drain pipe. It is better to pour it into a basin or bucket, and then into the toilet. This will prevent accumulated scale from clogging your bathroom or sink drain.
- Using a straight screwdriver, unscrew the screws and remove the protective cover from the bottom of the case. The tight-fitting lid is removed very slowly - as if unscrewing the lid on a can of canned food. It is very important not to damage the enamel.
Removing the protective cover from the tank
To drain, you will need a gas wrench and a hose. The sequence of actions to free the water heater from water is as follows:
- Use a gas key to turn off the cold water supply - the valve for incoming water;
- open the hot tap on the mixer to avoid vacuum;
- drain the water to the mark - this will take from 1 to 10 minutes;
- do not close the mixer, open the tap and let the water drain, you can also simply tighten the nuts at the cold water inlet and the liquid will easily drain;
- connect the water outlet hose to the thread of the heater, lower its second end into a sink or some container deep enough;
- then disconnect the hot water outlet hose from the body - this way we will get rid of the liquid accumulated around them;
- when you unscrew the nuts, the remaining water will finally drain from the water heater tank.
Emptying a small tank from residual water
This method of draining remaining water is suitable for units whose volume does not exceed 20 liters. Most often these are heaters of the Termex, Ariston, and Oasis brands. If the tank volume is large or a valve without a lever is installed, you will have to remove the water yourself. You cannot unscrew such a part, but you can press out the spring yourself. It is located in the direction of water into and out of the tank. It is more convenient to do this using an oblong metal object - a wide knitting needle, a nail or a drill.
For an example of such water drainage, see the video:
Before disconnecting the wires, it is recommended to sketch or photograph the details of their connection.
After this, proceed to unscrew the nuts securing the tubular electric heater (TEH) and the thermostat. This should be done so that any remaining drops of water or condensation drain away gradually. Remove the heating element and thermostat. Be sure to wipe them with a dry flannel rag - this way you can check the wear of the gasket on the heating element flange.
This concludes the disassembly of the device - the cover is removed.
View of the tank after removing the lid
Next, equipment is cleaned or parts are replaced. To prevent independent actions from leading to new problems, follow the recommendations of experts.
Preparing the hood for cleaning
How to clean grease from a hood? Every housewife knows how quickly this type of equipment gets clogged and how difficult it can be to deal with a thick layer of fat.
Before you begin cleaning procedures, you should read the user instructions, since the hood will have to be disassembled.
Here are some tips we recommend you take into account:
- Under no circumstances should you disassemble the device without unplugging it from the mains.
- Next, you need to remove the hood cover. Using the instructions and a detailed diagram for assembling/disassembling the device, find its latches.
- Keep in mind that the pipe that is the ductwork also needs regular cleaning. Some owners simply replace the corrugation with a new one, but this method does not work with all models of ventilation systems.
- Then it is necessary to thoroughly clean the filter and the unit body itself from grease deposits.
Pay attention to related topics!
They also discuss other methods of prevention and repair of fans. In particular, the process of disassembling non-separable fans with nylon clamps and the technology for restoring broken plain bearings are described.
How to Remove Dospel Fan Cover
Installing a fan in the bathroom or toilet
to install an exhaust fan in a bathroom, toilet or kitchen with your own hands, without the help of third parties. The whole process takes from 15 to 20 minutes. You will learn further how to do the installation correctly from this annotation. Answers@ how to remove the cover from a dospel fan. Before you begin installation, you need to connect the fan according to our instructions, and also choose the right one for the kitchen, bathroom and toilet.
Before installing the fan, I recommend that you read the instructions in the kit, which should carefully outline the installation procedure and features for your model in Russian. If there is no annotation or description, this most likely indicates the cheapness or low quality of the product you received.
AutoNews / Reviews / Tests
Sources:
https://autobryansk.info/ventiljator-dospel-kak-snjat-kryshku.html