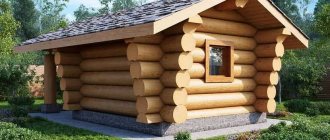
Anyone can build a log house with their own hands. This is facilitated not only by simple technology, but also by the availability of the material. Even our ancestors were engaged in the construction of houses, for the connection of which not a single nail was used. Since that time, the construction method has changed very little. But, in any case, without special skills and abilities in wood processing, it is very difficult to expect that the log house will be made using the “into the bowl” or “in the paw” method according to all the rules.
Preparation for construction
When thinking about cutting down a hut using the “in the bowl” or “in the paw” method, you first need to evaluate this project from the financial side. In practice, the costs are more than significant, although the technology involves the use of simple and accessible tools and eliminates the need to perform additional actions other than wood processing. However, everyone should be prepared for the fact that the process of cutting a log house “into a bowl” or “into a paw” will take a lot of time.
Still, this is not the same as building a frame house. Sometimes the deadlines can drag on even longer if poorly dried timber was purchased for the work. In this case, you will have to wait at least a year for the logs to go through the drying stage according to all the rules.
Foundation
If you are still determined to make a log house “in a bowl” or “in a paw,” then at the initial stage you will have to resolve the issue of the foundation. You have two options - choose a pile foundation or a regular poured one. Experts recommend choosing the first one, since it is more economical, requires less time for construction, and is also simpler in terms of technology.
Naturally, if a person gets down to business and is hearing about the “in-the-cup” or “in-the-paw” technology for the first time, then he will be interested to find out whether this work can really be done with his own hands and how the production of the log-in-the-paw takes place.
If we compare this structure with others, its main features include the presence of a regular shape and the absence of protruding ends of the logs. It is recommended to cut a log house from logs “into a bowl” or “into a paw” from timber of the same thickness.
Material
To cut “into the bowl” or “into the paw”, it is necessary to prepare the material; for this, the ends are marked on it. Elements with a minimum diameter are used first for assembly. During the construction process, you must remember that the log is always thicker on one side. Therefore, during work, the tree can “move apart”. But you can avoid this if you make a spike in the inner corner. To apply precise markings, it is best to use templates. They are made from cardboard, and when the templates are ready, all that remains is to attach them to the ends and cut out a spike along the contour.
Creating a "saddle"
The base of the “bowl” is the “saddle” into which the logs are placed. It should also be noted that each joint must initially have a special tenon. Outwardly, it may seem that the classic tongue-and-groove installation technique is being implemented, but this is not entirely true, since the joint is made by bringing together rounded planes - that is, through “saddles”.
If you do the Canadian felling of log houses with your own hands, then you can make calculations using a simplified scheme. For example, in determining the depth of the “saddle” you should focus on the radius of the log, which will subsequently be laid in this niche. This creates an organic masonry with a tight connection of logs. In this case, it is necessary to retreat from the edge at least 25 cm, and the marking of the “saddle” itself should be done with a sharp nail or a chemical pencil, since ordinary pens and markers can easily be erased.
Making paws
Beginning builders are recommended to cut a log house according to the simplest scheme - a “straight claw” connection. It differs in that it has only horizontal and vertical lines of the teski. To ensure a more reliable connection of elements, it is recommended to choose cutting with an oblique paw. In this case, the inclined planes will firmly hold the log and help prevent it from twisting.
But regardless of the chosen option, the following rules must be observed during the felling process:
- As part of the preparation, the “block” needs to be cut from all sides.
- When determining the depth of the notches, they are guided by the width of the “block”.
- After the completed operations, the result should be a parallelogram-shaped structure with a square cross-section at the end.
- Markings are applied to the end, the result should be 8 identical horizontal parts.
- Next, the type of paw with which the elements will be connected is selected, and marks are placed on the plane along which they will be connected.
- The pieces of wood that are outside the boundaries of the applied marks must be carefully removed, and then, focusing on the resulting paw, a template must be made.
- The template obtained from cardboard is used when cutting the remaining logs.
How to efficiently and quickly cut down?
The term “cutting” has been preserved historically, although modern craftsmen, when building houses from logs, more often use a chainsaw instead of an ax. Highly professional carpenters also perform the lines for the notches with a saw. After marking the cutting areas, cut down or saw out the bowl in such a way that when assembling the log house, the log will lie down, embedded exactly halfway into the adjacent bottom row.
To ensure a tight fit of the crowns to each other, lengthen the selected bowl by choosing a longitudinal oval with a groove. Select the size of the additional notch depending on the local weather. The colder the winter, the wider it should be. To ensure a tight fit, equalize the depth and volume of the wood cut for the oval.
Check the correctness and accuracy of the work performed by test laying the logs. The precisely processed surface of the upper log should fit tightly onto the lower log with its entire plane. The laid part should not have any gaps or cracks. If they form, mark again and adjust the cutting until the logs fit snugly.
Photo: a lot of interesting things on this topic can be gleaned from old books written with the participation of experienced carpentry masters.
To seal the connections, use an additional cutting element - a tenon. If you are cutting a warm building, take into account the location of the annual rings, since the looser southern parts of the rings should be inside the log house. To maintain the level of the rows in the horizontal direction, do not miss an important point. In log houses, the butt of the log is alternated with its narrower part. To align the crowns, cut down alternately - first in the wide part of the log, then in the narrow one.
Corner connections
The greatest difficulties for craftsmen who decide to cut a log house from logs arise with the manufacture of a rounded coupling in the timber. However, there is no great need for this, since there are special techniques designed for joining the crowns of logs.
- To connect the walls, a dowel is used, which seems to penetrate these structures. These fasteners are nothing more than wooden vertical nails with a diameter of approximately 30 cm and a length 20% less than the height of the frame.
- Also in construction, specific types and methods of corner joints are used. Special tenons are prepared for them, which can be composite and cut into the material.
- In the process of this work, it is necessary to strictly observe the rule: when connecting elements, which is a necessary operation when building a log or block house, care must be taken to ensure that there is a certain vertical gap. Its purpose is to compensate for the effects of natural shrinkage that accompanies the construction of each wooden object. This gap should be no larger than 0.5 cm. When making longitudinal mounting grooves, the gap size is increased to 1 cm.
Types of logs used
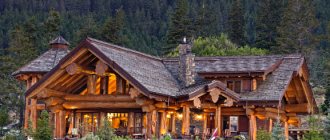
Don’t think that the technology is a one-size-fits-all solution with no possibility of making adjustments. The greatest space for individual choice involves precisely the variety of the main material - logs. Or rather, the methods of preparing the wood. It must be said that Canadian technology requires considerable investment in building materials, so there will be an opportunity to save money.
However, you should start with the optimal solution for those who do not want to skimp on quality. In this case, you should prefer a scraped log. This material preserves the natural shape of the surface, which also increases the aesthetic advantages of the log house. The drawing of crowns in such a design is carried out with minimal tolerances, duplicating the complex shape of the elements. The option of planed logs is no less attractive.
All external flaws and defects of the log are smoothed out, due to which the drawing process is simplified. This is a durable and high-quality processed log, which is inferior to the scraped one only in aesthetic advantages. If you plan to cut log houses in Canada with minimal investment, then it is worth using a planed log, the drawing of which is carried out in one approach. However, the tolerances of “bowls” with grooves in this case increase, which may require caulking.
Construction
At this stage, a plane or grinder , with which it is necessary to level one side of the beam. It will subsequently become the inner wall of the house. The other sides are treated a little differently - they are processed at the edges.
In accordance with the accepted technology for assembling a log house, markings are applied to the site chosen for construction, after which the first two logs are placed so that they are located opposite each other. After this, two more pencils are placed on them at right angles.
The resulting square is called the main crown in construction. It must be checked for compliance with the level, and only then proceed to applying markings on both ends of each beam. Particular attention should be paid to the landing socket, the size of which should not exceed half the diameter of the beam. The created depression is used to lay the next log.
The remaining upper part of the paw must be prepared for the next element - it is leveled, which ensures a tight fit of the next element.
Sometimes builders do not have enough skills to ensure that the elements of the log house fit together as tightly as possible. If even with the help of an ax nothing can be done, then a wooden wedge that needs to be driven into the crack will help get out of this difficult situation. However, experts still recommend avoiding such connections.
At this stage of construction of a log house, it is necessary to select the type of connection. This issue needs to be given special attention, since the clutch must be as tight as possible so that the beam does not start to “walk.”
One of the schemes often used in construction is a scheme that involves making a through hole in the paw, into which a stake, called a straight tenon, is subsequently driven. You need to choose it so that its diameter is slightly larger than the hole. This operation is performed according to the chess principle. In other words, each new stake should not fall into the previous one. If there is such a need, you can reinforce the structure using straight spikes that need to be driven in around the perimeter. This measure will help avoid deformation.
A more reliable method can be proposed, however, due to its increased complexity, it is suitable only for experienced builders.
- In accordance with it, at the initial stage you need to apply markings, and there should be a spike on the paw protruding 2-3 cm upward. Here it is important to correctly determine its area, which should correspond to a quarter of the paw.
- Cut out a hole of suitable size for it.
- Within the framework of this technique, the connection of the lags is carried out according to the same scheme that is used in the children's Lego construction set.
- To install the tenon, as a rule, a place is chosen next to the inner corner.
Recommendations from experts
For beginners in working with log houses, professional carpenters recommend using a notching saw when processing logs, and then removing excess with a chisel.
You should definitely have a ready-made log with a correctly executed “bowl” in your inventory - this will be an example that you can use as a guide in your work. In the absence of a reference log, in some cases tin templates are used, which will reduce the risk of inaccurate processing. But in any case, each crown must be additionally checked with a level.
There are other subtleties in Canadian log cutting that are worth keeping in mind. So, if an excess layer was removed during processing, this does not mean that the log becomes unusable. A layer of insulation that will lie between the logs will allow a few millimeters to be replenished.
Final work
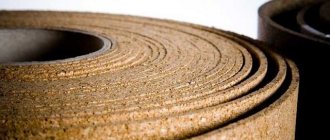
When using this method of making a log house, it is necessary to perform additional finishing inside the room . Having finished laying the logs, they proceed to processing the material, using special compounds to prevent parasites and rot. Along with them, it is recommended to use preparations that increase the fire resistance of wooden elements.
Logs in the paw
Another mandatory operation that is performed in the process of making a log house is insulating the corners. The material can be a board, or you can take any of the modern heat insulators and lay it on the inside. As the wood dries, gaps will begin to appear between the feet. They also need to be dealt with by treating them with a solution or driving wedges into the crevices.
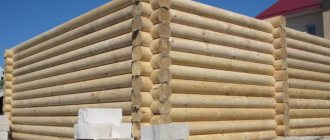
Material selection
For any log houses, it is recommended to use coniferous wood with natural moisture, felled in winter, preferably from the northern regions. Pine is the cheapest, larch and cedar are more expensive, but stronger and more durable. The trunks must be even along the entire length and of the same size.
Removing bark from all sides of logs is done using a special tool called a scraper. You can also remove the bark with an ordinary shovel with a cut off spout and a sharpened bottom edge. It is unacceptable to remove the bark mechanically, using power tools, chainsaw attachments or grinders, since the upper layers of the main wood will be damaged along with the bark. After which the workpieces are stacked with spacers for ventilation and covered with roofing felt. Drying lasts ≥ 6 months.
The timber must be dry, free from visible cracks, mechanical damage, falling knots, rot and mold or mildew.
Common Mistakes
In accordance with the log house manufacturing , assembly is carried out using groove joints. For fastening, only wooden wedges can be used; the use of metal is not permitted by this technology. If you break this rule and use staples or metal nails, this is guaranteed to cause the wood to rot.
the shrinkage of the log house is completed , it is impossible to move on to covering the walls, terraces and ceilings, as well as flooring. Otherwise, it will be necessary to carry out a labor-intensive operation to dismantle the frame in order to correct the groove joints. The fact is that such haste can lead to the appearance of cracks and distortions in them.