Since rigid roofing materials are used on the roof of the house, it is necessary to solve the problem of sealing the joints. When any type of composition is formed, a small gap appears that needs to be properly covered so that water does not penetrate into the house. Since the roofing material is not a single covering, but is connected to pieces, special roof ridges are produced for reliable joining. They are manufactured in such a way as to provide reliable protection against water penetration into the roof. The article will tell you how to choose the right material for your roof and make accurate calculations.
The roof ridge is designed to seal roofing materials Source handbuilder.ru
Features and Requirements
The ridge is a rib located in a horizontal plane, installed at the highest point of the roof. If the roof is three- or four-slope, or has an even more complex shape, there will be more than one element, and they will be located at an angle. Sometimes skates are called ridge strips, and this concept includes other parts that are attached to the rib.
The list of element functions includes:
- the ability to protect the under-roof space from moisture and dust, provided by covering the ends of each joint with parts of the ridge;
- creating a gap with the help of which the under-roof space is ventilated, vapors escape from the cake, and the drying rate of the insulation increases;
- improving the aesthetic characteristics of the roof is a feature that is not present on all skates, because it leads to an increase in their price.
When installing ridge strips, certain requirements must be met:
Along the line of this element in the waterproofing and vapor barrier there must be gaps necessary for condensate to escape from the under-roof space.- The sheathing installed on the rafters must provide a gap between the slopes of at least 50 mm.
- In the ridge area, additional waterproofing is installed, the width of which must be at least 250 mm.
When installing a cold roof, it is not necessary to comply with these requirements if dormer windows or a ridge aerator are provided.
Roof ridge
The ridge of the roof of a house is a useful element necessary to create the upper part of the roof. It unifies the roofing material and completes the entire “composition”.
The roof ridge serves several basic functions :
- Protection from water after rain or melting snow.
- Creating the necessary gap for ventilation of the space under the roof - so that the covering can dry out after rain.
These two problems can be solved at once if you choose the material wisely. Particular attention should be paid to the shape of the skate.
Types and selection criteria
The following types of ribs can be installed on the roofs of buildings:
- semicircular, with a smoothed shape, requiring the use of additional elements - end caps, which create an air cushion and provide ventilation;
- straight, the simplest in design and easy to make yourself;
- curved (shaped), increasing the efficiency of ventilation due to their complex shape;
- decorative, usually narrow and performing more of an aesthetic than practical function, and not very effectively protecting from precipitation and dirt.
The type of ridge does not always matter and may depend on the preferences of the home owners - but there are still several criteria for selection.
For a roof with rafters intersecting at an obtuse angle, a semicircular element is well suited. Decorative skates should be installed on small slopes of residential buildings or gazebos. Flat elements are a good choice for any roof, regardless of its type and covering material.
How to make a ridge connection
When installing the roof structure, the ridge connection is carried out last; this determines how long and reliably the roof will serve you. The structures are assigned the following functions:
- It prevents water penetration. If part of the roof remains open, then moisture gets into the middle of the structure, as a result of which the process of rotting begins and the rafter system is destroyed.
- Air circulation occurs. If the skate is installed according to the rules, ventilation should be good. A small gap is left, which ensures air movement; if it is not there, condensation may form on the rafters and they will deteriorate ahead of time.
- Thanks to the ridge, birds and insects, which will build their nests on your roof, do not penetrate into the structure, thereby disturbing their owners.
- The ridge gives the roof a finished aesthetic appearance and serves as a decorative element.
Features of planks taking into account the type of roof
The features of ridge strips are largely related to the roofing materials:
- On profiled sheets and metal tiles, skates are installed, the material of which is the same thin sheet metal. The planks can be anything - straight, rounded or curly.
- For a roof made of composite tiles, the same types of ridges are used as for corrugated sheets, but the metal must be of higher quality - composite.
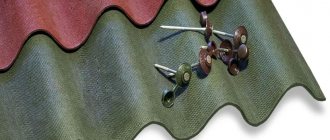
- Slate roofs have ridge strips made of inexpensive galvanized metal, which are secured with slate nails.
- For ondulin and its analogues, special ridges are required, which are included in the kit for such a roof and are made of the same material.
- For a soft roof, the ridge is made of special ridge-eaves tiles, which should come complete with a set of roofing materials.
- When installing a rather rare roof made of wood, the ridge is installed at the junction of the beams of the rafter system and is a round log.
For hip (hatched) roofs, semicircular elements with mounting holes are used. The materials are the same as for gable roofs. But due to the fact that the total length of the elements is greater, ridge strips are sometimes made of wood.
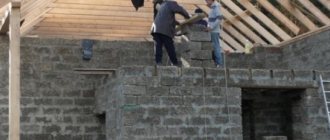
Fastening technology
The construction of the ridge begins after the completion of the procedure for attaching the roof to the slopes. Decorative components are delivered to the location using a winch mechanism or rope. To fix the ridge element, it is necessary to install a beam with a cross-section of at least 80×100 mm on the outside between the slopes. Next, sheathing bars are attached to each of its sides and a ridge beam is installed.
To simplify the subsequent process of laying parts, it would be a good idea to attach special brackets to the central support beam and place walking bridges on them. In addition, for the tightest fit of the roofing material, it is most rational to use a ridge beam with a rounded edge.
Beam for fastening the ridge
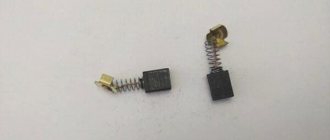
Elements
The roof rib consists of the following main elements:
- ridge beam;
- ventilation tape;
- fastenings with which the lightning rod is installed;
- aerodynamic elements;
- ridge tiles.
In addition to the main parts, the ridges also contain additional sealants and sealants that increase the level of protection of the under-roof space from precipitation. All these elements are important when installing ridge strips. But it is equally important to comply with all installation features, otherwise the roof will leak and the ridge will be useless.
How to make a ridge on a metal roof
1. Installation of the ridge on a hip roof is carried out using ridge elements.
2. The ridge is installed in the direction from bottom to top.
3. Since the ridge is located horizontally, its elements are laid with an overlap in the direction of the wind. The hip ridge runs at an angle to the horizontal. Here the upper element overlaps the lower one (along the line of water fall).
4. It is necessary to ensure that the axes of the ridge and the ridge coincide.
5. The lower ends of the ridges need to be trimmed and closed with plugs.
Height calculation
You can determine at what height the ridge should be above the bottom of the rafter system by knowing the angle of inclination of the roof. The value of this indicator should not be too large so as not to increase the wind load. However, a small angle can lead to snow accumulation and overload of the rafter system. The optimal option for the central zone of the Russian Federation is about 40 degrees.
To determine the height, the formula is used:
H = tg , where:
- L is the distance between the extreme points of the rafters;
- tg is the tangent of the roof inclination angle.
Therefore, for a building 5 meters wide, the roof of which is inclined at 45 degrees, H = 1.0 x 5/2 = 2.5 m. This is more than enough to provide through passage for a person to service communications passing through the attic.
If the roof is not gable, but attic, that is, pentagonal, the height of the ridge consists of two values:
- The first is the distance from the attic floor to the top of the bottom of the rafter legs, inclined 55–80 degrees.
- The second is to the highest point of the roof when this part is tilted at an angle of 12–30 degrees. To determine the height of the ridge, you should use special calculators.
Installation of metal tile gable
The pediment (end), like the ridge, takes on a large wind load. Here, too, it is recommended to place a sealant between the end strips and sheets.
1. Install wooden gable (wind) boards along both slopes.
2. The end strips are laid on top of the metal tiles. Adjacent ones are laid with an overlap of at least two centimeters or along the flanging line.
3. The planks are fixed to the sheets with ridge screws every second wave.
4. On the other side, each plank is attached to the gable end board. Also with self-tapping screws, at intervals of no more than 80 centimeters.
note
Since this fastening cannot be hidden, you need to ensure that the screws are positioned symmetrically relative to the ridge.
Installation steps
Before installing the ridge, a continuous sheathing consisting of boards nailed without gaps must be installed in the under-ridge space. The installation of the ridge strip should be carried out in dry and windless weather. And in order to avoid errors during operation, you need to install the element by performing the following steps:
- When laying the roof, leave a space of 5 cm from the intended intersection point of the slopes.
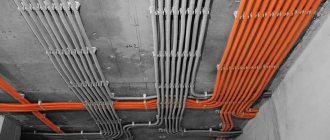
- Before fixing the ridge, waterproof the rib located between the slopes. To do this, you can use polyethylene film, a highly diffuse membrane or roofing felt. The material is secured using silicone sealant or a stapler.
- Place the ventilation tape on both slopes, removing the protective layer from its adhesive side. If more efficient ventilation is needed, install ridge aerators.
- Start installing the ridge strip from the end of the building so that the first element protrudes beyond the edge of the covering by 20–30 mm. Fix the element with self-tapping screws with a pitch between them of 300–400 mm.
- Install the second part so that it overlaps by 70–100 mm and fix it.
- Continue installation to the end, moving the last element 20–30 mm beyond the edge of the roofing and trim the strip using a grinder or hacksaw.
- Install the plugs on the ridge profile, if they are included in the kit.
When installing a rectangular ridge, a special supporting block is used. An additional element is installed along the line of intersection of the slopes.
From the video you will learn how to evenly screw the roof ridge:
Scheme
The diagrams show the intricacies of installing a roof ridge:
Drawing of the ridge of an attic roof
Slate roof drawing
Hip roof ridge
Installation of a metal roof ridge
Organization of ventilation through the ridge
Roof ridge structure
Did the article help you?
Self-production
You can try to make straight metal corners from thin steel, suitable for most types of pitched roofs, including metal tiles and soft roofs. The fastest way to get the job done is with a small profile bending machine:
- A sheet of metal is placed on the table.
- Marking in progress.
- The material is transferred to the machine and cut into several long strips of suitable width.
- The edges are bent on the machine to obtain the desired angle.
The use of automatic machines reduces the time for manufacturing strips from metal sheets , saving on the purchase of ready-made elements. And the products obtained after cutting and bending will last no less than those purchased.
But the method has a serious disadvantage - the need for profile bending and metal-cutting equipment. Although there are budget machines on sale, up to 20 thousand rubles, which can be useful in everyday life or for creating your own business. If you don’t have a machine, you should use other methods for making ridge strips yourself.
To make a ridge strip without special equipment, ready-made corners are used - galvanized and usually about 2 m long. You can buy such elements at any building materials store.
And the process of making skates from them involves changing the angle using a wooden mallet without damaging the galvanized coating. The production time for a skate is longer, but the costs are still lower than when purchasing an element and having it made to order by specialists.
The standard strip width is from 240 to 300 mm (120–150 mm on each side of the profile), to ensure an overlap with slopes of at least 5 cm.
Video on how to make a roof ridge with your own hands:
Video description
The video shows one of the options for lengthening rafters:
Roofing structures have several varieties of their shapes. Almost all models contain a large number of identical elements. But among them there is one design that differs significantly from the others. This is a hip roof . Its distinctive feature is that the rafters are connected by their upper edges to one point, which is called a ridge knot.
So, in order to connect the rafter legs to each other, you need a support to which they are attached. There are several ways to ensure high node reliability. The photo below shows one of them, which uses U-shaped perforated metal mounting profiles.
Connection of rafters on the ridge unit of a hip roof Source forestvrn.ru
Related materials:
Your feedback, comments, questions
Dear visitors! We will periodically answer your questions in the comments as we are busy. In order for us to respond to you promptly (within an hour), you can: call, write a personal message or leave a request for a free consultation by phone.
Comments
Peter 12/14/2015 12:30
0 How to correctly lay metal tiles on a roof with 3 gables
Reply | Reply with quote | Quote
Mikhail the foreman 01/09/2016 21:18
+2 The technology for laying metal tiles does not change depending on the number of gables. In any case, you start with the valley, then the sheets.))
Reply | Reply with quote | Quote
Ilya 12/15/2015 12:31
0 Here’s a question: how to properly make a roof valley?
Reply | Reply with quote | Quote
Mikhail the foreman 01/09/2016 21:16
0 If we are talking about a groove over a pipe, then to drain condensate, a groove is made above a membrane pipe. The base layer and a piece of counter-lattice are cut, a piece of waterproofing with a slope is inserted, glued, and the upper edge is attached to the counter-lattice. If the pipe is wider than 50-60 cm and the distance to the ridge is more than 1500 cm, then a slope is made over the metal tile pipe.
Reply | Reply with quote | Quote
Anton Krasikov 12/16/2015 12:32
+1 Tell me how to properly connect the skates on the roof?
Reply | Reply with quote | Quote
Mikhail the foreman 01/09/2016 21:11
-1 The skates overlap and are screwed in with self-tapping screws. It doesn’t matter what shape the skate is.
Reply | Reply with quote | Quote
ANDREY 03/10/2016 11:51
-1 Monterey metal roofing with a simple corner ridge. I want to improve ventilation and protect myself from blowing snow. I plan to replace it with a semicircular “large” one with three ktv ridge valves. Questions: won’t the ridge lose its appearance after bending it along the angle of the roof approximately 2x45 degrees in diameter, i.e. in the ridge approx. 90 degrees. And is it necessary to put a seal under the ridge shelves? I wouldn't want to worsen the ventilation.
Reply | Reply with quote | Quote Consultation by phone +7(495) 241-00-59 Answered by Mikhail the foreman moderator
It is better to use a semicircular cone on roofs with an obtuse angle; you cannot mount it on sharp ones. As an option, you can use piece aerators as under-roof ventilation. It is necessary to use seals in the ridge; they prevent snow from blowing in and do not impede ventilation.
Kirill 09.19.2016 11:04
-1 Is a ridge aero element even necessary for metal tiles?
Reply | Reply with quote | Quote Consultation by phone +7(495) 241-00-59 Answered by Mikhail moderator
Of course, with it, under-roof ventilation will be implemented much more efficiently!!
Update list of comments
The cost of installing metal roofing units
The approximate price for a standard installation of a metal tile covering with the main components is about 350 rubles per square. The following are assessed separately:
| installation of an aerator ridge | from 600 rubles per meter |
| connection to the pipe | from 2000 rubles per meter |
There are many subtleties in the installation of metal tiles and their components that are familiar to professionals.
We have fifteen years of installation experience. We will perform all necessary installation operations in the shortest possible time and in full accordance with technology. No overpayments, only the price of services that are included in the contract.
You don’t have to worry about the condition of the roof: our work is guaranteed for two years.
Installation of valley for metal tiles
1. Install additional boards between the step sheathing boards.
2. The valley planks are mounted from bottom to top with an overlap of 20-30 centimeters.
3. The bottom strip is cut slightly below the cornice and a flange is made along the cornice.
4. A sealant is placed under the ridge and along the valley flanges.
5. Metal tiles suitable for the valley should end 6-10 centimeters from its axis. To do this, the sheets are trimmed.
6. The sheets are fastened with self-tapping screws no closer than 25 centimeters from the axis.
7. If you intend to install a decorative overlay, it must be installed from the cornice to the ridge with an overlap of 10 centimeters.