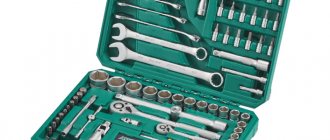
Nissan Maxima QX PAPAKHA › Logbook › DIY Systainer or tool box
Time passes, tools are bribed.
I drew attention to the fact that it makes me very angry that when in an ordinary tool box the tools are lying in bulk, and if you take something out, you need to find it, tear it apart, you still can’t put it back, and then the lid doesn’t close well. And since I love peace of mind, I began to look at how other people store their instruments? After all, everything was invented before us, just choose what you like and use it, why invent a wheel? Task: 1. Each tool in its own cradle 2. It should be easy to carry or transport. It is not known where and when I will need the tool. 3. The boxes must be of the same type, both in size and type, so that there is visual order. 4. It should be distributed among sellers, so that if you need to buy something in addition, you can go and buy it. 5. Since this is just pampering, and given the current situation in the world, it should cost minimal money. This is first and foremost a toy. 6. Since I have never used such systems before, I want to try first, is it convenient? And if you like everything, then bother with buying expensive systems. And then the sky in the world will brighten, and it will be easier to spend money. And if it doesn’t suit me, I’ll find where to put the trays. Not a big loss. It turns out that in the market these boxes (Systainers) are competing with the leaders:
L-Boxx storage system from Bosch
and T-LOC System from Festool
Makita systems seemed to me to be a little small in size.
But I discovered that they were asking a lot of money for one box. But it's just a box. I haven’t found any analogues of Festool, but Bosch with its L-Boxx has quite a lot of analogue partners. They can be found at the link (not advertising) l-boxx.com/en/partner-2/
By alternately entering different names, I found the cheapest option, which was a little more than 2 times cheaper, and looked like this:
But it’s still 590 UAH ($22 or 1564 rubles) for my idea I need at least 7 pieces... A green toad friend came, sat down next to me and looked at me quite threateningly. And considering that this is not for work, and pampering is a bit expensive. An alternative is made of plywood (high weight, where to make/buy?) or... plastic boxes for metal products. The logic is simple - plastic is not heavy, the storage box is universal in size, can be stacked and is strong enough, since it is designed for metal products. I came across a couple of options on YouTube, warehouse boxes KLT Option one
This is it, I think. I started searching in Ukraine, found a representative office in the capital, called, did the math... Box + lid + belt handles + latches = the same price as a ready-made Gedore. There's no point in bothering. Must! There must be a cheaper option! It's just a box! Plastic! But the examples from the video gave me the idea that the lids can be secured with ties; I don’t need tightness, I don’t go to construction sites. And then it dawned on me - simple food containers!
1. As cheap as possible 2. Different sizes 3. You can buy it at any market, hardware store, or almost at a kiosk. 4. You don’t have to save space, even if you have a drawer for each screwdriver!
Now the question is, what to make the supports (backing for tools) from? Material for the cradle - I don’t know what it’s made of, but a stub for one box costs 400-600 UAH ($15-22 or 1600 rubles) - it’s a bummer, the cradle costs the price of a box. I went to the market and found 5-layer glued foam polyester (I think). 1m*2m turned out to be 225 UAH (600 rubles or $8.42) - gorgeous. An evening of cutting with my assistant and here is the result:
Source
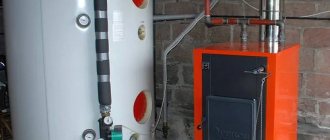
How to make a machine for applying plaster
Common models are made of a fire extinguisher and a hopper bucket.
The do-it-yourself plastering station, made on the basis of a fire extinguisher, has become the most widely known.
The fire extinguisher has a handle, a lever, and a nozzle, which makes it a favorite among devices for homemade mechanical plastering devices.
Step by step description.
- The factory fire extinguisher (bottom) is cut off and a container of several liters is obtained. The working solution will flow through the hole. The volume must be at least 4 liters. If it is larger, the device becomes heavy. If less, you need to frequently fill the container with solution.
- A tube with a nozzle with a diameter of 4 mm is inserted into it. The diameter of the fire extinguisher hole is 10 mm, the distance from it to the nozzle is 20 mm. Nozzles can be of different sizes: from 3 to 5 mm. Resin is suitable for attaching the tube, the level of which is below the nozzle.
- The compressor is connected to the fire extinguisher using a tube, through which compressed air is supplied. The tube is embedded in the wall of the container and is located opposite the outlet of the finished mixture.
- The solution supply power is regulated by increasing (decreasing) the diameter of the nozzle, air pressure, and the distance between the nozzle and the nozzle.
The average pressure is approximately 2 atmospheres. If it is larger, finishing is carried out, all pores and cracks of the coating are filled.
Productivity of the device: 4 liters of mixture are applied in 1 minute.
Homemade hopper bucket
It is used for renovation of the entire building.
Benefits at work:
- high spraying speed, which creates conditions for better adhesion of the mixture;
- the use of various impurities;
- outdoor and indoor use.
Before assembly, you need to understand the principle of its operation. Sequencing:
- The compressor supplies a stream of air through a hose into the bucket with the mixture.
- The other side of the bucket has holes d 12 mm for the solution to exit.
- The front wall is slightly inclined for ease of taking the mixture from the common container.
- A nozzle d 5 mm is placed on the hose. The distance from it to the outlet hole is 20 mm.
- The top of the bucket is wider than the bottom. It is fixed with two clamps.
- The device is connected to a compressor. Pressure 2-3 atmospheres. Distance to wall 18-20 cm.
When assembling a machine yourself, devices and spare parts from other products are used.
Making a metal hopper bucket
Sequencing:
- The drawing is made on a galvanized sheet.
- Cut using a grinder or scissors. When using rivets, an allowance of 15 mm is left.
- The parts are bent and connected by welding and riveting.
- A handle is attached.
- Holes are drilled for the nozzles (on the front wall) and for the spray gun (on the back).
- The nozzle is attached to the inside of the container.
- Additional stiffening ribs are attached.
- It is filled with solution, covered with a lid on top, and sprayed.
Additional Information! Use a lid to cover the top of the ladle. This will prevent the solution from splashing.
Additional nozzles and outlet openings increase operating speed. One hose is needed.
Systainers for instruments: what they are, review and model selection
Systainers are modular universal boxes designed for systematically organized storage of items used to perform various tasks.
These storage boxes are used by organizations that perform a range of tasks that require moving large quantities of items and tools in an organized manner. Systainers are equipped with specialized vehicles: ambulances, fire engines and others.
Boxes vary in size, material and external characteristics. The leading companies producing Systainers are Tanos, Makita, Magnusson.
The principle of operation of the unit and the technology of applying the solution
For mechanized application, you need to become familiar with the operating principles of the machine.
Sequencing.
- Pour the dry mixture into the container.
- Water is added in a certain proportion.
- The components are thoroughly mixed, the solution is saturated with air.
- The surface of the wall is covered with the mixture using a hose.
- Various nozzles, rules, spatulas are used, which reduces the completion time.
Important! Consistency of the solution: when squeezed into a fist, a lump is formed that does not release moisture. The plaster is laid in an even layer on the surface of the wall.
Plastering instructions:
- The base needs to be cleaned. It should be free of oil stains, moisture, and mold. The surface is dry and clean.
- Measure the curvature of the walls. This is done using a level.
- It is necessary to install guide beacons.
- Connect the plastering machine to the power supply and ensure the water supply.
- Pour the dry mixture into the container of the device.
- The solution enters the chamber through the feed auger to be mixed with water.
- The machine mixes the mixture during its operation.
- Using a mortar hose, the plaster mixture is applied to the surface.
- The solution is leveled and given time to dry. They are finishing the corners.
- The stages are controlled at the construction level.
- Minor irregularities are eliminated.
Before applying the plaster mixture, the surface is treated with a primer. The working solution is used at a temperature of 5−29 degrees.
Additional Information! If there is no water supply at the site, use a pump that supplies liquid from any container.
What mixtures are suitable for application by machine:
- fixation of the corner profile is carried out with a solution with a special composition;
- when plastering the facade, it is needed with the mark “for external work”;
- Gypsum-based plaster is used indoors.
Peculiarities
Such products are divided into 4 types:
Each type of Systainer is designed to be used together with other similar boxes. Their dimensional parameters have values that allow the blocks to be organically combined in the desired combination.
Each drawer is equipped with a set of special clips. They serve as locks for the box itself and as fastenings that allow it to be connected to others. As part of joint use, it is possible to install some blocks on top of others or in a side-to-side position. Compatibility of devices of different sizes and brands in one bundle is allowed, if the location and characteristics of the mounting points allow this.
The latest models are equipped with special twist locks that replace clip connections. This technical solution simplifies the procedure for connecting blocks and increases the service life of the fasteners. The new type of lock allows access to elements of the systainer system located in the middle or lower position. Access is achieved by turning the lock to a specific position, which secures the lid of the underlying drawer to the bottom of the superior one. In this case, the lid of the desired box is detached from its own block. This technology allows the simultaneous operation of all Systainers in the connected position.
For efficient separate transportation, the blocks are equipped with a handle located in the upper part of the housing. The handle is a structural element, reinforced with stiffening ribs and installed in such a way that the box is in the most level position at the time of movement. Some models have side recesses, which are grooves for holding the box with two hands.
To facilitate the movement of several systainers connected to each other, blocks with wheels are provided. They are installed at the bottom of the structure. Movement is carried out by holding the prefabricated storage system by the handle of the upper element. The final form is a two-wheeled cart containing several boxes.
The blocks are made mainly of durable plastic, reinforced with stiffening ribs of various configurations. Depending on the manufacturer and the specific model line, the boxes can be made in one color or another.
Table stand for drills
When working with a drill, you have to constantly change attachments. It often happens that you put a drill somewhere, and later it is difficult to find. Having made a small stand with just four parts with your own hands, you will place drills, cores, pencils, cutters and other similar attachments in it.
Photo of a table stand for drills.
For the top layer of the device, light plastic is optimal, on which the inscriptions are clearly visible, and it is easier to make neat holes in it. For the middle, select a piece of chipboard or MDF with a thickness of 16 mm or a little more. Fasten these two parts with screws and use an awl to mark the location of the holes. Mark on a square grid with a side of 15 mm for drills, and for other items, orient yourself in place depending on their dimensions.
Making a table stand for drills.
Drill holes, selecting drill bits 1 mm thicker than the shank of the nozzle being placed.
Clean the bottom surface of burrs and attach 3mm plywood to it. Screw a wooden strip for feather drills from the end and mark the plastic to quickly find the bits.
Self-production
As an alternative to a branded Systainer, you can design an analogue of your own production. To do this you will need the following materials and parts:
List of tools:
Manufacturing process
Before starting the assembly of the product, detailed drawings must be prepared containing indications of the dimensions of certain parts of the structure.
The algorithm of actions is as follows.
The box can be equipped with support legs, ventilation holes, side handles and other necessary additions.
Advantages and disadvantages
A homemade Systainer has a low cost compared to a store-bought equivalent. It can be designed to best suit the requirements of a particular user. The shape and design of the box can be adapted for use in certain conditions. This is the advantage of a homemade product.
The disadvantage of such a box is its low ergonomics when compared with factory models.
It is very difficult to make fastenings with your own hands that allow you to connect the blocks of boxes to each other and other parts of the structure that require the use of high-precision tools.
Regardless of the production method, Systainers are the best option for storing tools and other items that require organization. They allow you to sort items by size, functional purpose, ensure their compact arrangement in the allotted space, as well as the best preservation.
Review of Systainers for instruments in the video below.
Source
Plier holder
Pliers, round nose pliers, wire cutters and all other similar tools are neatly placed on this device.
Photo of a holder for pliers.
For the hanging strip, choose a birch strip, and plywood is suitable for the brackets.
Drawing of a holder for pliers.
Use a plane to round the top edges of the crossbar so that the pliers hang straight.
Making a holder for pliers.
Mark the grooves on the parts, drill holes in them and cut through the material with a hacksaw.
Finish the edges with a square file.
Adjust the grooves and sand the surfaces.
Connect the workpieces “dry” and screw the holder into place with self-tapping screws.
Place the hand tools you need on the hanger, and use the holes in the brackets to store screwdrivers.
Homemade plier holder.
If necessary, change the dimensions and even the design of the considered projects, adapting the holders to your needs.
Related articles:
Let's discuss how to work with a hammer drill without dust. And also: disadvantages when using a vacuum cleaner, how to avoid dust when drilling a wall and drilling a ceiling.
Options for homemade side stops for a carpentry workbench are considered. A drawing is presented and the manufacturing procedure for one of them is shown in detail.
Master class on replacing a failed nickel-cadmium screwdriver battery with a modern lithium-polymer battery.
Step-by-step instructions with photos examine the process of making a simple tap driver with your own hands.
The article discusses the process of making and using a simple tool for working with a hand-held circular saw that ensures precision.
Source
Types and features
The rods can be divided into composite and telescopic. Examples of the latter are the Russian Tesla or the Turkish Nokta Makro Anfibio.
Homemade rods can also be non-separable - this design is a priori lighter and stronger. But it’s inconvenient to carry such a barbell.
We also divide according to the method of laying the coil cable - inside or outside. As an example of an internal gasket, let’s take the Nokta Makro Impact. The pipe profile is also different. If all Tesoro metal detectors have a round pipe, then the same Impact has a triangular cross-section.
There are also differences in shape. S-shaped with a handle on a bend (XP Deus), T-shaped (Garret ATX) with a handle almost at a right angle to the bar and hybrid - with an S-shaped bar and a handle made according to a T-pattern, for example the famous “grater” - x-terra 705. Other variations are possible.
Tip for attaching the coil
In most serial metal detectors, the coil mount is made in the form of a bushing, which is T-shaped attached to the lower rod. The coil ears cover the ends of the bushing, and a fastening bolt is threaded through the holes.
But not the entire series is like this. Tesla went a different route; its coil has one eye, and the bushing on the lower rod is much narrower.
When buying a metal detector, look at the reviews - for example, many detectors note that MD Mars coils do not fit well with the wide bushings of Nokta Makro detectors. Which is fraught with physical destruction of the reel ears.
Modular tool storage system
The basis of the IF modular system for storing tools is a wall frame, which consists of horizontal and vertical guides. The frame is attached to the wall, and all other elements are simply hung on the perforations of the vertical guides, which makes the system modular - everything is removable and can be hung according to needs.
The result is a convenient design; you can combine wall racks with fastenings, for example, for shovels and rakes. In one place, organize the storage of tools in closed boxes on shelves and tools on open perforated panels for quick access. All elements of the system are made of galvanized steel and have proven themselves to be excellent for use in garages and home workshops.
Accessories
To make it easier to organize your workspace, the company offers auxiliary tools for its Systainers. Among them:
- sets of protective inserts and linings;
- mobile workbench MW 1000 with pull-out shelf and drawer mount;
- trolley SYS-Roll 100;
- roller board RB-SYS;
- steel rack YS-Port 1000/2 on casters for storing and transporting five boxes of different sizes;
- sliding shelf SYS-AZ for installation in modular systems;
- plastic mini-rack SYS 4 TL-Sort/3 with 12 drawers for storing fasteners and other small parts, which can be installed in a Systainer system.
See the Festool Systainer review below.
What to look for when choosing
If a digger decides to replace the broken rod of his metal detector, he should pay attention to original spare parts, new or even contract ones. You can buy “original” rods for almost all serial products.
If buying or making a new rod is a matter of tuning, then you should go from the tasks: to make the device lighter, or to expand the range of tasks, or, conversely, to narrow it. For example, it’s only worth taking carbon fiber for a beach cop - aluminum doesn’t do well in sea water and corrodes.
But the main thing in a barbell is not the weight, but the balance. If you constantly have to “push” the metal detector away from you, if it hits your elbow, the balance is in the armrest, and this is bad. If, on the contrary, the hand turns forward and the elbow pushes upward, that’s also nothing good.
Balance is an individual thing and it is worth choosing a barbell so that it matches the user’s sensations.
SHTOK. introduces modular boxes to the market
Job optimization is a hot topic in the modern world. In all production areas, there is a clearly noticeable trend towards simplification, the desire for maximum user convenience, ergonomics, automation and the reduction of any less useful and time-consuming actions.
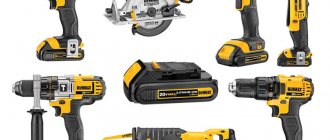
In the electrical installation tool market, this is expressed in the appearance of modular boxes or Systainers, which allow everyone to independently equip their own workplace or mobile set for work “in the field”, taking into account their specific tasks in a given area. We can say that today modular boxes are the most convenient and individual way to assemble, store and transport electrical installation tools.
In the West, market leaders such as Bosch, DeWalt, Festool, Stanley and Klauke have already added this product group to their product range. SHTOK. led this trend in Russia.
Having studied the demand at the MITEX-2013 exhibition, SHTOK specialists. We came to the conclusion that the interest in these products is extremely high, and the samples evoke a lively response from visitors to the stand. On the other hand, until today, modular boxes were practically not represented in Russia - primarily due to the rather high price, which significantly reduces the attractiveness of these convenient devices for most customers.
Therefore, in 2014, guided by the principles of relevance and timeliness, SHTOK. introduces modular boxes into its assortment - consistently high quality, but, unlike Western analogues, at prices affordable for the Russian consumer.
In the SHTOK assortment. Modular boxes of three standard sizes will be presented, as well as wheels, pallets and supports for them. All products are multifunctional, practical, and easy to use: the boxes are made of plastic - that is, they are lightweight for transportation, at the same time they are reliable enough to be used as a stool or workbench during field work. And the presence of a set of rolling rollers allows you to quickly move the workplace depending on the task. The very design of the boxes ensures the durability of their service, so making such a purchase once is enough for a long time.
End users who have already tried modular boxes in their work fully share the enthusiasm for this new product and say that they now cannot imagine how they ever managed without them. Based on the reviews, storing the instrument has become much more convenient; the necessary things are always at hand and do not get mixed up when carried. In addition, modular boxes eliminate the need to carry redundant tools or spend a lot of time putting together the optimal set: depending on the task ahead, you just need to grab a few ready-made modules and you can hit the road right away. Users also note the undoubted advantages in terms of design mobility - you moved a couple of meters within one work area and with one movement of your hand you moved the entire block with the tool behind you to a convenient distance. There is no need to reach anywhere and carry each tool separately.
We invite you to try out modular boxes and evaluate their functionality from your own experience. More detailed information about the new product can be found on the website.
Brand information
The rights to the Festool brand belong to the Festo company, which was founded in Germany in 1925 under the name Fezer&Stoll. In the first years of its existence, the company produced mainly equipment for wood processing. The company then began to develop and market innovative products for the time, including the world's first mobile chain saw (1927) and circular saw (1930).
In 1933, the name of the German company was changed to its modern one. Since 1975, the company changed its priorities and, instead of producing machine tools and hand tools, switched mainly to the production of power tools. In 2015, the company celebrated its 90th anniversary. It is noteworthy that the granddaughter of one of the co-founders works in the company’s management, so Festo still rightly considers itself a family business.
The company's head office is located in the German city of Wendlingen. Most of the company's factories are located there, as well as in neighboring Neidlingen, Illertissen and the Czech city of Ceska Lipa. Subsidiaries are open in 25 countries, including Russia, and there are branches in another 68 countries. Festo employs more than 16 thousand people, and the annual turnover of the German company exceeds 2 billion euros.
Reviews of models and manufacturers
Users say kind words about the Golden Mask carbon fiber rods - they are light and durable. They even buy these rods and put coils and control units from other metal detectors on them.
XP has taken an interesting step by releasing rods for its Orx device and promoting them as a viable alternative to replacing coils on a single rod. The weight of the all-plastic rod is only 300 grams. The wireless control unit can be easily and quickly transferred from rod to rod, saving time on replacing the coil or the lower rod with the coil.
We recommend watching a video about the Ice 250 (Garrett Ace) metal detector with a universal rod from Mars MD.
The universal rod is more interesting than the standard one.
Another example of replacing a rod is a video from the Ohio Metal Detecting channel about using a fiberglass rod from Anderson Detectors for Minelab Excalibur.
Source
Lift for laying aerated concrete blocks
Abroad, during the construction of private houses, cranes and various lifts are often used. This way construction goes faster, which means the “box” is cheaper, because It is more profitable to use small-scale mechanization tools than to hire laborers. Our developer relies on himself and often builds a house “with one helmet.” Therefore, the urgent question is how not to physically overstrain yourself when laying a wall from aerated concrete blocks weighing 35-40 kg.
An interesting option is the unusual homemade “assistant” of the FORUMHOUSE user with the nickname Krestik. First, let's show what he took as a basis.
German mini crane with retractable central post
A special feature of the lift is the original folding “arm-boom”, with the help of which the crane, moving on wheels, can reach two opposite walls.
I am building a house myself and, in order to be able to lay aerated concrete blocks, I built a lift according to the above model. The crane was made completely collapsible, except for the base. I didn’t measure the maximum load on the hook, but it easily lifts me (weighing 95 kg).
Technical characteristics of the lift:
The working height of lifting blocks is adjustable in two ranges. The first is 1750 mm. The second is 3.5 m, for which the structure is raised, sliding upward along the supporting “legs” using a hydraulic jack lined with spacers made of GB blocks.
To make the lift, the user needed:
During operation, the design was modified. For example, the user laid the cable for the winch in a corrugated pipe and extended the cable for the control panel.
The design has a number of shortcomings that I would like to correct. For example, I’m thinking about making wireless control, replacing the gate hinges with bearings. Increase the number of “joints” in the boom at the same reach. Instead of a temporary counterweight - bags of sand concrete, pour concrete ballast.
Important nuance : in order for the lift to move around a construction site or, for example, on a concrete floor slab on the second floor, you need to keep the workplace clean, because GB fragments and debris interfere with the relocation of the tap.
The design of the unusual lift attracted the interest of portal users.
With such a lift, I think, as they do in Germany, you need to make masonry from blocks larger than standard ones. The length and height are 2-3 times greater than a regular GB. The crane has enough lifting capacity, and the laying speed will increase significantly.
According to Krestik, he heard that someone on the portal had already tried to order blocks of 1x0.4x0.6 m format from a gas silicate manufacturer. But it turned out that this was not profitable for the plant, because it is necessary to reconfigure the line for the production of GB, but for the sake of a small volume (for an ordinary private house) they will not do this.
I'm wondering: is the work on site easier when using a crane? What work can be done with it and what cannot?
There is no need to install scaffolding when laying GB walls. The lift can be assembled and disassembled. I poured the concrete lintels over the windows the old fashioned way, from buckets, because... The volume is small, and it’s easier to do it with one assistant.
The overall result: the mini-crane turned out to be successful, and with some modifications to its design, the lift can be put into small-scale production.
Advantages of a homemade device
During manual work, the mixture is prepared and applied to the wall in small sections. Drying occurs unevenly, which leads to unevenness and cracks.
When using mechanics, the solution can be saved by saturation with air during the process of mixing and spraying under pressure. For finishing 1 sq. m with the manual method it takes 16 kg, mechanized - 13 (calculation is approximate, depends on the thickness of the layer).
Comparative characteristics:
| Manual application | Application of Plastering Machine | |
| Mixture quantity | Prepare in small portions as it hardens quickly | Large volume, fast consumption |
| Consistency | Every batch is different | Same, no lumps |
| Application area | Gradually, on part of the wall | Immediately on the entire surface |
| Saving solution | No. Loss occurs | Yes. With constant stirring, air becomes saturated and it increases in volume. |
| Working hours | For a long time. Requires several people | Fast. Two people can cope |
| Result | Due to uneven drying, cracking and collapse of the entire layer is possible. | Under pressure, additional adhesion of the mixture to the base occurs |
| Surface | Scaly | Rovnaya |
A do-it-yourself plastering machine, assembled from what you found in the garage, can make finishing work easier.
Mini crane made from scrap metal
Another version of a lifting mechanism made of metal “lying underfoot” was made by a portal participant with the nickname Petr_1.
According to Peter_1, the reason for the construction of the crane is that the house is getting higher and higher, and the blocks and concrete are getting heavier. Therefore, after revising the “unnecessary things”, the user manufactured a completely dismountable crane with a lifting capacity of 200 kg.
I think my crane can lift more, but I didn’t overload it. The crane can be disassembled into parts weighing 30-60 kg and can be easily transported in a car trailer. I carry an arrow on the trunk. Statically tested a structure weighing 400 kg. I usually lift up to 150 kg. This is quite enough for my construction needs.
The design of the crane is a hodgepodge of what was at hand. Let's list the main details:
The crane turned out to be mobile, and by lowering the boom, it can be moved from place to place, rolling on wheels along compacted soil. Level adjustment is carried out using screw supports.
Metal, gearboxes and rollers were purchased at a recycled metal shop. Only the cable and bearings are new.
The weight of the crane without counterweight is about 250 kg. The cost of the structure, taking into account the purchase of consumables - cutting discs for angle grinders, electrodes for a welding inverter and paint, is 4 thousand rubles.
Crane, + time for turning, + selection of components and fitting of components, I completed it in 3 working days. In the future, after finishing the work, I will completely disassemble it.
Wall clamp holder
Carpenter's clamps are often piled up or placed in a corner of the home workshop. Build a shelf holder for them from waste wood and a piece of sheet material.
Our homemade device can accommodate up to six rack clamps. You can increase the dimensions of the hanger to store more tools by approximately 30mm for each tool. Please note that if the holder expands significantly, you will need to strengthen the bar or place additional support in the middle.
Dimensions of blanks for wall clamp holder.
Cut the workpieces according to size and sand the visible surfaces. Align the parts and drill the countersunk holes.
Screw the bar to the supports with 4.5x40 mm screws.
Turn the pieces over and secure the back panel.
Hang the holder on the wall through the drilled mounting holes.
Directly below this device there is a place to store C-shaped clamps.
Ready-made wall holder for carpentry clamps.
The holders for them are very simple and are made separately for each set of clamps. The dimensions of the suspension are selected based on the fact that the width of the protruding shelf should be slightly less than the distance between the jaws.
Holder for storing C-clamps.